
When I recently started getting back into Solaris, one of the things I wanted to get working was LDAP authentication, so that I can log into systems with the same set of credentials like in a business environment. As with most Solaris tasks, the information on how to set this up is scarce on the Internet, especially for Solaris 8 and 9.
I already had three LDAP instances set up in my lab environment: a primary instance and two replicas. This post will not cover the setup of these, but all three are AlmaLinux 9 containers running OpenLDAP 2.6. The replicas have been configured to allow non-SSL connections to them, for the purpose of authenticating legacy operating systems such as Solaris. I don’t recommend allowing this in a production environment of course. Perhaps at a later date I will work on configuring Solaris to connect to OpenLDAP via SSL, but even this will require allowing insecure versions of SSL/TLS.
Updating nsswitch.conf
When the LDAP client is initialized on a Solaris system, the file /etc/nsswitch.ldap is copied to /etc/nsswitch.conf. Prior to initializing the client, I recommend editing /etc/nsswitch.ldap and change the hosts line to:
hosts: files dns
Otherwise, after the LDAP client is initialized, DNS resolution will stop working. This tripped me up the first time I initialized the LDAP client, as I had used the DNS names for my LDAP servers, and they were unable to be resolved. I guess Sun expected everyone to store all of their host information in LDAP? I don’t understand why they made this decision, but it’s present in Solaris 8 through 10.
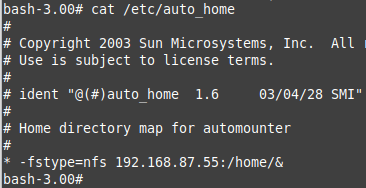
Automounting home directories
I chose to auto-mount the home directories for the LDAP users over NFS. Solaris comes configured for this already, as Sun obviously wanted its customers to use this feature. It is relatively easy to set up and saves you the trouble of creating home directories on each system (I’m not aware of Solaris having a pam_mkhomedir.so module like Linux, but I could be wrong).
To set up automounted home directories, first export a directory containing the home directories on another *nix host. Ensure that the UIDs and GIDs match what is in LDAP. Then on the Solaris host, edit /etc/auto_home, comment out +auto_home, then enter your NFS information similar to below:
Next, restart autofs. On Solaris 8 and 9 issue /etc/init.d/autofs stop && /etc/init.d/autofs start (or I guess kill -HUP <PID>? I prefer to restart things instead of reloading them). On Solaris 10, issue svcadm restart autofs.
It is optional to use automounted home directories. You might want to comment out the /home line in /etc/auto_master before creating directories in /home.
Initializing LDAP on Solaris 9 and 10
I used the below command to initialize the LDAP client on Solaris 9 and 10. Your bind DN should be a read-only account that can look up public user and group attributes. I would not advise using the root account for this purpose.
ldapclient manual -a credentialLevel=proxy \

-a authenticationMethod=simple \

-a "proxyPassword=bind_dn_pw" \

-a "proxyDN=uid=authagent,ou=backend,dc=example,dc=com" \

-a defaultSearchBase=dc=example,dc=com \

-a serviceSearchDescriptor=passwd:ou=people,dc=example,dc=com \

-a serviceSearchDescriptor=group:ou=groups,dc=example,dc=com \

-a serviceAuthenticationMethod=pam_ldap:simple \

-a "preferredServerList=server1 server2"
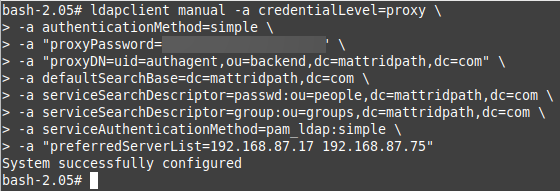
Now you should be able to su – user if everything was set up correctly.

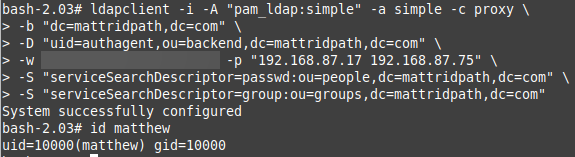
Initializing LDAP on Solaris 8
The arguments for ldapclient in Solaris 8 are a little different than 9 and 10. I used the below command to join my Solaris 8 system to LDAP:
ldapclient -i -A "pam_ldap:simple" -a simple -c proxy \

-b "dc=example,dc=com" \

-D "uid=authagent,ou=backend,dc=example,dc=com" \

-w "bind_dn_pw" -p "server1 server2" \

-S "serviceSearchDescriptor=passwd:ou=people,dc=example,dc=com" \

-S "serviceSearchDescriptor=group:ou=groups,dc=example,dc=com"
Configuring /etc/pam.conf
After initializing the LDAP client, I was still unable to login in with my password. This stumped me for a while. Finally (don’t ask me how), I found that I had missed a step: I needed to add pam_ldap.so.1 entries to /etc/pam.conf. Prior to doing this, I recommend making a backup of /etc/pam.conf that can be quickly restored in single user mode. I used the guide from Oracle for Solaris 11 found here: https://docs.oracle.com/cd/E53394_01/html/E54912/clientsetup-89.html. However, as the pam.conf was different for each version of Solaris, I edited the files manually.
Below are the /etc/pam.conf files I used for each Solaris version. Feel free to use these on your systems, although I recommend backing up your current configuration and comparing it to these first. You will need to reboot in order to log into the desktop, but not to log in with SSH.
pam.conf_ldap_sol10 pam.conf_ldap_sol8 pam.conf_ldap_sol9
Once I added the appropriate lines to /etc/pam.conf, I was able to SSH and log in to the desktop on my Solaris 8/9/10 systems.
UPDATE
- I recommend setting the hosts line in /etc/nsswitch.ldap to hosts: files dns prior to initialization.