Linux back when a 1999 Camry wasn’t a beater
Recently I found some ISOs out on the Internet Archive for Red Hat Linux 6.2—not the Red Hat Enterprise Linux we’re more familiar with today, but instead the the original version released by Red Hat. The reason I was happy to find this version was because it was the last one released for the SPARC architecture. Since I’ve been experimenting a lot with Sun Microsystems products, I was eager to try this out in the QEMU SPARC emulator (which I recently used to run Solaris 8/9 in). However, I first installed the x86 version of this OS in Virtual Box.
Installing Red Hat Linux 6.2 in VirtualBox
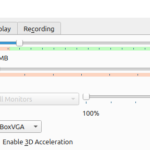
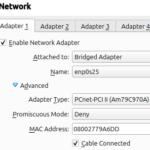
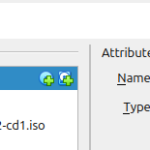
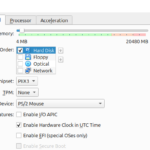
Below is the gallery of the settings I chose for Red Hat Linux 6.2 in VirtualBox. I disabled audio, USB, and the serial ports. The hard drive controller was set to PIIX4, the graphics controller set to VBoxVGA, and the NIC set to PCnet-PCI II. I tried to use the oldest settings possible for everything.
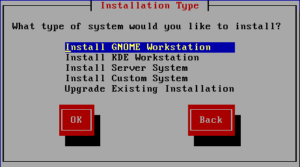
I chose Red Hat (32-bit) for the OS version and 512MB of RAM. After choosing these settings, power on the VM to start the installation. I selected GNOME Workstation for the installation type:
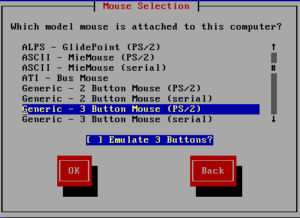
The default PS/2 mouse seemed to work fine:
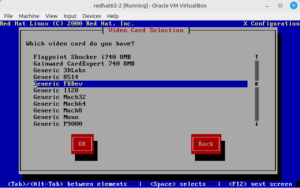
Most of the other options are straightforward: partitioning the drive, setting the time zone (I chose UTC), and the network settings. We are then brought to the graphics card selection. Before proceeding, I’d like to credit this post and this post for providing the solution to this. There is no way I would have figured this out without these individuals. Scroll down and select Generic FBDev as the video card and hit OK.
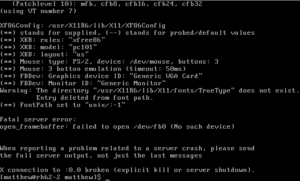
After finishing the installation, I rebooted and it dropped me to the non-graphical login prompt. I logged in with the user account I created during installation and attempted to start the graphical environment with startx. This failed of course:
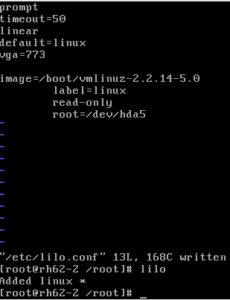
To resolve this: 1) become root with su -. 2) Edit /etc/lilo.conf. 3) Below the “default” line, add vga=773. 4) Exit the editor and run the lilo command. If you want the system to boot into the graphical run level each time, edit /etc/inittab and change the line id:3:initdefault: to id:5:initdefault:. Reboot the system.
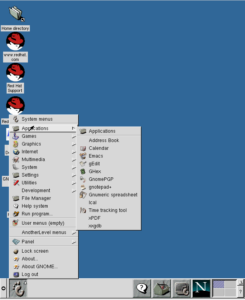
After rebooting, you should be greeted with the Red Hat graphical login screen.
First impressions
I was really impressed at how simple and usable GNOME 1 was in 2000, compared to both something like the Common Desktop Environment that Solaris used in the same era, or a bloated user-unfriendly modern desktop like GNOME 3. I don’t think anyone could successfully make the case to me that more eye candy and clunky menus improve one’s user experience over simple gray menus. But that is just my biased opinion.
Installing Red Hat Linux 6.2 on the QEMU SPARC and i386 emulators
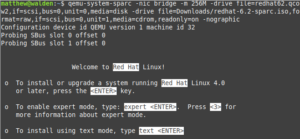
For installation on the SPARC emulator, I chose to do a non-graphical installation, as my attempts to get it to install in graphical mode were unsuccessfully (it would just hang at points). First, I created the QCOW2 image with: qemu-img create -f qcow2 name.qcow2 number-of-gigsG. I then launched the machine with:
qemu-system-sparc -nic bridge -m 256M -drive file=redhat62.qcow2,if=scsi,bus=0,unit=0,media=disk -drive file=redhat-6.2-sparc.iso,format=raw,if=scsi,bus=0,unit=1,media=cdrom,readonly=on -nographic
Note: you can leave off the -nic bridge option if you don’t want to use bridged networking and don’t have it set up. I discuss setting this up in my previous post.
At the 0 > prompt, type boot cdrom and hit enter to start the installation. Hit enter again at the next prompt.
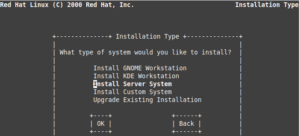
For the installation type, I selected Install Server System:
After that, I just selected all of the defaults and completed the installation. Everything is pretty self-explanatory. After installation, it reboots and take you to the non-graphical console login prompt.
For the i386 emulator, I used the below command to launch the installation. I didn’t install a graphical environment.
qemu-system-i386 -nic bridge -m 256M -hda redhat62_x86.qcow2 -cdrom Downloads/red-hat-linux-6.2-cd1.iso
After installation, the OS will fail to boot because of hda: lost interrupt errors. Thanks to the solution provided in this post, I was able to resolve this with the following:
At the LILO boot prompt, type linux noapic and hit enter.
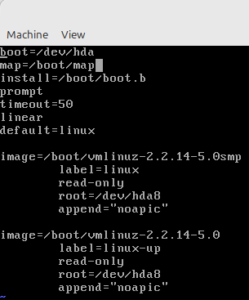
After the system boots, log in and edit /etc/lilo.conf. Add the line append=”noapic” at the bottom of each image entry, as pictured:
Save the file. Execute the lilo command to apply the changes and reboot.
Installing OpenSSH
Just like Solaris 8, Red Hat Linux 6.2 didn’t include OpenSSH for accessing the system remotely. Instead, you would have used the unencrypted remote shell (rsh). I didn’t want to use rsh (I wanted to be able to use the standard SSH client that’s on every Linux system), so I decided to install a version of OpenSSH from the same period.
First off—and I almost never lecture or state the obvious—but this is important: the software mentioned here should never be used in production and absolutely should never be exposed to the Internet. It has been compromised for decades and should only be used on an isolated network for experimental/historical/hobbyist purposes.
Before you can install software downloaded from the Internet on Red Hat Linux 6.2, you must set up a method for transferring files on to the machine, as SCP and Rsync are unavailable. One method you can use is to mount an NFSv3 share (it must be NFS version 3) with mount server:/share mountpoint. Another method is to put the files on a web server and download them using wget, which isn’t installed by default, but can be installed from the CD-ROM:
- First, become root with su – and mount the CD-ROM with mount /dev/cdrom /mnt/cdrom (you may need to re-insert the virtual CD-ROM in VirtualBox).
- Install wget with: rpm -Uvh /mnt/cdrom/RedHat/RPMS/wget*
- Download your software with wget <url>
In order to install OpenSSH, you must first install OpenSSL. I downloaded the following packages, which are close enough to the era:
- openssh-2.9p2.tar.gz, which can be found here, in the OpenSSH portable releases.
- openssl-0.9.6m.tar.gz, which can be found here.
To install OpenSSL, extract the archive with tar xzf openssl-0.9.6m.tar.gz, cd to openssl-0.9.6m, and run:
# ./config
# make
# make install
It is considerably faster compiling from source on VirtualBox than on the QEMU SPARC emulator. Once OpenSSL has been installed, you can proceed with installing OpenSSH:
# wget http://your-server/openssh-2.9p2.tar.gz
# tar xzf openssh-2.9p2.tar.gz
# cd openssh-2.9p2
# ./configure --with-pam --sysconfdir=/etc/ssh
# make
# make install
# cp contrib/redhat/sshd.pam /etc/pam.d/sshd
# cp contrib/redhat/sshd.init /etc/rc.d/init.d/sshd
- Edit /etc/rc.d/init.d/sshd. Add the line PATH=$PATH:/usr/local/bin:/usr/local/sbin somewhere above the functions. I placed it above the KEYGEN variable.
- Enable sshd to start on boot with chkconfig sshd on
- Start sshd with /etc/rc.d/init.d/sshd start
You will need to add the below options to your .ssh/config file if you want to be able to SSH from a modern Linux system:
Host rh62-2
    KexAlgorithms diffie-hellman-group1-sha1
    PubkeyAcceptedAlgorithms +ssh-rsa
    HostKeyAlgorithms +ssh-rsa
    Ciphers aes128-cbc
You will also get the error unknown terminal “xterm-256color”. This can be resolved with: TERM=xterm ssh host
Installing and configuring PostgreSQL
Initially I wanted to run a LAMP stack on this OS to try out one of the early versions of phpBB or MediaWiki. However, both of these require MySQL, which isn’t available in the set of packages that came on the OS CD-ROM. I tried to find a download for MySQL 3, which would have been contemporary to Red Hat Linux 6.2, but I couldn’t find one (I blame Oracle). I did find a download for MySQL 4.1 (which you can find here, in case you need it for something), but it requires glibc 2.2 and this OS only has 2.1. In the end, I decided to install PostgreSQL 6.5, which is already present on the installation media. This can be done with: rpm -Uvh /mnt/cdrom/RedHat/RPMS/postgresql-6.5* /mnt/cdrom/RedHat/RPMS/postgresql-server*. After this, start Postgres with /etc/rc.d/init.d/postgresql start.
PostgreSQL 6.5 has a number of “quirks” compared to more recent versions of Postgres. One quirk that I discovered was that it wasn’t possible to grant a user access to all tables in a database, only individual ones. Nothing in the documentation page (https://www.postgresql.org/docs/6.5/sql-grant.htm) says that you can grant a user access to all tables in a database, nor did any combination of wildcards or SQL statements from later versions work. In the end, the only way to grant this sort of access is to create a database with the same name as the user name. I used the basic steps below:
- Become the postgres user from root with: su – postgres
- Access the database with: psql -d template1
- CREATE USER user WITH PASSWORD “password”;
- CREATE DATABASE user;
- \q to exit psql
- Edit pg_hba.conf. At the bottom, add the line host <your_username> <ip> <subnet_mask> password <your_username>. For example, my username is mattdb and I wanted to allow access from all IPs, so I added host mattdb 0.0.0.0 0.0.0.0 password mattdb
- Exit the postgres user and restart Postgres with /etc/rc.d/init.d/postgresql restart
- Test out password authentication with: psql -u -d <database>, optionally adding
-h for the host.
After creating the database and user, I created some simple tables (a basic computer inventory database with items from around the time I started my IT career). One thing of note is that PostgreSQL 6.5 did not support foreign key constraints.
CREATE SEQUENCE domains_seq;

CREATE TABLE domains (
    domain_id int2 DEFAULT NEXTVAL('domains_seq') PRIMARY KEY,
    domain_name VARCHAR(30) UNIQUE NOT NULL
);

CREATE SEQUENCE locations_seq;

CREATE TABLE locations (
    location_id int2 DEFAULT NEXTVAL('locations_seq') PRIMARY KEY,
    location_name VARCHAR(50) UNIQUE NOT NULL
);

CREATE SEQUENCE hw_models_seq;

CREATE TABLE hw_models (
    hw_model_id int4 DEFAULT NEXTVAL('hw_models_seq') PRIMARY KEY,
    hw_manufacturer VARCHAR(30) NOT NULL,
    hw_model VARCHAR(30) NOT NULL
);

CREATE SEQUENCE os_seq;

CREATE TABLE operating_systems (
    os_id int2 DEFAULT NEXTVAL('os_seq') PRIMARY KEY,
    os_vendor VARCHAR(30) NOT NULL,
    os_name VARCHAR(30) NOT NULL,
    os_version VARCHAR(10) NOT NULL
);

CREATE SEQUENCE inventory_seq START 200000;

CREATE TABLE inventory (
    inventory_id int4 DEFAULT NEXTVAL('inventory_seq') PRIMARY KEY,
    name VARCHAR(30) UNIQUE NOT NULL,
    domain_id int2 NOT NULL,
    location_id int2 NOT NULL,
    hw_model_id int4 NOT NULL,
    os_id int2 NOT NULL,
    static_ip VARCHAR(15)
);

INSERT INTO domains (domain_name) VALUES ('dev.example.net');
INSERT INTO domains (domain_name) VALUES ('prod.example.net');
INSERT INTO domains (domain_name) VALUES ('ad.example.net');

INSERT INTO locations (location_name) VALUES ('New York Sales Office');
INSERT INTO locations (location_name) VALUES ('San Francisco Sales Office');
INSERT INTO locations (location_name) VALUES ('Raleigh, NC Office');
INSERT INTO locations (location_name) VALUES ('Atlanta Data Center');
INSERT INTO locations (location_name) VALUES ('Sacramento Data Center');

INSERT INTO hw_models (hw_manufacturer,hw_model) VALUES ('Sun Microsystems','V210');
INSERT INTO hw_models (hw_manufacturer,hw_model) VALUES ('Sun Microsystems','V240');
INSERT INTO hw_models (hw_manufacturer,hw_model) VALUES ('Sun Microsystems','X2100');
INSERT INTO hw_models (hw_manufacturer,hw_model) VALUES ('Sun Microsystems','SunBlade 100');
INSERT INTO hw_models (hw_manufacturer,hw_model) VALUES ('Sun Microsystems','SunBlade 150');
INSERT INTO hw_models (hw_manufacturer,hw_model) VALUES ('Sun Microsystems','Ultra 5');
INSERT INTO hw_models (hw_manufacturer,hw_model) VALUES ('Hewlett-Packard','Proliant DL360 G4');
INSERT INTO hw_models (hw_manufacturer,hw_model) VALUES ('Hewlett-Packard','Proliant DL360 G5');
INSERT INTO hw_models (hw_manufacturer,hw_model) VALUES ('Hewlett-Packard','Proliant DL360 G6');
INSERT INTO hw_models (hw_manufacturer,hw_model) VALUES ('Lenovo','Thinkpad T400');
INSERT INTO hw_models (hw_manufacturer,hw_model) VALUES ('Lenovo','Thinkpad T410');
INSERT INTO hw_models (hw_manufacturer,hw_model) VALUES ('Lenovo','Thinkpad T420');
INSERT INTO hw_models (hw_manufacturer,hw_model) VALUES ('Lenovo','Thinkpad X61');
INSERT INTO hw_models (hw_manufacturer,hw_model) VALUES ('Lenovo','Thinkpad X220');

INSERT INTO operating_systems (os_vendor,os_name,os_version) VALUES ('Sun Microsystems','Solaris','9');
INSERT INTO operating_systems (os_vendor,os_name,os_version) VALUES ('Sun Microsystems','Solaris','10');
INSERT INTO operating_systems (os_vendor,os_name,os_version) VALUES ('Red Hat','Red Hat Linux','6.2');
INSERT INTO operating_systems (os_vendor,os_name,os_version) VALUES ('Red Hat','RHEL','4.8');
INSERT INTO operating_systems (os_vendor,os_name,os_version) VALUES ('Red Hat','RHEL','5.4');
INSERT INTO operating_systems (os_vendor,os_name,os_version) VALUES ('Open Source','CentOS','4.8');
INSERT INTO operating_systems (os_vendor,os_name,os_version) VALUES ('Open Source','CentOS','5.6');
INSERT INTO operating_systems (os_vendor,os_name,os_version) VALUES ('Microsoft','Windows Server','2008R2');
INSERT INTO operating_systems (os_vendor,os_name,os_version) VALUES ('Microsoft','Windows','XP');

INSERT INTO inventory (name,domain_id,location_id,hw_model_id,os_id,static_ip) VALUES ('jasmith-x61',3,1,13,9,NULL);
INSERT INTO inventory (name,domain_id,location_id,hw_model_id,os_id,static_ip) VALUES ('ddraper-x220',3,1,14,9,NULL);
INSERT INTO inventory (name,domain_id,location_id,hw_model_id,os_id,static_ip) VALUES ('pmueller-sb100',1,3,4,1,'10.2.0.77');
INSERT INTO inventory (name,domain_id,location_id,hw_model_id,os_id,static_ip) VALUES ('pmueller-t420',3,3,12,9,NULL);
INSERT INTO inventory (name,domain_id,location_id,hw_model_id,os_id,static_ip) VALUES ('sac-prod-web-1',2,5,9,5,'10.0.0.5');
INSERT INTO inventory (name,domain_id,location_id,hw_model_id,os_id,static_ip) VALUES ('sac-prod-db-1',2,5,9,5,'10.0.0.15');
INSERT INTO inventory (name,domain_id,location_id,hw_model_id,os_id,static_ip) VALUES ('sac-prod-fs-1',2,5,2,2,'10.0.0.22');
INSERT INTO inventory (name,domain_id,location_id,hw_model_id,os_id,static_ip) VALUES ('atl-dev-web-1',1,4,7,7,'10.10.0.50');
INSERT INTO inventory (name,domain_id,location_id,hw_model_id,os_id,static_ip) VALUES ('atl-dev-ldap-1',1,4,7,6,'10.10.0.52');
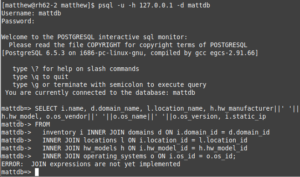
The next thing I discovered, after creating the tables and inserting the data, was that the more modern INNER JOIN syntax was not yet available.
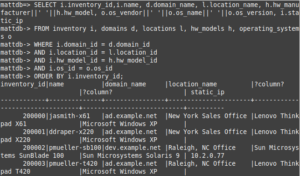
I had to use the older syntax:
Installing PHP 3 and Apache
I realize this post is getting long. I absolutely encourage you to move on to something that is more interesting and modern. In the meantime, for those few still reading, I will continue on. I decided to install PHP 3 and Apache, and try creating a simple PHP page that queries PostgreSQL.
First, I installed these three packages in /mnt/cdrom/RedHat/RPMS, with rpm -Uvh: apache-1.3.12-2.i386.rpm, php-3.0.15-2.i386.rpm, and php-pgsql-3.0.15-2.i386.rpm. Apache initially failed to start with /etc/rc.d/init.d/httpd start. This was resolved by me setting ServerName to the server’s FQDN in /etc/httpd/conf/httpd.conf.
The default DocumentRoot for this installation of Apache is /home/httpd/html. In this directory I created a simple PHP file, inventory.php3, to output the contents of my PostgreSQL query. The PHP 3 syntax is of course different from more recently implementations, especially the Postgres functions, which use camel case in some instances. I was able to find a copy of the PHP 3 manual shared out here: https://ptwebsite.com/manuais/PHP3_Manual.pdf.
The PHP I wrote for this exercise is ugly, outdated, and is not meant to be used as an example for modern coding. Below is what I wrote, however (UPDATE: I know that the table header and query lines were cut off by WordPress. I have fixed these):
<?php
$conn = pg_connect("host=127.0.0.1 user=mattdb password=abc1234 dbname=mattdb port=5432");
if (!$conn) {
    echo "An error occured.\n";
    exit;
}

echo "<table><tr><th>Asset Tag</th><th>Name</th><th>Domain</th><th>Location</th><th>HW Model</th><th>OS</th><th>IP</th></tr>";

$result = pg_Exec ($conn, "SELECT i.inventory_id,i.name, d.domain_name, l.location_name, h.hw_manufacturer||' '||h.hw_model, o.os_vendor||' '||o.os_name||' '||o.os_version, i.static_ip FROM inventory i, domains d, locations l, hw_models h, operating_systems o WHERE i.domain_id = d.domain_id AND i.location_id = l.location_id AND i.hw_model_id = h.hw_model_id AND i.os_id = o.os_id ORDER BY i.inventory_id;");
if (!$result) {
    echo "An error occured.\n";
    exit;
}

$row_num = 0;
$row_count = pg_numrows($result);

while ($row_num < $row_count) {
    $row = pg_fetch_row($result, $row_num);
    $col_count = 0;
    echo "<tr>";
    while ($col_count < count($row)) {
        echo "<td>$row[$col_count]</td>";
        $col_count++;
    }
    echo "</tr>";
    $row_num++;
}

// Free resultset
pg_FreeResult($result);


// Closing connection
pg_Close($conn);

echo "</table>";
?>
Conclusion
There is more I would like to do with this historic version of Linux. One thing I was not able to get working was the Perl DBD module for PostgreSQL. At a later date I may return to this, but my interest has waned somewhat and I want to move on to experimenting with other things. In the end, it was a fun experience learning to set up an “adolescent” version of Linux. A lot has improved, but also a lot has gotten unnecessarily complicated. I hope this was of interest to someone. As always, thank you for reading!

