
Following up on my previous post, Running Solaris 8 and 9 under the QEMU SPARC32 Emulator, I decided to try running Sun Solaris 2.6 in the QEMU SPARC32 Emulator. Someone has graciously shared the CD images for both the SPARC and X86 Solaris 2.6 images out on the Internet Archive. I also installed the Oracle 8i database server and connected to it from Solaris 9 QEMU machine. My ultimate goal in this exercise was to query Oracle 8i with the Perl DBD::Oracle module, but I ultimately failed at this. More on this later. This post will be similar to my other one on Solaris 8/9 in QEMU, so I’m going to skip steps such as how to set up QEMU for this.
Create and format the disk for Solaris
First, create the QCOW2 disk that with the qemu-img command:
qemu-img create -f qcow2 solaris26.qcow2 10G
Then start up your QEMU machine with something like:
qemu-system-sparc -nic bridge -m 256M -drive file=solaris26.qcow2,if=scsi,bus=0,unit=0,media=disk -drive file=Sol26.598InstallationSparc.iso,format=raw,if=scsi,bus=0,unit=1,media=cdrom,readonly=on
You can leave off the -nic bridge to use the default SLIRP network. At the prompt, type boot cdrom:d -vs and hit enter. At the # prompt, issue the format command. Select disk 0 and specify 16 (other) for the disk type.
As I wrote in my previous post, use the below formula to calculate the number of data cylinders:
- Disk size in bytes / (16 * 63 * 512)
- Round down to the nearest integer
- Subtract that by 2
My disk is 10737418240 bytes (10GB) in size, so I divided 10737418240 by (16 * 63 * 512), which when rounded down came to 20805. I subtracted 2 from 20805 to get 20803, which is what I put for the number of data cylinders. I then entered 16 for the number of heads and 63 for the number of data sectors/track, while accepting the defaults for the other values. After the format completes, enter label at the format> prompt and hit enter, enter y, and hit enter again. Below is a screenshot of this process:
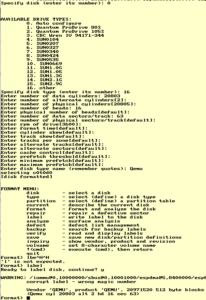
Enter quit at the format> prompt and reboot at the # prompt.
Start the installation
At the prompt, enter type boot cdrom:d and hit enter. Follow the prompts to install Solaris 2.6 to your preferences. Below are some of the options I selected:
- For the “Name Service”, I selected “Other”.
- I chose Auto Layout for the disk layout. As per my previous post, my attempts at performing a manual layout with Solaris 9 ended in failure. (Note: I found out later that Manual Layout does work with Solaris 2.6).
- For the software selection, I chose “Entire Distribution”.
Allow the installation to finish and reboot the machine. Set a root password when prompted and log in with root to the Common Desktop Environment (the Sun logo wallpaper is awesome).

Access the machine via remote shell
To make it easier to do terminal stuff, such as having the services of the clipboard, I decided to set up Remote Shell (rsh), which is the insecure/unencrypted predecessor to SSH. I installed the rsh client on a CentOS 6 system (it might be available on newer distributions) and logged into the Solaris 2.6 machine with rsh -l user host. Note: root login will not work unless you comment out the CONSOLE line in /etc/default/login (per this document).
Preparing for installing Oracle 8i
The Oracle 8i Enterprise Edition disc contains the Oracle8i Installation Guide, which of course can be used to figure out how to install Oracle. Chapter 2 of the documents lists the prerequisites that need to be done before running the installer.
First, there are some kernel parameters for shared memory that need to be added to /etc/system. I didn’t read formulas and just used the minimum value listed in the document. I added the following to the bottom of /etc/system:
set shmsys:shminfo_shmmax=4294967295
set shmsys:shminfo_shmmin=1
set shmsys:shminfo_shmmni=100
set shmsys:shminfo_shmseg=10
set semsys:seminfo_semmni=100
set semsys:seminfo_semmsl=100
set semsys:seminfo_semmns=200
set semsys:seminfo_semopm=100
set semsys:seminfo_semvmx=32767
This change requires a reboot, which you can do prior to starting the installation (this is also a good time to change to the Oracle installation disc).
Next, I set up the mount point. As the auto-layout in the installation allocated more much space for /export/home than I needed, I decided to repurpose this partition for the combined software/data disk (Oracle tells you that these should be separate, but this is just a demo, not a production database).
- Run umount /export/home to unmount the partition.
- Create the directory /u01
- Edit /etc/vfstab and change the mount /export/home to /u01
- mount /u01 with mount /u01
Create the Oracle user and groups
The Oracle 8i installation guide recommends creating an oracle user account, as well as the groups oinstall and dba. I created these and chown’d /u01 to oracle:oinstall
groupadd oinstall
groupadd dba
useradd -g oinstall -G dba -m -d /export/home/oracle oracle
passwd oracle
chown oracle:oinstall /u01
Per the instructions, I also added the below to .profile in the home directory of the oracle user:
ORACLE_BASE=/u01/app/oracle
export ORACLE_BASE
ORACLE_HOME=$ORACLE_BASE/product/8.1.5
export ORACLE_HOME
PATH=$PATH:$ORACLE_HOME/bin
export PATH
I rebooted the machine to apply the kernel parameters and logged in with the oracle user.
Launching the Oracle 8i installation
To launch the installation, open a terminal and cd to /cdrom/cdrom0 and run ./runInstaller. I also recommend keeping open a separate terminal logged in as root (su –), as the installation will require you to run some commands as root.
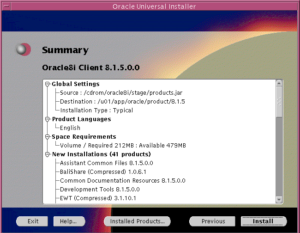
Below lists some the choices I made during the installation:
- For “File Locations”, “Destination”, /u01/app/oracle/product/8.1.5 was already selected, as this was inherited from the ORACLE_HOME variable set in my .profile.
- For UNIX Group Name, I put oinstall. It will then prompt you to run /tmp/OraInstall/orainstRoot.sh in a root terminal. Click Retry when this is done.
- Select Oracle8i Enterprise Edition for the product to install
- For “installation types”, I chose “Typical”.
- For “database identification,” choose whatever.
- I chose to put the database files in /u01/db
- Run /u01/app/oracle/product/8.1.5/root.sh when prompted during the database creation.
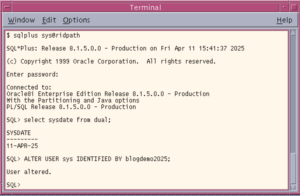
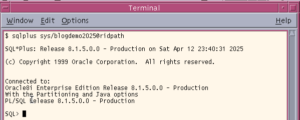
After the installation completes, you should be able to open a terminal (as the oracle user) and access SQLPlus with sqlplus sys@your_db. The initial password for the sys account is change_on_install. This can be changed in SQLPlus with ALTER USER sys IDENTIFIED BY yourpassword;.
Configuring Oracle to start on boot
Having an init script for Oracle saves you the trouble of having to run the dbstart and dbshut commands whenever you start up or shut down your Solaris system. Chapter 4 of the Oracle8i Installation Guide provides the steps for creating the init script and making Oracle start/stop automatically.
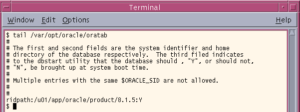
First, become the root user (su –) and edit the /var/opt/oracle/oratab file. Change the N next to your database entry to a Y:
Next, create the file /etc/init.d/dbora. I added one modification to the init script provided by Oracle: I added the commands to start and stop the Net8 listener, which is what SQLPLus (or other applications) use to communicate with the database via TCP. The directions mention how to start and stop the listener manually, but fail to mention how to make it do so automatically. Below is my /etc/init.d/dbora script:
#!/bin/sh
# Set ORA_HOME to be equivalent to the ORACLE_HOME
# from which you wish to execute dbstart and
# dbshut
# set ORA_OWNER to the user id of the owner of the
# Oracle database in ORA_HOME
ORA_HOME=/u01/app/oracle/product/8.1.5
ORA_OWNER=oracle

case "$1" in
'start')
# Start the Oracle databases:
# The following command assumes that the oracle login will not prompt the
# user for any values
su - $ORA_OWNER -c "$ORA_HOME/bin/dbstart"
su - $ORA_OWNER -c "$ORA_HOME/bin/lsnrctl start"
;;
'stop')
# Stop the Oracle databases:
# The following command assumes that the oracle login will not prompt the
# user for any values
su - $ORA_OWNER -c "$ORA_HOME/bin/dbshut"
su - $ORA_OWNER -c "$ORA_HOME/bin/lsnrctl stop"
;;
esac
Make the script executable and link it to the appropriate run levels:
chmod 744 /etc/init.d/dbora
ln -s /etc/init.d/dbora /etc/rc0.d/K10dbora
ln -s /etc/init.d/dbora /etc/rc2.d/S99dbora
Installing the Oracle 8i Client on other Solaris systems
I installed the Oracle 8i Client (really just SQLPlus) on additional QEMU machines running Solaris versions 2.6 and 9. Note: when running multiple QEMU machines at once in bridged mode, set a different MAC address for that machine with -nic bridge,mac=MAC. This was something I learned only after an hour of troubleshooting why my machines couldn’t connect to one another.
A few of prerequisites were similar to the server installation, such as creating the groups and oracle user. /u01 doesn’t need to be on a separate partition, as the software doesn’t use as much disk space.
mkdir /u01
groupadd oinstall
groupadd dba
useradd -g oinstall -G dba -m -d /export/home/oracle oracle
passwd oracle
chown oracle:oinstall /u01
Just like with the server installation, I added the below to .profile in the home directory of the oracle user, but with the addition of the LD_LIBRARY_PATH environment variable (this was required in order to use SQLPlus for the client installation only):
ORACLE_BASE=/u01/app/oracle
export ORACLE_BASE
ORACLE_HOME=$ORACLE_BASE/product/8.1.5
export ORACLE_HOME
PATH=$PATH:$ORACLE_HOME/bin
export PATH
LD_LIBRARY_PATH=/usr/lib:/usr/ucblib:$ORACLE_HOME/lib
export LD_LIBRARY_PATH
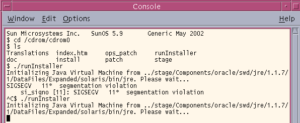
Kicking off the installation is similar as well: log in as the oracle user, open a terminal, cd to /cdrom/cdrom0, and run ./runInstaller. In Solaris 9, ./runInstaller would segfault for me on the first attempt, but would succeed on the second attempt.
Similar to the server installation, the client installation will prompt you to run some scripts as root, so it is a good idea to keep a separate terminal open as the root user. Below lists some the choices I made during the installation:
- For “File Locations”, “Destination”, /u01/app/oracle/product/8.1.5 was already selected, as this was inherited from the ORACLE_HOME variable set in my .profile.
- For UNIX Group Name, I put oinstall. It will then prompt you to run /tmp/OraInstall/orainstRoot.sh in a root terminal. Click Retry when this is done.
- Select Oracle8i Client for the product to install
- Run /u01/app/oracle/product/8.1.5/root.sh when prompted during the database creation.
The client installation will also take you through the Net8 configuration assistant, which creates the /u01/app/oracle/product/8.1.5/network/admin/tnsnames.ora file used by SQLPlus to determine which host and port to connect to for a given database. For the Net Service Name and SID, I just entered the name of my database, “ridpath.” I chose TCP/IP for the protocol, the IP address of my database server for the host, and left 1521 as the port. The Net8 assistant also gives you the chance to test the connection. If connectivity works, you should be able to connect to your database server using SQLPlus after the installation:
Loading in some data
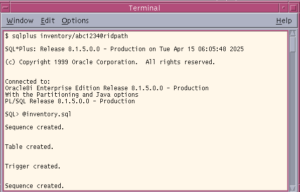
Before I could load in data, I found that I needed to create a new user, as the SYS isn’t like the root user in MySQL. For example, I received the error “ORA-04089: cannot create triggers on objects owned by SYS.” I ended up creating a new user “inventory” using the below statement:
CREATE USER inventory IDENTIFIED BY abc1234;
GRANT ALL PRIVILEGES TO inventory;
I then reconnected with sqlplus user/password@db. For my sample data, I modified the inventory database I created in my previous post on Red Hat Linux 6.2 and PostgreSQL 6.5. Of note, Oracle (until version 12c) required the creation of a sequence and a trigger that increments the sequence each time a row is inserted. I learned this from this document. This is somewhat more cumbersome, but not a big deal once you learn the appropriate CREATE statements. Below is the SQL file I created:
SET AUTOCOMMIT ON;

CREATE SEQUENCE domains_seq;

CREATE TABLE domains (
    domain_id NUMBER,
    domain_name VARCHAR2(30) NOT NULL,
    PRIMARY KEY (domain_id),
    UNIQUE (domain_name)
);

CREATE OR REPLACE TRIGGER domains_on_insert
  BEFORE INSERT ON domains
  FOR EACH ROW
BEGIN
  SELECT domains_seq.nextval
  INTO :new.domain_id
  FROM dual;
END;
/

CREATE SEQUENCE locations_seq;

CREATE TABLE locations (
    location_id NUMBER,
    location_name VARCHAR2(50) NOT NULL,
    PRIMARY KEY (location_id),
    UNIQUE (location_name)
);

CREATE OR REPLACE TRIGGER locations_on_insert
  BEFORE INSERT ON locations
  FOR EACH ROW
BEGIN
  SELECT locations_seq.nextval
  INTO :new.location_id
  FROM dual;
END;
/

CREATE SEQUENCE hw_models_seq;

CREATE TABLE hw_models (
    hw_model_id NUMBER,
    hw_manufacturer VARCHAR2(30) NOT NULL,
    hw_model VARCHAR2(30) NOT NULL,
    PRIMARY KEY (hw_model_id)
);

CREATE OR REPLACE TRIGGER hw_models_on_insert
  BEFORE INSERT ON hw_models
  FOR EACH ROW
BEGIN
  SELECT hw_models_seq.nextval
  INTO :new.hw_model_id
  FROM dual;
END;
/

CREATE SEQUENCE os_seq;

CREATE TABLE operating_systems (
    os_id NUMBER,
    os_vendor VARCHAR2(30) NOT NULL,
    os_name VARCHAR2(30) NOT NULL,
    os_version VARCHAR2(10) NOT NULL,
    PRIMARY KEY (os_id)
);

CREATE OR REPLACE TRIGGER os_on_insert
  BEFORE INSERT ON operating_systems
  FOR EACH ROW
BEGIN
  SELECT os_seq.nextval
  INTO :new.os_id
  FROM dual;
END;
/

CREATE SEQUENCE inventory_seq START WITH 200000;

CREATE TABLE inventory (
    inventory_id NUMBER,
    name VARCHAR2(30) NOT NULL,
    domain_id NUMBER NOT NULL,
    location_id NUMBER NOT NULL,
    hw_model_id NUMBER NOT NULL,
    os_id NUMBER NOT NULL,
    static_ip VARCHAR2(15),
    PRIMARY KEY (inventory_id),
    UNIQUE (name),
    FOREIGN KEY (domain_id) REFERENCES domains(domain_id),
    FOREIGN KEY (location_id) REFERENCES locations(location_id),
    FOREIGN KEY (hw_model_id) REFERENCES hw_models(hw_model_id),
    FOREIGN KEY (os_id) REFERENCES operating_systems(os_id)
);

CREATE OR REPLACE TRIGGER inventory_on_insert
  BEFORE INSERT ON inventory
  FOR EACH ROW
BEGIN
  SELECT inventory_seq.nextval
  INTO :new.inventory_id
  FROM dual;
END;
/

INSERT INTO domains (domain_name) VALUES ('dev.example.net');
INSERT INTO domains (domain_name) VALUES ('prod.example.net');
INSERT INTO domains (domain_name) VALUES ('ad.example.net');

INSERT INTO locations (location_name) VALUES ('New York Sales Office');
INSERT INTO locations (location_name) VALUES ('San Francisco Sales Office');
INSERT INTO locations (location_name) VALUES ('Raleigh, NC Office');
INSERT INTO locations (location_name) VALUES ('Atlanta Data Center');
INSERT INTO locations (location_name) VALUES ('Sacramento Data Center');

INSERT INTO hw_models (hw_manufacturer,hw_model) VALUES ('Sun Microsystems','V210');
INSERT INTO hw_models (hw_manufacturer,hw_model) VALUES ('Sun Microsystems','V240');
INSERT INTO hw_models (hw_manufacturer,hw_model) VALUES ('Sun Microsystems','X2100');
INSERT INTO hw_models (hw_manufacturer,hw_model) VALUES ('Sun Microsystems','SunBlade 100');
INSERT INTO hw_models (hw_manufacturer,hw_model) VALUES ('Sun Microsystems','SunBlade 150');
INSERT INTO hw_models (hw_manufacturer,hw_model) VALUES ('Sun Microsystems','Ultra 5');
INSERT INTO hw_models (hw_manufacturer,hw_model) VALUES ('Hewlett-Packard','Proliant DL360 G4');
INSERT INTO hw_models (hw_manufacturer,hw_model) VALUES ('Hewlett-Packard','Proliant DL360 G5');
INSERT INTO hw_models (hw_manufacturer,hw_model) VALUES ('Hewlett-Packard','Proliant DL360 G6');
INSERT INTO hw_models (hw_manufacturer,hw_model) VALUES ('Lenovo','Thinkpad T400');
INSERT INTO hw_models (hw_manufacturer,hw_model) VALUES ('Lenovo','Thinkpad T410');
INSERT INTO hw_models (hw_manufacturer,hw_model) VALUES ('Lenovo','Thinkpad T420');
INSERT INTO hw_models (hw_manufacturer,hw_model) VALUES ('Lenovo','Thinkpad X61');
INSERT INTO hw_models (hw_manufacturer,hw_model) VALUES ('Lenovo','Thinkpad X220');

INSERT INTO operating_systems (os_vendor,os_name,os_version) VALUES ('Sun Microsystems','Solaris','8');
INSERT INTO operating_systems (os_vendor,os_name,os_version) VALUES ('Sun Microsystems','Solaris','9');
INSERT INTO operating_systems (os_vendor,os_name,os_version) VALUES ('Sun Microsystems','Solaris','10');
INSERT INTO operating_systems (os_vendor,os_name,os_version) VALUES ('Red Hat','Red Hat Linux','6.2');
INSERT INTO operating_systems (os_vendor,os_name,os_version) VALUES ('Red Hat','RHEL','4.8');
INSERT INTO operating_systems (os_vendor,os_name,os_version) VALUES ('Red Hat','RHEL','5.4');
INSERT INTO operating_systems (os_vendor,os_name,os_version) VALUES ('Open Source','CentOS','4.8');
INSERT INTO operating_systems (os_vendor,os_name,os_version) VALUES ('Open Source','CentOS','5.6');
INSERT INTO operating_systems (os_vendor,os_name,os_version) VALUES ('Microsoft','Windows Server','2008R2');
INSERT INTO operating_systems (os_vendor,os_name,os_version) VALUES ('Microsoft','Windows','XP');
INSERT INTO operating_systems (os_vendor,os_name,os_version) VALUES ('Sun Microsystems','Solaris','2.6');

INSERT INTO inventory (name,domain_id,location_id,hw_model_id,os_id,static_ip) VALUES ('jasmith-x61',3,1,13,10,NULL);
INSERT INTO inventory (name,domain_id,location_id,hw_model_id,os_id,static_ip) VALUES ('ddraper-x220',3,1,14,10,NULL);
INSERT INTO inventory (name,domain_id,location_id,hw_model_id,os_id,static_ip) VALUES ('pmueller-sb100',1,3,4,2,'10.2.0.77');
INSERT INTO inventory (name,domain_id,location_id,hw_model_id,os_id,static_ip) VALUES ('pmueller-t420',3,3,12,10,NULL);
INSERT INTO inventory (name,domain_id,location_id,hw_model_id,os_id,static_ip) VALUES ('sac-prod-web-1',2,5,9,6,'10.0.0.5');
INSERT INTO inventory (name,domain_id,location_id,hw_model_id,os_id,static_ip) VALUES ('sac-prod-db-1',2,5,9,6,'10.0.0.15');
INSERT INTO inventory (name,domain_id,location_id,hw_model_id,os_id,static_ip) VALUES ('sac-prod-fs-1',2,5,2,3,'10.0.0.22');
INSERT INTO inventory (name,domain_id,location_id,hw_model_id,os_id,static_ip) VALUES ('atl-dev-web-1',1,4,7,8,'10.10.0.50');
INSERT INTO inventory (name,domain_id,location_id,hw_model_id,os_id,static_ip) VALUES ('atl-dev-ldap-1',1,4,7,7,'10.10.0.52');
INSERT INTO inventory (name,domain_id,location_id,hw_model_id,os_id,static_ip) VALUES ('atl-dev-db-1',1,4,7,8,'10.10.0.54');

SET AUTOCOMMIT OFF;
The SQL file can then be loaded into SQLPlus with @file.sql.
I was then able to run the below query:
SELECT i.inventory_id,i.name,d.domain_name,l.location_name,h.hw_manufacturer||' '||h.hw_model,o.os_vendor||' '||o.os_name||' '||o.os_version,i.static_ip
FROM inventory i, domains d, locations l, hw_models h, operating_systems o
WHERE i.domain_id = d.domain_id
AND i.location_id = l.location_id
AND i.hw_model_id = h.hw_model_id
AND i.os_id = o.os_id
ORDER BY i.inventory_id;
I’m stuck and not sure where to take this next
One my goals with this exercise was to be able to write some Perl scripts and possibly even Perl web pages that query Oracle 8i. However, I wasn’t able to get this to work. Per the documentation for the DBD::Oracle Perl module, you will need to install the 1.17 version of the module in order to use the 8i client. However, this will require compiling the module and Solaris doesn’t include a C compiler; this was an add-on you had to purchase from Sun. I attempted to compile the module using the C compiler from OpenCSW on Solaris 9, but I did not succeed, as the Perl modules were designed to work with Sun’s compiler. In the end, I just gave up and lost interest, moving on to something else for the time being.
The OpenCSW packages do include version 1.23 of the DBD::Oracle. This appears to want version 10g of the Oracle client. I’m certain that neither one of these is compatible with Oracle 8i, but I may try them anyway. If I can get DBD::Oracle working on Solaris, I will write about it in a separate post.