
Recently I borrowed a pair of HP DL360 G7 servers from the office that had been decommissioned and are eventually destined for the e-waste bin. The servers are from 2011 and have little practical use in 2025, either in production or as lab systems, as they are slow and power-hungry. Still, I thought they would be fun to tinker with at home for at least a little while.
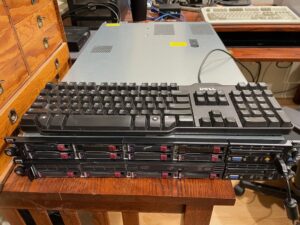
The top server has two CPUs and 72GB of RAM, while the bottom one has one CPU and only 4GB of RAM. The top one has a bunch of old laptop SATA drives in it (two of which are dead), while the bottom one has HP Enterprise SAS drives, all of which still function, in a RAID 1+0 array. I started with the bottom one.
One of my goals with this exercise was to avoid using the graphical remote console in Integrated Lights-Out console. My experiences with the .Net and Java remote consoles in iLO 2 and 3 have been unpleasant to say in the least, and I had no desire to relive them. Rather, I want to be able to install Linux on these systems using the serial console, which can be accessed by the way of SSHing into the iLO. I also decided to try installing AlmaLinux 9 (a Red Hat Enterprise Linux clone) on these at first, rather than an older OS. There is conflicting information out on the Internet as to whether this is possible and I wanted to find out for myself. These steps should work also for RHEL and any RHEL clones (Oracle Linux, Rocky Linux, etc).
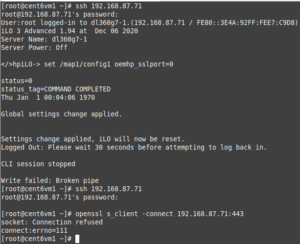
I logged into the web GUI a few times, from IE6 in Windows XP. But after upgrading the firmware to iLO 3 version 1.94, the GUI became inaccessible in both IE6 and in modern browsers. I could have troubleshooted it further, but decided to just block the web GUI altogether with: set /map1/config1 oemhp_sslport=0.
In the CLI, I changed a few other settings:
- I disabled CLI timeouts with: set /map1/config1 oemhp_timeout=0
- I set the serial connection speed with: set /map1/config1 oemhp_serialclispeed=115200
After making these changes, I cd’d to /map1 and ran reset to reboot the iLO.
Kickstarting the single-processor G7
I choose to use PXE booting to initiate the AlmaLinux 9 installation, using a Kickstart. Normally I use Foreman to provision machines and let it manage TFTP and Kickstarts, but I don’t have this running in my lab at the moment. Instead, I installed tftpd-hpa on one of my Ubuntu systems. I also installed pxelinux and syslinux, and copied the following files to /srv/tftp. Note: this is not a guide for setting up a Kickstart server. There are better guides out there.
- /usr/lib/syslinux/modules/bios/{chain.c32,ldlinux.c32,libutil.c32,mboot.c32,menu.c32}
- /usr/lib/syslinux/memdisk
- /usr/lib/PXELINUX/pxelinux.0
- initrd.img, TRANS.TBL, and vmlinuz from isolinux on the AlmaLinux 9 ISO to /srv/tftp/alma9
I created the directory /srv/tftp/pxelinux.cfg with two files: default and 01+mac-address-lowercase-with-dashes. So if your MAC address is 88:99:AA:BB:CC:DD, then you would name this file: 01-88-99-aa-bb-cc-dd. The default file is what the system will boot from if there isn’t a MAC address file.
default menu.c32
prompt 0
ALLOWOPTIONS 0
NOESCAPE 1

timeout 0
ONTIMEOUT local

MENU TITLE BIOS PXE Menu

LABEL local
        MENU LABEL Boot local hard drive
        LOCALBOOT 0
The MAC address one, meanwhile, boots from a specific Kickstart URL as the first option.
default menu.c32
prompt 0
ALLOWOPTIONS 0
NOESCAPE 1

timeout 150
ONTIMEOUT alma9

MENU TITLE BIOS PXE Menu

LABEL alma9
         MENU LABEL AlmaLinux 9 installer
         KERNEL alma9/vmlinuz
         APPEND initrd=alma9/initrd.img ip=dhcp inst.ks=http://your_ip/kickstart/kickstart.cfg inst.text console=ttyS1,115200n8

LABEL local
        MENU LABEL Boot local hard drive
        LOCALBOOT 0
The inst.text and console= are important here in that they allow the installation process to be watched on the iLO serial console, removing the need to have a monitor or access the temperamental/non-functional GUI.
I used the iLO CLI to obtain the MAC address for the first NIC: show /system1/network1/Integrated_NICs. Finally, I created a Kickstart file:
url --url http://your-ip/almalinux/9/5
lang en_US.UTF-8
keyboard us
network --bootproto=static --device=88:99:aa:bb:cc:dd --hostname=proliantg7-1.example.com --ip=192.168.1.2 --netmask=255.255.255.0 --gateway=192.168.1.1 --nameserver=192.168.1.10
rootpw --iscrypted #Use openssl passwd -6 or some other command to get this#
user --name=ansible --homedir=/var/opt/ansible_home --shell=/bin/bash
firewall --enabled
sshkey --username=ansible "SSH_PUBLIC_KEY"
timezone 'UTC'
timesource --ntp-server 0.pool.ntp.org
bootloader --location=mbr --append="nofb quiet splash=quiet"
zerombr
clearpart --all --initlabel
part / --fstype xfs --size=1 --grow --asprimary
part swap --recommended
selinux --disabled
text
reboot

%packages
nfs-utils
sssd
psmisc
telnet
libnsl
yum-utils
@base
-cockpit
%end

%post --log=/var/log/kickstart.log
#changing to VT 3 that we can see whats going on....
exec < /dev/tty3 > /dev/tty3
/usr/bin/chvt 3

logger "Starting anaconda proliantg7-1.example.com postinstall"

# Add Ansible sudoers entry
echo "Adding Ansible sudoers entry"
echo "ansible ALL=(ALL) NOPASSWD: ALL" > /etc/sudoers.d/10_ansible
%end
Of course a lot of what is in here may not be necessary for you. I’m just including what I used.
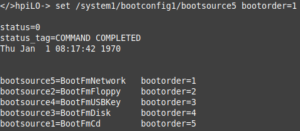
To boot from the network, you have two options: hit F12 when prompted or set the network as the first item on the boot order. I chose to do the latter. I did so in the iLO CLI with this command: set /system1/bootconfig1/bootsource5 bootorder=1.
After that, issue power on to boot the server and then issue vsp to enter the serial console. Hit ESC, then Shift+9 to exit the VSP. You may want to change the boot order back to bootsource3 while the Kickstart is running or delete the TFTP MAC address file to prevent AlmaLinux from installing over and over again. A provisioning tool like Foreman will take care of this for you.
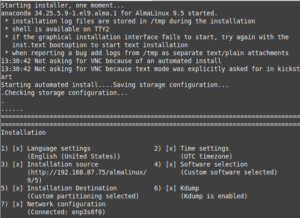
After rebooting, I was happy to see that it displayed the login prompt with any need to configure Grub:
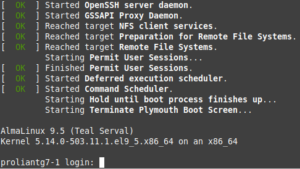
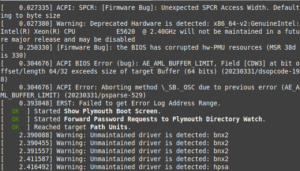
Of note during the boot process were some warnings about EL9 being the end of the line for these old CPUs:
Upgrading the RAID controller firmware and installing SSACLI
I decided to upgrade the firmware for the P410 RAID controller, as I always like to install the latest and greatest on systems. The firmware can be found here (no doubt this link will be dead within the next three months). I downloaded the RPM, SCP’d it to the G7, and installed it with sudo dnf install ./hp-firmware-smartarray-14ef73e580-6.64-2.x86_64.rpm. After this, the firmware upgrade can be run with: sudo /usr/lib/x86_64-linux-gnu/hp-scexe-compat/CP027071.scexe. Say yes to all of the prompts and reboot after completion.
I also installed the Smart Storage Administrator CLI (ssacli) RPM, which can be downloaded from here. This contains the CLI which can be used to check the status of the RAID controller and hard drives. I installed it with sudo dnf install ./ssacli-6.40-6.0.x86_64.rpm. The below commands can be used:
- ssacli ctrl all show status displays the status of the RAID controller.
- ssacli ctrl all show config displays the status of the drives.
- ssacli ctrl all show config detail displays everything in greater detail.
The ssacli command can be used for the creation of Nagios checks, which parse the output of the command and alert if there is an issue.
Installing and querying the System Health Monitor (hp-health)
Another product I wanted to try on this was the HP System Health Monitor, which can be installed from the hp-health RPM found here. Unfortunately HPE has not yet published an RPM for EL9, but the EL8 one seems to install without complaint:

After installation completes, run sudo /usr/sbin/hplog to see the available options.
- -f displays the fan status
- -p displays the power supply status
- -t displays the current thermal sensor data
These can be parsed into Nagios checks. Below is one I wrote in Perl some years back to check the fan status. No doubt there are better ones out there.
#!/usr/bin/perl -w

# This plugin uses the hplog command to check the status of an HP Proliant server's fans.
# It requires the hp-health package to be installed.

use strict;

my $state = 0;
my $exit_msg = '';

sub nagios_exit_state {
  (my $state, my $exit_msg) = @_;
  # Exit State
  # 0 = no alarm
  # 1 = warning
  # 2 = critical
  # 3 = unknown (including application errors)

  print "$exit_msg\n";
  exit $state;
}

unless (-x '/usr/sbin/hplog') {
  &nagios_exit_state(3, '/usr/sbin/hplog not found! You may need to install the hp-health package');
}

open(HPLOG, '/usr/sbin/hplog -f |') || die 'ERROR: unable to get hplog output';
while (my $line = <HPLOG>) {
  if ($line =~ /^\s+\d+\s+/) {
    $line =~ s/^\s+//;
    my @output = split(/\s{2,}/, $line);
    my $fan = $output[0];
    my $status = $output[3];
    my $redundant = $output[4];
    #print "Fan $fan: status = $status, redundant = $redundant\n";
    next if ($status eq 'Absent');

    unless ($status eq 'Normal') {
      $state = 2;
      $exit_msg .= "Fan $fan status = ${status}. ";
    }
    unless ($redundant eq 'Yes') {
      $state = 2;
      $exit_msg .= "Fan $fan not redundant. ";
    }
  }
}
close(HPLOG);

if ($state == 2) {
  $exit_msg = 'CRITICAL: ' . $exit_msg;
} else {
  $exit_msg = 'All fans are healthy';
}

&nagios_exit_state($state, $exit_msg);
Below shows the output of sudo hplog -p and sudo hplog -f. I have one of the power supplies unplugged, which is why it is showing as failed:

Updating an existing system to use the serial console
As a test, I decided to reinstall AlmaLinux without the console=ttyS1,115200n8 in the PXELinux file. This would cover the scenario of needing to enable the serial console on an existing installation if the GUI had become inaccessible. To do this, SSH into your Proliant and edit /etc/default/grub.
- Change GRUB_TERMINAL to “serial console”
- Set GRUB_SERIAL_COMMAND to “serial –unit=1 –speed=115200”
- On the GRUB_CMDLINE_LINUX, remove rhgb and append console=ttyS1,115200n8 to the line.
GRUB_TIMEOUT=5
GRUB_DISTRIBUTOR="$(sed 's, release .*$,,g' /etc/system-release)"
GRUB_DEFAULT=saved
GRUB_DISABLE_SUBMENU=true
GRUB_TERMINAL_OUTPUT="serial console"
GRUB_SERIAL_COMMAND="serial --unit=1 --speed=115200"
GRUB_CMDLINE_LINUX="nofb quiet splash=quiet crashkernel=crash-kernel-stuff-may-not-work-on-your-system resume=UUID=your-UID selinux=0 console=ttyS1,115200n8"
GRUB_DISABLE_RECOVERY="true"
GRUB_ENABLE_BLSCFG=true
Apply these changes with:
sudo grub2-mkconfig --update-bls-cmdline -o /boot/grub2/grub.cfg
Omit the update-bls-cmdline if you are using AlmaLinux (or another EL distribution) 9.2 or older. This was a change introduced in 9.3.
Rescue a broken system without the GUI console
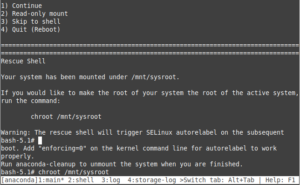
While working on this post, I thought about a scenario. Suppose you need to rescue a broken DL360 G7 in a remote office somewhere. You can’t SSH into it because the network configuration was messed up and the GUI console is of course inaccessible. All you have access to is the serial console. And you have nobody on site capable of assisting you. How can you get access to this system to fix it?
I came up with an idea: PXE the server into Rescue mode. To try this, I first created a simple Kickstart file.
url --url http://your_ip/almalinux/9/5
rescue
lang en_US.UTF-8
keyboard us
network --bootproto=dhcp

%post

%end
The key command of course is rescue, which tells the kickstart to put the system into rescue mode. I then modified the PXELinux file to use that Kickstart file:
default menu.c32
prompt 0
ALLOWOPTIONS 0
NOESCAPE 1

timeout 150
ONTIMEOUT alma9

MENU TITLE BIOS PXE Menu

LABEL alma9
         MENU LABEL AlmaLinux 9 rescue mode
         KERNEL alma9/vmlinuz
         APPEND initrd=alma9/initrd.img ip=dhcp inst.ks=http://your-ip/kickstart/rescue.cfg inst.text console=ttyS1,115200n8

LABEL local
        MENU LABEL Boot local hard drive
        LOCALBOOT 0
And, well, it worked:
This is a potential solution for accessing older iLO 2 systems like G5/G6s, but I don’t have any of them to test this with. They will also likely need to load an older OS.
Working on the dual-CPU G7
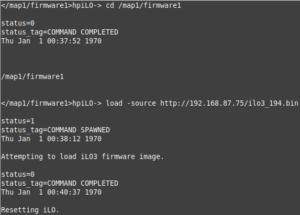
I used most of the previous steps to install AlmaLinux on the dual-CPU G7 without any issues. I moved the SAS drives over from the single-CPU server, as it made more sense to have the better drives in the more powerful server. The P410 RAID controller successfully detected the logical array from the other server. One task I did differently was upgrade the iLO firmware through the CLI instead of the GUI. I did this with: cd /map1/firmware1, then load -source http://ip/ilo3_194.bin.
I don’t plan on running AlmaLinux 9 on either one of these servers going forward. I prefer to run Debian or Ubuntu on systems in my lab, as I believe these are somewhat less bloated than Enterprise Linux. I may experiment with other OS’s on them as well. If it’s something that I believe could be of interest, I will post it here.
As always, thank you for reading!