Exploring Red Hat Linux 6.2 in 2025

Linux back when a 1999 Camry wasn’t a beater

Recently I found some ISOs out on the Internet Archive for Red Hat Linux 6.2—not the Red Hat Enterprise Linux we’re more familiar with today, but instead the the original version released by Red Hat. The reason I was happy to find this version was because it was the last one released for the SPARC architecture. Since I’ve been experimenting a lot with Sun Microsystems products, I was eager to try this out in the QEMU SPARC emulator (which I recently used to run Solaris 8/9 in). However, I first installed the x86 version of this OS in Virtual Box.
Continue reading

Running Solaris 8 and 9 under the QEMU SPARC32 Emulator

One of the really cool features of QEMU (Quick Emulator) is that it can emulate CPU architectures other than x86-64, such as PowerPC, AArch64, and SPARC. In my experimentation with Solaris, I’ve really wanted to try the SPARC and SPARC64 emulators with Solaris, and do something similar to this article: Build your own SPARC workstation with QEMU and Solaris. However, I really wanted to do this with Solaris 8/9/10, as 2.6 is more limited in what you can do with it. In particular, I wanted to run Solaris 8 in this, as installing 8 in VirtualBox is a hassle, with barely-functional graphics. In the end, I was only able to run Solaris in the 32-bit emulator, which emulates a SPARCstation 5 by default. The SPARC64 emulator can only run BSD and Linux variants, and not Solaris. In the future, I intend on writing another post on the SPARC64 emulator.

Continue reading

Installing Sudo and using Ansible to manage Solaris 9

Since I’ve started experimenting with Solaris in my home lab, I’ve really wanted to try managing systems with some sort of configuration management software. I originally thought about trying Rex, a Perl configuration management tool, but I’ve yet to take the time to learn it. I do, however, know Ansible, and it came as a welcome surprise to me that I can install Python, which is needed by Ansible, on Solaris without having to go through the hassle of compiling it from source. This is because Python can be installed using the pkgutil tool from OpenCSW. In addition, the community.general collection in Ansible includes a pkgutil module that allows Yum/Apt-like package management. One day I decided to see if Ansible would work on Solaris.

Note: your results may vary in following these directions; I can’t guarantee that they will work for you.

Prepare Solaris 9 for Ansible

Continue reading

Installing AlmaLinux 9 on a DL360 G7 and other stuff

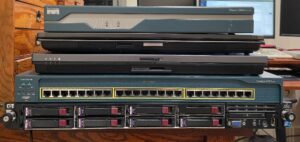
Recently I borrowed a pair of HP DL360 G7 servers from the office that had been decommissioned and are eventually destined for the e-waste bin. The servers are from 2011 and have little practical use in 2025, either in production or as lab systems, as they are slow and power-hungry. Still, I thought they would be fun to tinker with at home for at least a little while.

The latest and greatest from 2011

The top server has two CPUs and 72GB of RAM, while the bottom one has one CPU and only 4GB of RAM. The top one has a bunch of old laptop SATA drives in it (two of which are dead), while the bottom one has HP Enterprise SAS drives, all of which still function, in a RAID 1+0 array. I started with the bottom one.

Continue reading

Configuring LDAP Authentication on Solaris 8/9/10

When I recently started getting back into Solaris, one of the things I wanted to get working was LDAP authentication, so that I can log into systems with the same set of credentials like in a business environment. As with most Solaris tasks, the information on how to set this up is scarce on the Internet, especially for Solaris 8 and 9.

I already had three LDAP instances set up in my lab environment: a primary instance and two replicas. This post will not cover the setup of these, but all three are AlmaLinux 9 containers running OpenLDAP 2.6. The replicas have been configured to allow non-SSL connections to them, for the purpose of authenticating legacy operating systems such as Solaris. I don’t recommend allowing this in a production environment of course. Perhaps at a later date I will work on configuring Solaris to connect to OpenLDAP via SSL, but even this will require allowing insecure versions of SSL/TLS.

Continue reading

Installing OpenSSH on Solaris 8 x86

As mentioned in a previous post, I recently purchased a SunBlade 100 workstation off eBay. The first operating system I installed on it was Solaris 8, as this was the only version of Solaris I had CD ISOs for and it only has a CD-ROM drive (later I was able to install Solaris 9 on it over the network). I was disappointed to find out that Solaris 8 didn’t come with OpenSSH preinstalled; it wasn’t until Solaris 9 that SSH was installed with the base OS. I also had an x86 Solaris 8 virtual machine running in VirtualBox that I wanted to be able to access from my Linux systems (installed using the steps here: https://github.com/mac-65/Solaris_8_x86_VM). I decided to try installing OpenSSH on the VM first, as I could take snapshots and revert to a working state if a step failed. Prior to starting these steps, I applied the below patches per mac-65’s guide:

  • The Solaris 8 x86 recommended patch cluster, found here.
  • Patch 112439-02, which provides /dev/random and /dev/urandom (needed to generate SSH keys), found here.

I didn’t have to apply any patches to my SunBlade 100.

Continue reading

Back to blogging in 2025

It’s been nearly four years since I’ve posted anything to this blog. In that span of time, I have learned so many new skills and systems administrator “hacks”, to the point that this blog seems to represent a version of myself several major releases old.

Back when I last posted to this blog, I was still new to Ansible, while still clinging to and believing in the superiority of Puppet. I’ve since warmed to Ansible and now use it for practically all of my configuration management, even having passed the RHCE, which tests primary on one’s Ansible knowledge. Meanwhile, I haven’t written Puppet code in at least three years.

I’ve also recently gained an interest in “retro” server computing, that is Unix and Linux (and possibly some Windows) from the late 90s to the late 2000s. The first job I had where I interacted with *nix systems had a mixture of RedHat Enterprise Linux 5 and Solaris 8/10 systems. Being a 24-year-old who had mostly experimented with Ubuntu and Fedora, I hated working on the Solaris systems, particularly the SunBlade 150 workstation I was given in a broken state and told to fix before I could “graduate” to the Unix support team. After fixing it, I was told to use it as my secondary desktop. I hated it: the ugly gray and purple case, the dated Window 3.1-like CDE UI, and the out-of-date software, having to compile many tools I wanted from source. When I had a chance to inherit a departing coworker’s x86 desktop running RHEL 5 (which I also found dated), I wasted no time in kicking the SB-150 out of my cubicle.

It would probably come as a surprise to my past self, then, that at age 37 I would willingly purchase another SunBlade workstation off eBay, an SB-100 with 50 less Mhz. Why would I willingly subject myself to such pain, when Solaris has become almost a memory? I suppose after a certain period of time, maybe 20 years or so, old and slow becomes cool again, sort of like 80s and 90s cars (well, for some people anyway). For me, getting old stuff to work has always been a delightful and brain-stimulating challenge.

What I’ve found, however, is that information on how to get things working on Solaris is scarce and scattered througout the Internet, and mostly pertains to Solaris 10 or newer. In this blog I’d like to—attempt to at least—share what I’ve learned. It will probably be of use to very few people, but there is always the chance it might help someone.

In sum: going forward, this blog might contain some posts on new stuff, old stuff, or I may just stop posting to it altogether like I usually do.

Warmly,
Matt Ridpath

Prepare a Jenkins Docker Build Node with Ansible

Recently I have started to take more time to learn Ansible, building role-based projects similar to what I’ve always done with Puppet, as opposed to simple monolithic playbooks. I still believe Puppet is superior to Ansible when a host has a long list of items to be managed, whereas Ansible excels for more narrowly-scoped tasks such as pushing some files out and restarting a service. However, I’m sure that most would disagree with me, and in my lab I have chosen to use Ansible for most tasks in keeping with the latest trend. For this case, I created a simple Ansible project to set up a CentOS/EL8 Jenkins build node running Docker. The directory structure of this project is below:

├── inventory
├── jenkins_build.yml
├── roles
    ├── docker
    │   └── tasks
    │       ├── install.yml
    │       ├── main.yml
    │       └── service.yml
    ├── jenkins_node
        ├── files
        │   └── jenkins.pub
        └── tasks
            ├── install.yml
            ├── main.yml
            └── user.yml

First, I created a simple inventory file. The inventory just has one host for now with no variables.

[jenkins_build]
jenkins-node2

I then created a simple playbook, jenkins_build.yml, that includes the two roles I need.

---
- hosts: jenkins_build
  roles:
    - docker
    - jenkins_node

Next, I created the roles with mkdir -p roles/docker/tasks and mkdir -p roles/jenkins_node/{tasks,files}. This project is extremely simple; it does not use templates, variables, handlers, etc. and probably could have just used a monolithic playbook for brevity’s sake. However, I decided to use the full directory structure so that the roles could be reused later.

First, I’ll go over the Docker role. All it does is install the docker-ce packages from Docker and ensures that the service is running. The install yml file also needs to install the Docker GPG key:

---
# install.yml
  - rpm_key: state=present key=https://download.docker.com/linux/centos/gpg

  - yum_repository:
      name: docker-ce-stable
      description: Docker CE Stable - $basearch
      baseurl: https://download.docker.com/linux/centos/$releasever/$basearch/stable
      gpgcheck: yes
      gpgkey: https://download.docker.com/linux/centos/gpg

  - yum: name=docker-ce state=installed

---
# service.yml
  - service: name=docker state=started enabled=yes

main.yml includes both of the above:

  - include: install.yml
  - include: service.yml

Next, the Jenkins node role: this role installs the required packages and creates the jenkins user. First, you will need a generate a password hash for the Jenkins user. To do so, execute the below Python one-liner:

python -c 'import crypt,getpass;pw=getpass.getpass();print(crypt.crypt(pw) if (pw==getpass.getpass("Confirm: ")) else exit())'

Then include the resulting hash in your user.yml file:

---
  - user:
      name: jenkins
      state: present
      password: 'hash'
      group: users
      groups:
        - docker
  - ansible.posix.authorized_key:
      user: jenkins
      key: "{{ lookup('file', 'jenkins.pub') }}"
      state: present

If you want your Jenkins server to connect to the node using an SSH key, you will need to place the public key in a file located in files. I created this file as jenkins.pub. Then create the .yml files that install the necessary packages and include the tasks.

# install.yml
---
  - yum:
      name:
        - git
        - java-1.8.0-openjdk
      state: installed

# main.yml
---
  - include: install.yml
  - include: user.yml

Finally, run the playbook against the Jenkins build node from a host with Ansible installed. You might want to run it first with the -C option to ensure that it does what you expect it to do:

ansible-playbook -Kkb -i inventory -D jenkins_build.yml

If this was successful, you should then be able to add the node to Jenkins, located at Dashboard > Manage Jenkins > Manage Nodes and Clouds > New Node:

Setting up a Jenkins build node. The Labels section is optional, but is a method of restricting on which node a job can be run.

This concludes my blog post. This is a rather simple Ansible task, but demonstrates a use case for it, especially if you are setting up a bunch of build nodes for Jenkins. In my next post I will show how I configured a Jenkins job to build an RPM in a Docker container on the node I added here.

A few notes on building Hyper-V systems out of Foreman

I use Foreman for provisioning systems in both my lab and at work. For the most part I’ve had success over the years kickstarting CentOS/Enterprise Linux systems from Foreman using both PXE booting and the lightweight iPXE ISO. These include various generations of HP servers, custom-built desktops, and the following virtual machine types: Virtual Box, KVM, Xen, and VMWare. However, I have had a little more difficulty with Microsoft Hyper-V, but I have managed to get it to work on both Generation 1 and 2 VM types. In this post I will share some of my tips for getting this to work. This is not meant to be an in-depth guide. It assumes that you have a working Foreman installation running the latest release.

First of all, PXE booting does in fact work with Hyper-V. You will, however, need to choose the Generation 1 VM type and ensure that the NIC is a “Legacy Network Adapter.” It’s quite probable that a legacy NIC provides worse performance than a standard NIC, similar to how an E1000 NIC is inferior to a VMXNET3 NIC in VMWare. But for lab purposes it’s probably fine.

Generation 1 VM with Legacy NIC settings

It’s pretty clear that Microsoft intended the Generation 1 VM to be as “legacy” as possible. I find it amusing that it even emulates COM ports and a diskette drive. In any case, this is the only configuration from which I’ve been able to PXE boot a system from Foreman. For all other scenarios, I had to use the full boot ISO. The lightweight “host” ISO has not worked in my experience with Hyper-V (but works fine with other virtualization implementations of course).

Full disclaimer: I’ve only tested this with the current version of Foreman (as of this writing, 2.3). I don’t know if you can kickstart Hyper-V systems off the earlier versions of Foreman, though EFI boot disk functionality was added in 2.1 (EFI is required for a Generation 2 VM). When my organization was on Foreman 1.18, the only method that seemed to work for my Hyper-V administrator was to use a custom ISO I had generated from the Enterprise Linux 7 boot disk. However, with version 2.3 I can build both generation 1 and 2 VMs using the full boot disk.

The Foreman Boot Disk drop down. My experience is that only the full host image works.

Before creating your host, you will need to have the following template types associated with your host’s operating system version: Provisioning (your Kickstart file), PXELinux, iPXE, and PXEGrub2. This has always been annoying to do in Foreman, because you have to first make the template available to the OS under Provisioning Templates > template > Associate, then enable it at Operating Systems > OS > Templates.

In addition, if you are going to build a Generate 2 VM, you will need to include an EFI partition in your partition table.

A Foreman partition table for EL7 or greater, with an EFI partition.

Once these prerequisites have been met, you should be ready to create your VM. When creating a Generation 2 VM in Hyper-V, make sure to disable Secure Boot. Otherwise, the default settings should be sufficient.

Hyper-V Generation 2 VM settings for a Linux VM

Over in Foreman, the steps for creating a host are mostly the same as with other virtualization types. Under the Operating System tab: for your PXE loader, choose PXELinux BIOS for a Generation 1 VM or Grub2 UEFI for a Generation 2 VM.

Fill out all the remaining required fields and click Submit at the bottom of the page. If the host saves correctly, you should then be able to download the full ISO, mount it to your Hyper-V virtual machine, and Kickstart a VM from it.

I hope you’ve found these tips to be useful, if you’ve encountered a need to build Hyper-V VMs out of Foreman. I should mention also that I performed all my testing on a Windows 10 system and not with the server implementations of Hyper-V.

Build an RPM of the Mongo C Driver for CentOS 7

Greetings! It has been a while since I’ve posted anything in my systems administration blog. In this post I will describe my process for building a newer version of the Mongo C driver for Enterprise Linux/CentOS 7. These steps were also performed on an Enterprise Linux 6 system, but this post will focus on EL7 solely.

Last year I was asked by a developer to obtain a newer version of the Mongo C Driver for CentOS 7, as the one currently available in the EPEL repository, 1.3.6, does not support the most recent versions of MongoDB. I could not find a guide on the Internet for building an RPM of the newer version, so I was required to piece together a solution on my own. Originally I built the package on a build virtual machine; however, I later chose to use Docker, as the package requires several dependencies and I did not want to break anything on the build server. This example uses Docker, but it should work on a standard CentOS system as well.

To begin, I obtained a spec file for the latest mongo-c-driver, for Fedora. At the time I used the FC34 mongo-c-driver-1.17.1-1 SRPM from Remi’s RPM repository and modified it to make it to work on CentOS 6 and 7. All credit goes to Remi Collet; I merely adapted this spec file for my own needs. Expand the below to see the example spec file:

mongo-c-driver.spec
# remirepo spec file for mongo-c-driver
#
# Copyright (c) 2015-2020 Remi Collet
# License: CC-BY-SA
# http://creativecommons.org/licenses/by-sa/4.0/
#
%global gh_owner     mongodb
%global gh_project   mongo-c-driver
%global libname      libmongoc
%global libver       1.0
%global up_version   1.17.4
#global up_prever    rc0
# disabled as require a MongoDB server
%bcond_with          tests

Name:      mongo-c-driver
Summary:   Client library written in C for MongoDB
Version:   %{up_version}%{?up_prever:~%{up_prever}}
Release:   1%{?dist}
# See THIRD_PARTY_NOTICES
License:   ASL 2.0 and ISC and MIT and zlib
URL:       https://github.com/%{gh_owner}/%{gh_project}

Source0:   https://github.com/%{gh_owner}/%{gh_project}/releases/download/%{up_version}%{?up_prever:-%{up_prever}}/%{gh_project}-%{up_version}%{?up_prever:-%{up_prever}}.tar.gz

BuildRequires: cmake3
BuildRequires: gcc
# pkg-config may pull compat-openssl10
BuildRequires: openssl-devel
%if %{with tests}
BuildRequires: mongodb-server
BuildRequires: openssl
%endif
# From man pages

Requires:   %{name}-libs%{?_isa} = %{version}-%{release}
Requires:   libmongocrypt
# Sub package removed
Obsoletes:  %{name}-tools         < 1.3.0
Provides:   %{name}-tools         = %{version}
Provides:   %{name}-tools%{?_isa} = %{version}

%description
%{name} is a client library written in C for MongoDB.

%package libs
Summary:    Shared libraries for %{name}

%description libs
This package contains the shared libraries for %{name}.

%package devel
Summary:    Header files and development libraries for %{name}
Requires:   %{name}%{?_isa} = %{version}-%{release}
Requires:   pkgconfig
Requires:   pkgconfig(libzstd)
Requires:   libmongocrypt

%description devel
This package contains the header files and development libraries
for %{name}.

Documentation: http://mongoc.org/libmongoc/%{version}/

%package -n libbson
Summary:    Building, parsing, and iterating BSON documents
# Modified (with bson allocator and some warning fixes and huge indentation
# refactoring) jsonsl is bundled .
# jsonsl upstream likes copylib approach and does not plan a release
# .
Provides:   bundled(jsonsl)

%description -n libbson
This is a library providing useful routines related to building, parsing,
and iterating BSON documents .

%package -n libbson-devel
Summary:    Development files for %{name}
Requires:   libbson%{?_isa} = %{version}-%{release}
Requires:   pkgconfig

%description -n libbson-devel
This package contains libraries and header files needed for developing
applications that use %{name}.

Documentation: http://mongoc.org/libbson/%{version}/

%prep
%setup -q -n %{gh_project}-%{up_version}%{?up_prever:-%{up_prever}}

%build
%cmake3 \
    -DENABLE_BSON:STRING=ON \
    -DENABLE_MONGOC:BOOL=ON \
    -DENABLE_SHM_COUNTERS:BOOL=ON \
    -DENABLE_SSL:STRING=OPENSSL \
    -DENABLE_SASL:STRING=CYRUS \
    -DENABLE_MONGODB_AWS_AUTH:STRING=ON \
    -DENABLE_ICU:STRING=ON \
    -DENABLE_AUTOMATIC_INIT_AND_CLEANUP:BOOL=OFF \
    -DENABLE_CRYPTO_SYSTEM_PROFILE:BOOL=ON \
    -DENABLE_MAN_PAGES:BOOL=ON \
    -DENABLE_STATIC:STRING=OFF \
%if %{with tests}
    -DENABLE_TESTS:BOOL=ON \
%else
    -DENABLE_TESTS:BOOL=OFF \
%endif
    -DENABLE_EXAMPLES:BOOL=OFF \
    -DENABLE_UNINSTALL:BOOL=OFF \
    -DENABLE_CLIENT_SIDE_ENCRYPTION:BOOL=ON \
    -S .

%if 0%{?cmake_build:1}
%cmake_build
%else
make %{?_smp_mflags}
%endif

%install
%if 0%{?cmake_install:1}
%cmake_install
%else
make install DESTDIR=%{buildroot}
%endif

: Static library
rm -f  %{buildroot}%{_libdir}/*.a
rm -rf %{buildroot}%{_libdir}/cmake/*static*
rm -rf %{buildroot}%{_libdir}/pkgconfig/*static*
: Documentation
rm -rf %{buildroot}%{_datadir}/%{name}

%check
ret=0

%if %{with tests}
: Run a server
mkdir dbtest
mongod \
  --journal \
  --ipv6 \
  --unixSocketPrefix /tmp \
  --logpath     $PWD/server.log \
  --pidfilepath $PWD/server.pid \
  --dbpath      $PWD/dbtest \
  --fork

: Run the test suite
export MONGOC_TEST_OFFLINE=on
export MONGOC_TEST_SKIP_MOCK=on
#export MONGOC_TEST_SKIP_SLOW=on

make check || ret=1

: Cleanup
[ -s server.pid ] && kill $(cat server.pid)
%endif

if grep -r static %{buildroot}%{_libdir}/cmake; then
  : cmake configuration file contain reference to static library
  ret=1
fi
exit $ret

%files
%{_bindir}/mongoc-stat

%files libs
%{!?_licensedir:%global license %%doc}
%license COPYING
%license THIRD_PARTY_NOTICES
%{_libdir}/%{libname}-%{libver}.so.*

%files devel
%doc src/%{libname}/examples
%doc NEWS
%{_includedir}/%{libname}-%{libver}
%{_libdir}/%{libname}-%{libver}.so
%{_libdir}/pkgconfig/%{libname}-*.pc
%{_libdir}/cmake/%{libname}-%{libver}
%{_libdir}/cmake/mongoc-%{libver}
%{_mandir}/man3/mongoc*

%files -n libbson
%license COPYING
%license THIRD_PARTY_NOTICES
%{_libdir}/libbson*.so.*

%files -n libbson-devel
%doc src/libbson/examples
%doc src/libbson/NEWS
%{_includedir}/libbson-%{libver}
%{_libdir}/libbson*.so
%{_libdir}/cmake/libbson-%{libver}
%{_libdir}/cmake/bson-%{libver}
%{_libdir}/pkgconfig/libbson-*.pc
%{_mandir}/man3/bson*
  

I placed this spec file in a work directory, then downloaded the mongo-c-driver tarball from https://github.com/mongodb/mongo-c-driver/releases into the same work directory. I also created two Yum repo files for installing some of the dependencies for the build. These were libmongocrypt and MongoDB (I chose to install version 4.0):

[libmongocrypt]
name=libmongocrypt repository
baseurl=https://libmongocrypt.s3.amazonaws.com/yum/redhat/$releasever/libmongocrypt/1.0/x86_64
gpgcheck=1
enabled=1
gpgkey=https://www.mongodb.org/static/pgp/libmongocrypt.asc

[mongodb-org-4.0]
name=MongoDB Repository
baseurl=https://repo.mongodb.org/yum/redhat/$releasever/mongodb-org/4.0/x86_64/
gpgcheck=1
enabled=1
gpgkey=https://www.mongodb.org/static/pgp/server-4.0.asc

Next, I created a Dockerfile in the work directory that installs the required dependencies and builds the image.

FROM centos:7
MAINTAINER Matt Ridpath matt@example.com
COPY libmongocrypt.repo /etc/yum.repos.d
COPY mongodb.repo /etc/yum.repos.d
RUN yum install -y epel-release
RUN yum install -y rpm-build icu libicu-devel python-sphinx python2-sphinx snappy cmake3 libzstd-devel libmongocrypt mongodb-org-server gcc openssl-devel cyrus-sasl-devel
WORKDIR /root
RUN mkdir -p rpmbuild/{BUILD,RPMS,SOURCES,SPECS,SRPMS}
COPY mongo-c-driver-*.tar.gz rpmbuild/SOURCES
COPY mongo-c-driver.spec rpmbuild/SPECS

Now the container image can be built:

sudo docker build --pull -t="matt/mongo-c-driver" .

Next, I created a directory for the container to mount as a pass-through volume, so that it has a location to copy the finished RPMs into. I chose to create an “artifacts” directory within my work directory, as this task would later be turned into a Jenkins job. You can chose another location, however. The option follows the format of -v <local_dir>:<container_dir>. Once the directory had been created, I ran the container to build the RPMs:

sudo docker run --rm -v $HOME/mongo-c-driver/artifacts:/artifacts matt/mongo-c-driver /bin/bash -c "cd rpmbuild/SPECS && rpmbuild -ba mongo-c-driver.spec && cp ../RPMS/x86_64/*.rpm /artifacts"

If the RPM builds successfully, the RPMs should be dropped into the specified local directory in the -v option and made available for installation.

matt@docker:~$ ls mongo-c-driver/artifacts/
libbson-1.17.4-1.el7.x86_64.rpm
libbson-devel-1.17.4-1.el7.x86_64.rpm
mongo-c-driver-1.17.4-1.el7.x86_64.rpm
mongo-c-driver-debuginfo-1.17.4-1.el7.x86_64.rpm
mongo-c-driver-devel-1.17.4-1.el7.x86_64.rpm
mongo-c-driver-libs-1.17.4-1.el7.x86_64.rpm

In a future post, I will show how I turned this task into a Jenkins job, so that one can build these packages regularly as new versions are released.

Finally, a disclaimer: I’m not an expert on Docker or building RPMs. Someone else more than likely has a better solution for achieving this end result. Rather, I would merely like to share how I arrived at a solution for building these packages and hope it will save someone else the trial and error I went through.

Credits:

1) Remi Collet for providing the spec file to modify for this task: https://rpms.remirepo.net/.
2) mongo-c-driver contributors and authors for providing the source tarball: https://github.com/mongodb/mongo-c-driver.
3) This guide for providing an example of how to build RPMs with Docker: http://saule1508.github.io/build-rpm-with-docker/.