
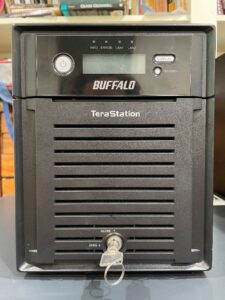
A while back I took home a 2011-vintage Buffalo TeraStation TS-XEL that was destined to be e-wasted. I initially used it in its stock configuration, deploying it as a “junk” NFS server to store software and act as a storage back-end for a test Proxmox cluster. I quickly grew tired of it, however, as the OS on it was outdated and used deprecated protocols. I also prefer to manage systems through the command line and this NAS only could be managed through its web interface. After the initial novelty of having a “new” piece of hardware to play with wore off, I deposited it in the closet with the other pieces of hardware that get taken out every few years.
That was, until I discovered this individual’s site here: Buffalo NAS Wiki, and their GitHub page here. This person has made it possible to install recent versions of Debian on Buffalo NAS’s such as the TS-XEL. None of what I have written on this blog post would be possible without them building the images and documenting the installation process. The specific page for the TS-XEL can be found here.
The first thing I needed for this project was a 4-pin USB-to-UART cable for accessing the serial console of the NAS. After obtaining one, I connected it to the hidden serial header on the bottom-left of the device. The easiest way to access this is to remove the four screws that secure the front panel, behind the door. From bottom to top, the order of the pins of the cable is: black, red, white, green. Below is a blurry picture of the pins:

Next, I plugged the USB end of the cable into my computer. On Linux, the serial console device can be found at /dev/ttyUSB0. To access this, I installed Minicom and connected to it from the terminal with: sudo minicom -D /dev/ttyUSB0 -b 115200. I also found that the regular old screen command can be used for this (and is also available on Mac OS): sudo screen /dev/ttyUSB0 115200. On Windows you would use Putty, but I don’t have a Windows computer available at the moment to show a screenshot of this. I personally prefer Minicom for accessing serial consoles.
TFTP-booting the Debian installer
Before proceeding, I should mention that while it is possible to install Debian and preserve the data on the stock RAID 5 array, I chose to erase the partition table on each drive and do a clean install instead. I pulled each drive out of the NAS, plugged them into a spare computer, and cleared the partition table with dd if=/dev/zero of=/dev/sdx bs=512 count=1 (be careful if you do this of course!) I had no need to preserve any of the data on the drives and I wanted to use RAID 1+0. The GitHub wiki for the Debian on Buffalo has the steps for performing the installation if you would prefer to preserve the data on the RAID 5 array.
If you choose to install everything from scratch, you will need a another computer that hosts a TFTP server. The IP of the TFTP server needs to be 192.168.11.1. The 192.168.11.x network will also need to be able to reach the Internet in order to download packages from Debian. This creates a bit of a problem: you can set the IP of your computer’s ethernet interface to 192.168.11.1 and TFTP-boot the Buffalo, but then how will the Buffalo get an IP address from the DHCP host and reach out to the Internet once the installer loads? You could configure your laptop or desktop to forward traffic to another interface, depending on what OS and firewall you are running. For me, I already had something in place for this: I have a managed switch and a small Linux computer acting as a router that hosts multiple VLANs. I simply spun up a TFTP server on this tiny computer, added 192.168.11.x as a VLAN, and enabled this VLAN on another port on my managed switch. However, I realize that most people do not have multiple VLANs set up on their home network. This led me to think of another solution that might be easier for others:
- Set the static IP of your computer’s ethernet interface to 192.168.11.1.
- Install a TFTP server on your computer. If running Ubuntu or Debian like I am, you would install tftpd-hpa. If running Windows, you would use something like Tftpd64. I’m not sure what is available for Mac OS.
- Obtain a spare router. Chances are if you’re reading this article, you have at least one. An old WRT54G will do. Connect your computer to the router and set the router’s IP to 192.168.11.2.
- Connect the WAN port of your spare router into an ethernet port on your home router.
- Connect the NAS’s first ethernet port to the router.
- Configure DHCP on either the router or the computer. I prefer to run DHCP on Linux, but using the router’s DHCP server will suffice also. Remember to set the default gateway to 192.168.11.2.
- Ensure that the computer can reach the Internet via the 192.168.11.1 interface.
Another of advantage of the above approach is that the router will provide a “dumb” switch for the computer and the NAS to communicate to one another.
Next, I obtained the Debian Bookworm installer images from the 1000001101000/Debian_on_Buffalo GitHub project. These can be found here. You will need the files initrd.buffalo and uImage-88f6281.buffalo.tsxel. Rename uImage-88f6281.buffalo.tsxel to uImage-88f6281.buffalo, and copy both files to the directory where your TFTP images are served; on Ubuntu/Debian this is /srv/tftp.

Finally everything should be ready to begin the installation. I plugged the USB connector of the UART cable into my computer and connected to the serial console with sudo minicom -D /dev/ttyUSB0 -b 115200. I then powered the NAS on by holding down the power button until it beeped. The device would beep annoyingly at me for a few seconds due to the missing OS, but went away once the TFTP boot is successful:
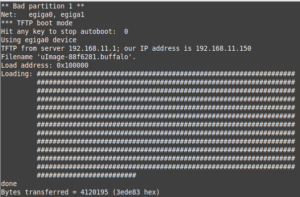
If everything loads successfully, you should be greeted with this screen:
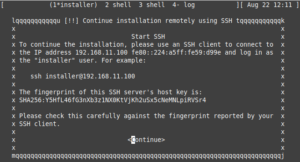
Installing Debian over SSH
To start the installation, SSH into the device with the IP provided on the “Start SSH” screen: ssh installer@192.168.11.x. The password is install.
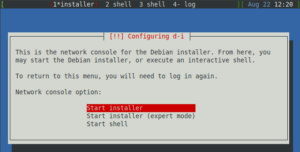
The installer is straightforward until you get to the disk partitioning:
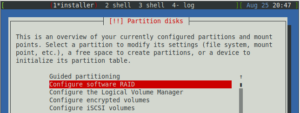
I set up the following partition layout:
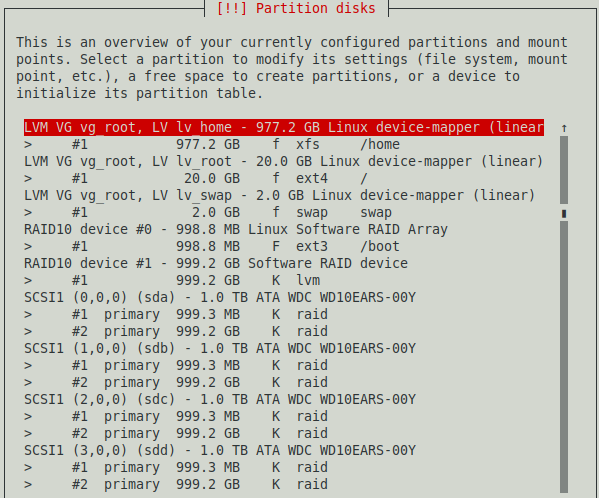
- Divided each disk into two primary partitions, /dev/sdx1 and /dev/sdx2. /dev/sdx1 was 1G and /dev/sdx2 took the remaining space (slightly under 1TB in my case).
- Created two software RAID10 arrays, /dev/md0 and /dev/md1. /dev/md0 used all of the /dev/sdx1 partitions, while /dev/md1 used all of the /dev/sdx2 partitions.
- Configured /dev/md0 to be formatted with EXT3 and mounted as /boot. It is somewhat of an overkill to have /boot as a RAID10 array, but I wanted all of the disks to be partitioned the same.
- /dev/md1 was assigned as a physical LVM volume.
- Created the LVM volume group vg_root and added /dev/md1 to it.
- Created three logical volume groups: lv_root (20G, lv_swap (2G), and lv_home (remaining space).
- lv_root was configured to be mounted as / and formatted with EXT4.
- lv_swap was configured to be the swap of course.
- lv_home was configured to be mounted as /home and formatted with XFS.
I know this is somewhat complicated. You are free to partition everything with a simpler layout. The only requirement is that /boot is placed on its own partition, is formatted with EXT3, and is the first partition on the disks (that requirement is described here). I haven’t experimented with other partition layouts, as the installation takes a long time due to the slow CPU in the NAS and my slow Internet connection. Below is a screenshot of my chosen disk layout:
I then selected “Finish partitioning and write changes to disk.” I also ignored the warning about /boot not being on the first partition of the disk, as it should be if /dev/md0 is using /dev/sdx1. The remaining steps of the installation are mostly non-interactive and take a long time due to the lack of CPU, RAM, and, as I discovered later, slow disk performance. But it eventually finished for me and I successfully rebooted the device into Debian.
First boot-up impressions
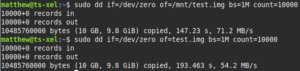
When the system first booted up, the large RAID 10 array was in a syncing state, which hogged all of the CPU and IO, making the system unusable until it completed. I left it running overnight and it was finished when I checked in the morning. The system was still extremely slow, mainly due to poor disk performance. For example, installing packages with apt was painfully slow. The below dd tests illustrate this issue:

It also confirmed that using LVM for / and /home on top of MD wasn’t the culprit, as /boot a standard partition. Finally, I decided to remove one of the spare drives from the software RAID arrays and format it with XFS, and perform the same dd test.
- /dev/sdd1 and /dev/sdd2 were removed from the RAID arrays with mdadm /dev/md0 –remove /dev/sdd1 and mdadm /dev/md1 –remove /dev/sdd2
- /dev/sdd was re-partitioned with fdisk.
- The NAS was rebooted and /dev/sdd1 was formatted with mkfs.xfs /dev/sdd1 and mounted with mount /dev/sdd1 /mnt
I found that while write performance was a little better, it was still extremely slow.
While the software RAID is a slight performance restriction, the main issue is the hardware, either the speed of the system or the drives. I ended up pulling out the 4th drive and put it in another computer, getting 124 MB/s on the same dd—not fast, but more of what I would expect from a 2011-vintage SATA drive.
Configuring NFS
Setting up the NAS to serve directories is no different than on any other Debian host. To make things slightly less boring, I created an Ansible playbook for performing this task:
---
- hosts: ts-xel
  tasks:
  - name: Install nfs-kernel-server
    ansible.builtin.apt:
      name: nfs-kernel-server
      state: present

  - name: Configure /etc/exports
    ansible.builtin.copy:
      dest: /etc/exports
      content: "/home 192.168.11.0/24(rw,sync,no_subtree_check)\n"
    notify: Restart nfs-server

  - name: Enable nfs-server
    ansible.builtin.systemd:
      name: nfs-server
      state: started
      enabled: true

  handlers:
  - name: Restart nfs-server
    ansible.builtin.systemd:
      name: nfs-server
      state: restarted
Of course all of the above steps could be done manually.
Configuring Samba
For demonstration purposes, I attempted to keep the Samba config as close to the default as possible. I installed samba with sudo apt install samba. I then edited the configuration file, /etc/samba/smb.conf, and changed the following:
- Under the [homes] section, I set read only = no.
- Commented out the [printers] and [print$] sections, since I’m not sharing a printer.
- Created a [software] share that shares out /home/software. More on that below.
I executed the following commands as root to add my user account to Samba and create a software share:
smbpasswd -a matthew
groupadd software
gpasswd -a matthew software
mkdir /home/software
chgrp software /home/software
And then added the below section to /etc/samba/smb.conf (borrowing from this guide):
[software]
   path = /home/software
   security = user
   writable = yes
   guest ok = no
   valid users = @software
   force group = software
   force create mode = 660
   force directory mode = 770
   inherit permissions = yes
I then restarted Samba with sudo systemctl restart smbd.
Conclusion
I initially had plans to try to configure other applications on this NAS, such as Nginx, MariaDB, and OpenLDAP. However, with only 256MB of RAM and horrible disk write performance, even running apt to install these packages and their dependencies took exceedingly long. I decided to remove them and just left it as a dedicated NFS/Samba server, possibly for occasional backups. At least it now supports modern protocols and isn’t locked down to a web interface.
I do have one other experiment I want to do the TS-XEL, one that shouldn’t be too taxing on its limited resources. Since it has two NICs, I’d like to try configuring it as a router. But that will be in another post in which I configure some other systems from my collection as routers as well.
As always, thanks for reading!