
Recently, for my home network, I transitioned from using a standard home router running DD-WRT to a setup with a separate managed switch, wireless access point, and a combination router/server running Ubuntu 24.04. The “router” is a basic x86-64 mini-PC with two network interfaces, purchased for about $100. The internal interface hosts three VLANs (internal, lab, and guest) and provides DHCP, DNS, and LDAP services. I prefer this setup to something like OPNsense, because I can manage everything with the command line and Ansible. If the cheap PC dies an early death or I want to switch to something newer, I can simply install Ubuntu on the replacement system, configure the NICs, and run the Ansible project to configure everything else. It also gives me a low-power-usage PC that I can run other services on in containers or even virtual machines. In this blog post I run through the steps for configuring a router like this, with both Ubuntu and Debian.
Hardware Requirements
Any reasonably modern computer can be used for this setup, as long as it has two NICs and can run Ubuntu or Debian. A Raspberry Pi might be a poor choice for this, as it has only one NIC. Newer mini-PCs will draw less power, which is beneficial for something that will be running all of the time.
You will need a managed switch for this exercise. These have really gone down in price recently, at least for Gigabit ones. I paid under $30 for my Netgear GS308E and it has worked well. If you want wireless connectivity, you’ll also want to purchase an access point that supports multiple VLANs. I have a TP-Link TL-WA3001 that has been dependable.
Switch Setup
To configure a managed switch for the router, simply set the port your router’s internal interface will be plugging into to “trunk”—that’s all there is to it. For this exercise, though, I plan on doing something slightly more interesting: I have a 48-port Cisco Catalyst 2960X and will configure the port the router will be plugging into as a trunk port using the IOS CLI. Feel free to skip this section if Cisco configuration is of no interest or relevance for you. This blog is a sort of “free-form journal” of what I am working on tech-wise, and hence certain sections might not be of interest to some.
First, I should mention that when it comes to configuring Cisco equipment, I am a beginner. Thus, it is certainly possible that I am doing something wrong here! For this exercise, I will be configuring three VLANs:
- An “internal” network with internet access. Clients on this network will be able to access resources such as file shares and databases. The VLAN ID is 20 and the subnet is 10.0.20.0/24.
- A “guest” network that only has internet access. The VLAN ID is 21 and the subnet is 10.0.21.0/24.
- A lab network that has no internet access. This is used for legacy systems, such as those running Solaris and Windows XP. The VLAN ID is 22 and the subnet is 10.0.22.0/24.
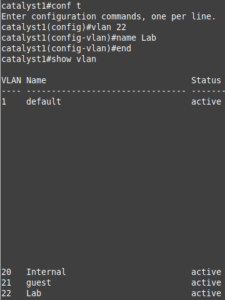
To add a VLAN to a Cisco Catalyst switch, first enter enable mode (en or enable) and enter the enable password. At the # prompt, enter configure terminal (or conf t), vlan ID (hit enter), name description (optional), then either hit enter, type end, and hit enter again or ctrl+z. Enter the command show vlan to verify the result. Below shows the process:
Next, configure a trunk port on the switch with the three VLANs. This is done with:
- show interface status (obtain the interface ID; mine was Gi2/0/6).
- conf t
- interface Gi2/0/6
- switchport mode trunk
- switchport trunk allowed vlan 20,21,22
- end (or ctrl+z)
- show run interface Gi2/0/6 to verify status.
If you want these settings to persist after power-cycling the switch, run the command copy run start.
In addition to the trunk port, you might want to configure some access ports for hard-wired systems. An access port is one that is restricted to a single VLAN. To configure one on a Cisco switch:
- show interface status (obtain the interface ID; mine was Gi2/0/7).
- conf t
- interface Gi2/0/7
- switchport mode access
- switchport access vlan 20
- end (or ctrl+z)
- show run interface Gi2/0/7 to verify status.
Configure VLANs in Ubuntu with Netplan
Ubuntu Server uses the Netplan network configuration renderer to configure network interfaces. I really like Netplan because it uses a YAML file for defining the interfaces, and I’m a fan of YAML, being an Ansible user and having written a YAML-based renderer for Keepalived. On a fresh install of Ubuntu Server 24.04, the Netplan YAML file is located in /etc/netplan/50-cloud-init.yaml. For my router, I used the following configuration:
network:
  version: 2
  renderer: networkd
  ethernets:
    enp3s0:
      dhcp4: true
    enp2s0: {}
  vlans:
    vlan.20:
      id: 20
      link: enp2s0
      addresses: [10.0.20.1/24]
    vlan.21:
      id: 21
      link: enp2s0
      addresses: [10.0.21.1/24]
    vlan.22:
      id: 22
      link: enp2s0
      addresses: [10.0.22.1/24]
After making the desired edits to 50-cloud-init.yaml, apply it with sudo netplan apply, then verify the results with ip a.

Of note, I set the WAN interface, enp3s0, to use DHCP, as it will most likely obtain its IP from an ISP router. The enp2s0: {} line initializes the LAN NIC, but does not configure it, as all addressing is done in the VLAN sections.
Configure VLANs in Debian
The Debian system I used for this exercise is an old Buffalo TeraStation NAS, which I installed Debian 12 on in a previous blog post. Conveniently, the TeraStation has two NICs, so thought it would be interesting to set it up as a router (using your NAS as a router is not a wise idea for real-world scenarios, but this is a junk one being used for an exercise).
Unlike Ubuntu, Debian uses a more traditional /etc/networking/interfaces file. It did take me a little more digging to figure out how to configure this, but it is relatively straightforward, and some might prefer it to Netplan’s YAML format.
My /etc/networking/interfaces file looked like below:
# This file describes the network interfaces available on your system
# and how to activate them. For more information, see interfaces(5).

source /etc/network/interfaces.d/*

# The loopback network interface
auto lo
iface lo inet loopback

# The primary network interface
allow-hotplug eth0
iface eth0 inet dhcp

auto eth1
iface eth1 inet manual

auto eth1.20
iface eth1.20 inet static
    address 10.0.20.1/24

auto eth1.21
iface eth1.21 inet static
    address 10.0.21.1/24

auto eth1.22
iface eth1.22 inet static
    address 10.0.22.1/24
To apply these changes, restart the networking service with sudo systemctl restart networking or reboot the system. Note: it’s always a good idea to have console access to the system before restarting the networking service.
Configuring a DHCP server
As I mentioned in the introduction, my goal was to manage the configuration of this router setup with Ansible (with the exception of the network interfaces). The first service that we will configure is DHCP, as this will be needed for assigning out IPs on the LAN. For this I created a simple playbook that installs a DHCP server on Ubuntu and Debian, and configures it (note: I placed the variables inside the playbook for simplicity’s sake. This is not the preferred method for Ansible; rather, you should use variables files in the group_vars and host_vars directories. For more on Ansible variables, refer to this page). (Another note: this article assumes that you already know how to use Ansible and perform simple tasks such as creating inventory files).
The below code snippets contain the playbook for Debian and the dhcpd.conf.j2 template. The dhcp_interfaces variable for Ubuntu should read vlan.20, etc. instead.
---
- hosts: linux_router
  vars:
    dhcp_interfaces:
      - eth1.20
      - eth1.21
      - eth1.22
    dhcp_subnets:
      10.0.20:
        start: 150
        end: 250
        domain: ridpath.mbr
        dns_servers:
          - 10.0.20.1
        tftp_server: '10.0.20.1'
      10.0.21:
        domain: guest.localdomain
        dns_servers:
          - 1.1.1.1
          - 8.8.8.8
      10.0.22:
        domain: lab.ridpath.mbr
        dns_servers:
          - 10.0.22.1

  tasks:
  - name: Install isc-dhcp-server
    ansible.builtin.apt:
      name: isc-dhcp-server
      state: present

  - name: deploy dhcpd.conf
    ansible.builtin.template:
      src: dhcpd.conf.j2
      dest: /etc/dhcp/dhcpd.conf
    notify: restart isc-dhcp-server

  - name: deploy dhcpd-reservations.conf
    ansible.builtin.template:
      src: dhcpd-reservations.conf.j2
      dest: /etc/dhcp/dhcpd-reservations.conf
    notify: restart isc-dhcp-server
    when: dhcp_reservations is defined

  - name: set interfaces in /etc/default/isc-dhcp-server
    ansible.builtin.lineinfile:
      path: /etc/default/isc-dhcp-server
      regexp: '^(#)?INTERFACESv4'
      line: "INTERFACESv4=\"{{ dhcp_interfaces | join(' ') }}\""
    notify: restart isc-dhcp-server

  - name: enable and start isc-dhcp-server
    ansible.builtin.systemd:
      name: isc-dhcp-server
      state: started
      enabled: true

  handlers:
  - name: restart isc-dhcp-server
    ansible.builtin.systemd:
      name: isc-dhcp-server
      state: restarted
default-lease-time 600;
max-lease-time 7200;
authoritative;

{% for subnet, val in dhcp_subnets.items() %}
subnet {{ subnet }}.0 netmask {{ val.netmask | default('255.255.255.0') }} {
  range dynamic-bootp         {{ subnet }}.{{ val.start | default(100) }} {{ subnet }}.{{ val.end | default(200) }};
  option subnet-mask          {{ val.netmask | default('255.255.255.0') }};
  option broadcast-address    {{ subnet }}.255;
  option routers              {{ subnet }}.1;
  option domain-name          "{{ val.domain | default('example.net') }}";
  option domain-name-servers  {{ val.dns_servers | join(', ') }};
{% if val.tftp_server is defined %}
  filename                    "pxelinux.0";
  next-server                 {{ val.tftp_server }};
{% endif %}
}

{% endfor %}
{% if dhcp_reservations is defined %}
include "/etc/dhcp/dhcpd-reservations.conf";
{% endif %}
Optionally, you can define the dhcp_reservations variable with a dictionary of MAC addresses and IPs. I placed these in a separate file, in the event that I choose to manage them with a different tool in the future. The block_route parameter is used for systems that should not have Internet access (this is unnecessary if the system is located on a lab network, but still useful on networks with Internet access).
dhcp_reservations:
  website1:
    ip: 10.0.20.25
    mac: 52:54:00:ab:cd:89
  winxp-1:
    ip: 10.0.22.11
    mac: 52:54:00:ab:cd:45
    block_route: true
{% for key, value in dhcp_reservations.items() %}
host {{ key }} {
  hardware ethernet {{ value.mac }};
  fixed-address {{ value.ip }};
{% if value.block_route is defined and value.block_route == true %}
  option routers 0.0.0.0;
{% endif %}
}
{% endfor %}
Configure a DNS server
My main intention with this post was to demonstrate replacing an off-the-shelf router with a Linux computer, not configuring a home server. I feel like configuring a DNS server falls more of in the latter’s scope, so I won’t go into too many details on the subject. Nonetheless, you will probably want to run a DNS server on your home network if you’re a power user like myself, and so I included a short tutorial on configuring one. My Linux router currently runs a Bind 9 DNS server with a few simple zone files. Below is a simple playbook that configures Bind 9 on either Debian or Ubuntu, along with a simple zone file:
---
- hosts: linux_router
  vars:
    dns_forwarders:
      - '1.1.1.1'
      - '8.8.8.8'
    dns_subnets:
      - '10.0.20'
      - '10.0.21'
      - '10.0.22'
    dns_zones:
      - 'ridpath.mbr'
  tasks:
  - name: install bind9
    ansible.builtin.apt:
      name: bind9
      state: present

  - name: deploy named.conf.local
    ansible.builtin.template:
      src: named.conf.local.j2
      dest: /etc/bind/named.conf.local
      owner: root
      group: bind
      mode: 0640
    notify: restart named

  - name: deploy named.conf.options
    ansible.builtin.template:
      src: named.conf.options.j2
      dest: /etc/bind/named.conf.options
      owner: root
      group: bind
      mode: 0640
    notify: restart named

  - name: deploy zone files
    ansible.builtin.copy:
      src: "db.{{ item }}"
      dest: "/var/cache/bind/db.{{ item }}"
      owner: root
      group: bind
      mode: 0640
    loop: "{{ dns_zones }}"
    notify: restart named

  - name: enable and start named
    ansible.builtin.systemd:
      name: named
      state: started
      enabled: true

  handlers:
  - name: restart named
    ansible.builtin.systemd:
      name: named
      state: restarted
options {
  directory "/var/cache/bind";
  listen-on port 53 {
    127.0.0.1;
{% for net in dns_subnets %}
    {{ net }}.1;
{% endfor %}
  };
  listen-on-v6 port 53 { none; };
  allow-query {
    127.0.0.1;
{% for net in dns_subnets %}
    {{ net }}.0/24;
{% endfor %}
  };
  allow-recursion {
    127.0.0.1;
{% for net in dns_subnets %}
    {{ net }}.0/24;
{% endfor %}
  };
  allow-transfer { none; };
  forwarders { {{ dns_forwarders | join('; ') }}; };

	//========================================================================
	// If BIND logs error messages about the root key being expired,
	// you will need to update your keys.  See https://www.isc.org/bind-keys
	//========================================================================
	dnssec-validation auto;
};
{% for zone in dns_zones %}
zone "{{ zone }}" IN {
  type master;
  file "db.{{ zone }}";
};

{% endfor %}
$TTL    300
@       IN      SOA     router.ridpath.mbr. root.ridpath.mbr. (
                        2025090700 ; Serial
                        300        ; refresh (1 hour)
                        600        ; retry (10 minutes)
                        1209600    ; expire (2 weeks)
                        300        ; minimum (1 hour)
                        )
                        A  10.0.20.1
                        NS router.ridpath.mbr.
router  IN  A 10.0.20.1
ts-xel IN A 10.0.20.1
plato IN A 10.0.20.15
Setting up the firewall: nftables
Your router of course needs a firewall, to block unsafe access from the outside and forward packets. There are a few choices out there for a host-based firewall. I chose nftables, as it is the “modern” replacement for classic iptables. I wouldn’t say it’s better or worse than iptables, but it’s what has been adopted as the standard and I won’t fight that. The wiki for nftables provides a “simple ruleset for a home router.” My nftables configuration is based on this example.
My goals with this firewall configuration were:
- Ensure that all access is blocked from the WAN interface.
- Prevent the guest/IoT VLAN from being able to reach the other VLANs.
- Allow access between the internal and lab VLANs, but block the lab VLAN from reaching the Internet.
Below is the simple /etc/nftables.conf file that I deployed as an Ansible template, borrowed from the guide in the wiki:
#!/usr/sbin/nft -f

flush ruleset

define DEV_INT = {{ nft_internal_dev }}
define DEV_GUEST = {{ nft_guest_dev }}
define DEV_LAB = {{ nft_lab_dev }}
define DEV_WORLD = {{ nft_wan_dev }}
define NET_INT = {{ nft_internal_net }}
define NET_GUEST = {{ nft_guest_net }}

table ip global {
    chain inbound_world {

    }

    chain inbound_internal {
        # Accepting ping (icmp-echo-request) for diagnostic purposes.
        icmp type echo-request limit rate 5/second accept

        # Allow DHCP, DNS, and SSH. Additional services hosted on the router can be allowed here.
        ip protocol . th dport vmap { tcp . 22 : accept, udp . 53 : accept, tcp . 53 : accept, udp . 67 : accept }
    }

    chain inbound_guest {
        # Accepting ping (icmp-echo-request) for diagnostic purposes.
        icmp type echo-request limit rate 5/second accept

        # Allow DHCP and DNS from the guest/IoT network
        ip protocol . th dport vmap { udp . 53 : accept, tcp . 53 : accept, udp . 67 : accept}
    }

    chain inbound {
        type filter hook input priority 0; policy drop;

        # Allow traffic from established and related packets, drop invalid
        ct state vmap { established : accept, related : accept, invalid : drop }

        # Allow loopback traffic, anything else jump to chain for further evaluation
        iifname vmap { lo : accept, $DEV_WORLD : jump inbound_world, $DEV_INT : jump inbound_internal, $DEV_LAB : jump inbound_internal, $DEV_GUEST : jump inbound_guest }

        # The rest is dropped by the above policy
    }

    chain forward {
        type filter hook forward priority 0; policy drop;

        # Allow traffic from established and related packets, drop invalid
        ct state vmap { established : accept, related : accept, invalid : drop }

        # connections from the internal net to the internet: wlan to lan and lan to wlan not allowed
        meta iifname . meta oifname { $DEV_INT . $DEV_WORLD, $DEV_GUEST . $DEV_WORLD, $DEV_LAB . $DEV_INT, $DEV_INT . $DEV_LAB } accept

        # The rest is dropped by the above policy
    }

    chain postrouting {
        type nat hook postrouting priority 100; policy accept;

        # Masquerade private IP addresses
        ip saddr $NET_INT meta oifname $DEV_WORLD counter masquerade
        ip saddr $NET_GUEST meta oifname $DEV_WORLD counter masquerade
    }
}
Before running the playbook that deploys this, I should note that this will block inbound SSH traffic from the WAN interface (which you should want). Because of this, it will need to be run from a system on the internal VLAN. Or if you have console access to the router, you can run Ansible directly on the host.
---
- hosts: linux_router
  vars:
    nft_guest_dev: 'eth1.21'
    nft_internal_dev: 'eth1.20'
    nft_lab_dev: 'eth1.22'
    nft_wan_dev: 'eth0'
    nft_guest_net: '10.0.21.0/24'
    nft_internal_net: '10.0.20.0/24'

  tasks:
  - name: Remove ufw
    ansible.builtin.apt:
      name: ufw
      state: absent

  - name: Install nftables
    ansible.builtin.apt:
      name: nftables
      state: present

  - name: Create /etc/nftables.conf
    ansible.builtin.template:
      src: nftables.conf.j2
      dest: /etc/nftables.conf
      mode: 0700
    notify: Restart nftables

  - name: Enable and start nftables
    ansible.builtin.systemd:
      name: nftables
      state: started
      enabled: true

  - name: Enable ip_forward
    ansible.posix.sysctl:
      name: net.ipv4.ip_forward
      value: '1'

  handlers:
  - name: Restart nftables
    ansible.builtin.systemd:
      name: nftables
      state: restarted
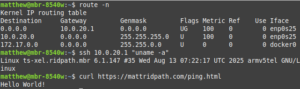
Below shows a screenshot of reaching out to the Internet from a laptop plugged into an access port configured for VLAN 20, using the Buffalo TS-XEL as a router. Additional testing on the other two VLANs confirmed that network segregation worked as expected.
I also applied this playbook to my Ubuntu host, which is an multi-core x86_64 host with 12GB of RAM; the playbook ran considerably faster. Results with the router were similar to Debian. The only concern I have is that there is about a 30-second delay before a system can obtain an IP address from DHCP. I’m not sure if this is an issue with Linux or the Cisco switch. As I stated before, I’m a beginner with configuring Cisco equipment, so my knowledge is still limited.
Setting up WireGuard
WireGuard is a lightweight VPN application that can be configured to allow remote access into your LAN. Since the routers in this example already run Linux, they can also be configured as WireGuard servers. For this exercise, I chose not to use Ansible. I have written an Ansible project that manages WireGuard in the past, but it is somewhat complicated, requiring the use of Ansible Vault to encrypt the keys among other things. For now, I will just provide the steps manually.
First you will need to re-configure nftables to allow traffic on the WireGuard UDP port on the WAN interface and forward packets to the internal network. This really only required a few modifications. First, I added the variables nft_wg_dev (value ‘wg0′) and nft_wg_net (value 192.168.116.0/24’) to the Ansible playbook and to the nftables.conf.j2 template at the top. Under the inbound_world chain, I added udp dport 51820 accept to accept WireGuard traffic on the WAN interface. Under the forward chain, I added $DEV_WG . $DEV_WORLD and $DEV_WG . $DEV_INT to the list of forward rules, so that traffic gets forwarded from the WireGuard interface to the internal network and the Internet. Finally, I added the WireGuard subnet to the postrouting chain. The below code snippet contains these changes:
#!/usr/sbin/nft -f

flush ruleset

define DEV_INT = {{ nft_internal_dev }}
define DEV_GUEST = {{ nft_guest_dev }}
define DEV_LAB = {{ nft_lab_dev }}
define DEV_WG = {{ nft_wg_dev }}
define DEV_WORLD = {{ nft_wan_dev }}
define NET_INT = {{ nft_internal_net }}
define NET_GUEST = {{ nft_guest_net }}
define NET_WG = {{ nft_wg_net }}

table ip global {
    chain inbound_world {
        # Allow WireGuard
        udp dport 51820 accept
    }

    chain inbound_internal {
        # Accepting ping (icmp-echo-request) for diagnostic purposes.
        icmp type echo-request limit rate 5/second accept

        # Allow DHCP, DNS, and SSH. Additional services hosted on the router can be allowed here.
        ip protocol . th dport vmap { tcp . 22 : accept, udp . 53 : accept, tcp . 53 : accept, udp . 67 : accept }
    }

    chain inbound_guest {
        # Accepting ping (icmp-echo-request) for diagnostic purposes.
        icmp type echo-request limit rate 5/second accept

        # Allow DHCP and DNS from the guest/IoT network
        ip protocol . th dport vmap { udp . 53 : accept, tcp . 53 : accept, udp . 67 : accept}
    }

    chain inbound {
        type filter hook input priority 0; policy drop;

        # Allow traffic from established and related packets, drop invalid
        ct state vmap { established : accept, related : accept, invalid : drop }

        # Allow loopback traffic, anything else jump to chain for further evaluation
        iifname vmap { lo : accept, $DEV_WORLD : jump inbound_world, $DEV_INT : jump inbound_internal, $DEV_LAB : jump inbound_internal, $DEV_GUEST : jump inbound_guest }

        # The rest is dropped by the above policy
    }

    chain forward {
        type filter hook forward priority 0; policy drop;

        # Allow traffic from established and related packets, drop invalid
        ct state vmap { established : accept, related : accept, invalid : drop }

        # connections from the internal net to the internet: wlan to lan and lan to wlan not allowed
        meta iifname . meta oifname { $DEV_INT . $DEV_WORLD, $DEV_GUEST . $DEV_WORLD, $DEV_LAB . $DEV_INT, $DEV_INT . $DEV_LAB , $DEV_WG . $DEV_WORLD , $DEV_WG . $DEV_INT } accept

        # The rest is dropped by the above policy
    }

    chain postrouting {
        type nat hook postrouting priority 100; policy accept;

        # Masquerade private IP addresses
        ip saddr $NET_INT meta oifname $DEV_WORLD counter masquerade
        ip saddr $NET_GUEST meta oifname $DEV_WORLD counter masquerade
        ip saddr $NET_WG meta oifname $DEV_WORLD counter masquerade
    }
}
Next, install WireGuard (apt install wireguard) and become root. Use the below commands to generate client and server keys. Instead of “client1”, you can give it a name such as the hostname of the client.
umask 077
wg genkey | tee /etc/wireguard/server_private.key | wg pubkey | tee /etc/wireguard/server_public.key
wg genkey | tee /etc/wireguard/client1_private.key | wg pubkey | tee /etc/wireguard/client1_public.key
Create the file /etc/wireguard/wg0.conf. It can look like below:
[Interface]
Address = 192.168.116.1/24
ListenPort = 51820
PrivateKey = server_private_key

[Peer]
PublicKey = client1_public_key
AllowedIPs = 192.168.116.2/32

[Peer]
PublicKey = client2_public_key
AllowedIPs = 192.168.116.3/32
The server_private_key will be the contents of /etc/wireguard/server_private.key and the client1_public_key will be the contents of /etc/wireguard/client1_public.key. Additional clients will go under separate Peer sections.
Finally, start and enable with the WireGuard service with systemctl enable –now wg-quick@wg0.
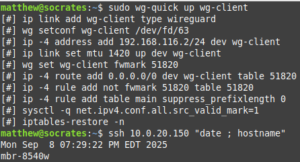
On the client you will also install WireGuard. Create the config file /etc/wireguard/wg-client.conf. It should have contents similar to below:
[Interface]
PrivateKey = client_private_key
Address = 192.168.116.2/32

[Peer]
PublicKey = server_public_key
AllowedIPs = 192.168.116.0/24
Endpoint = wan_interface_ip:51820
You can start the tunnel with something like sudo wg-quick up wg-client or use systemctl with sudo systemctl start wg-quick@wg-client. Your desktop OS may also have a GUI client that can be used.
Conclusion
I hope that this guide can be of use to someone evaluating different options for using Linux as a router. Overall, I’ve been happy with this setup and it has been extremely reliable. In the future I may repeat this exercise with a RedHat-based OS such as AlmaLinux or Fedora. As always. thanks for reading!