
Introduction
In a post from 2025 I discussed the steps for installing Solaris 8 (and 9) in the SPARC 32-bit QEMU (Quick Emulator), as well as the issues I encountered, such as the Solaris 8 installation crashing. I decided to revisit this using the latest release of QEMU, while also installing Oracle 8i and seeing if I could run a Perl script that queries Oracle. I also discuss setting up QEMU on Linux and configuring bridged networking.
Installing QEMU from source
My experience has been that using the qemu-system-sparc binary that is installed from APT or DNF will result in an unstable system with Solaris 8. For example, when using the 8.2.2 one that comes with Linux Mint 22, Solaris 8 would go into a boot loop after installation. Instead, I prefer to compile and install QEMU from the source tarball. This will also provide the latest bug fixes and enhancements. When I previously ran Solaris 8 on QEMU 9.2.2, I found that installing software from the second CD would crash due to an illegal instruction set error. This seems to have been resolved in the latest version as of November 2026, version 11.1.3.
The latest version of QEMU can be downloaded here: https://www.qemu.org/download/. After downloading it, extract the contents of the tarball with: tar xvJf qemu-11.1.3.tar.xz, then cd into qemu-11.1.3.
The biggest challenge for me was figuring out what dependencies were needed. This required running ./configure ‐‐target-list=sparc-softmmu in the extracted qemu-11.1.3 directory and seeing what dependencies were missing. For a Debian 13 install with a GUI, these are the dependencies I needed to install with APT:
apt install git glib-2.0 libgtk-3-dev meson ninja-build python3-sphinx python3-sphinx-rtd-theme python3-venv
On Linux Mint 22, I installed the same dependendencies except for glib-2.0:
apt install git libgtk-3-dev meson ninja-build python3-sphinx python3-sphinx-rtd-theme python3-venv
After this is done, you can then run the ./configure command. Optionally, you can specify a ‐‐target-list with the list of emulators you want to build, as you likely won’t need all of them. You only need the *-softmmu versions of the emulators. The list of targets can be found by running ./configure ‐‐help. For example, to build only the SPARC 32-bit emulator, run:
./configure --target-list=sparc-softmmu
Additional targets are separated by commas:
./configure --target-list=sparc-softmmu,sparc64-softmmu
If ./configure completes successfully, you can then build the binaries by running make command. To speed things up a bit, you can compile with make -j$(nproc) to leverage all of your system’s processors. Or if you’re not comfortable with using all of the processors, you can pick a number such as 2 or 4, as long as it’s less than the value of nproc. If the compile completes successfully, you can install the binaries to /usr/local/bin with sudo make install.
Configuring bridged networking (optional)
By default QEMU uses a NATted network called SLIRP, documented here. SLIRP works, but has some limitations. For example, it doesn’t allow ICMP and requires you to forward ports to it, similar to Docker. Instead, I prefer to use a Linux network bridge, which allows me to access the emulated machine on my internal network.
On a standard Debian CLI (non-graphical installation), the bridge interface can be configured in /etc/network/interfaces. Usually I will install bridge-utils (apt install -y bridge-utils) and reconfigure the network interfaces file as below, for a single-NIC system.
# The primary network interface
allow-hotplug eno1
iface eno1 inet manual

auto br0
iface br0 inet static
  address 192.168.2.44/24
  gateway 192.168.2.1
  bridge_ports eno1
  bridge_stp off
  bridge_waitport 0
  bridge_fd 0
Then restart the networking service with: sudo systemctl restart networking.
However, you may be running QEMU on an Enterprise Linux system or on a Debian system that uses Network Manager. This is slightly more cumbersome to configure. Below are the commands I used to configure a single bridged interface on a Debian system with a desktop interface. Enterprise Linux systems will be similar.
nmcli con del "Wired connection 1"
nmcli con add type bridge autoconnect yes con-name br0 ifname br0 ipv4.method manual ipv4.addresses 192.168.1.44/24 ipv4.gateway 192.168.1.1 ipv4.dns 192.168.1.1
nmcli con add type bridge-slave autoconnect yes con-name enp1s0 ifname enp1s0 master br0
I then rebooted the system. You can verify that the bridge interface came up with the ip addr command.
After the bridge interface is created, you will need to perform two additional steps to make it available to QEMU emulators running as non-privileged users. If you don’t perform these steps, the bridge interface will be unavailable to QEMU unless you run it as root, which should be avoided.
# Become root.
sudo su -
# If the system umask is set to 077, temporarily change it to 022.
umask 022
mkdir /usr/local/etc/qemu
echo "allow br0" > /usr/local/etc/qemu/bridge.conf
# Add the setuid privilege to /usr/local/libexec/qemu-bridge-helper
chmod u+s /usr/local/libexec/qemu-bridge-helper
Bridged networking and unique MAC addresses
When you specify the bridged network type with -nic bridge, by default QEMU will assign the machine a MAC address of 52:54:00:12:34:56 (per this source, which I have verified). As long as you’re confident that you have no other QEMU machines running on your network, this is probably acceptable. However, if you have doubts (such as on a corporate network) or if you do need to run multiple machines, you should generate a random MAC address using a one-liner (with Perl, Python, etc.) and override the MAC address with -nic bridge,mac=52:54:00:xx:xx:xx. All examples in this post will include the MAC address option.
Create and format the disk for Solaris
To create a virtual QCOW2 disk for a QEMU machine, simply run the below command, replacing 10 with the number of gigabytes you would like to allocate to the image.
qemu-img create -f qcow2 solaris8.qcow2 10G
The create command will tell also tell you the size of the image file in bytes, which you will need later. You can also obtain this with the command qemu-img info solaris8.qcow2. Note: qemu-img info will not work when the system is running, as QEMU puts a lock on the image file.
Obtaining Solaris 8 installation media
For this post, I’ve used this particular set of Solaris 8 ISOs: https://archive.org/details/solaris8_703sparc. Hopefully these continue to remain available in the future.
Format the disk
Before you can install Solaris, you will need to boot into single user mode and format the disk. First, start the machine with:
qemu-system-sparc -nic bridge,mac=52:54:00:xx:xx:xx -m 256M -drive file=solaris8.qcow2,if=scsi,bus=0,unit=0,media=disk -drive file=solaris_8_sparc_d1.iso,format=raw,if=scsi,bus=0,unit=1,media=cdrom,readonly=on
If you are running the QEMU machine on a system without a GUI, you can include the -nographic to run it in text mode.
qemu-system-sparc -nic bridge,mac=52:54:00:xx:xx:xx -m 256M -drive file=solaris8.qcow2,if=scsi,bus=0,unit=0,media=disk -drive file=solaris_8_sparc_d1.iso,format=raw,if=scsi,bus=0,unit=1,media=cdrom,readonly=on -nographic
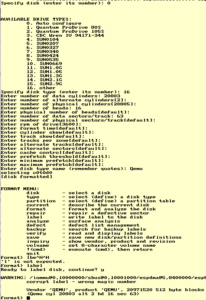
At the 0 > prompt, type boot cdrom:d -vs and hit enter. At the # prompt, type format command and hit enter. Select disk 0 and specify 18 (other) for the disk type. After this, you be prompted to enter the number of data cylinders. Below is the formula I used for determining this for a 10GB disk:
- I multiplied 16 heads by 63 sectors by 512 bytes per sector. This is going off the PATA standard, and I’m not sure it’s correct for SCSI. This comes to 516096.
- I divided 10737418240 bytes by 516096 = rounded down to 20805
- 20805 – 2 = 20803. This is the number of data cylinders.
For the other values, I entered:
- Enter 16 for the number of heads.
- Enter 63 for the number of data sectors/track.
- Enter whatever value you want for the disk type name. I chose Qemu.
- For the other values, press enter to accept the default value.
After the format completes, enter label at the format> prompt, hit enter, y, then enter again. Below is a screenshot of this process:
Enter quit at the format> prompt and reboot at the # prompt.
Start the installation
At the prompt, type boot cdrom:d and hit enter. This will start the Solaris 8 installation. For the most part it’s following the prompts. If you’re running the machine in non-graphical mode and the the function keys don’t work on your computer, you can use the keys ESC+2 etc.
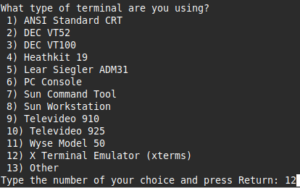
At the “What type of terminal are you using?” prompt on the text install, I chose 12, X Terminal Emulator:
For the disk layout, I chose auto format. For the software selection, I chose the Entire Distribution.
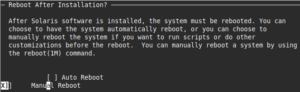
For the “Reboot After Installation?” prompt, choose Manual Reboot. This will provide you with an opportunity to shut down the machine and change to the second ISO.
After part one of the installation completes, you will be dropped to a root # prompt. Type poweroff and hit enter to power off the machine. Power back on the machine with the second installation ISO (add -nographic if installing in nographics mode).
qemu-system-sparc -nic bridge,mac=52:54:00:xx:xx:xx -m 256M -drive file=solaris8_2.qcow2,if=scsi,bus=0,unit=0,media=disk -drive file=Downloads/solaris_8_sparc_d2.iso,format=raw,if=scsi,bus=0,unit=1,media=cdrom,readonly=on
When the machine starts back up, you will be prompted to enter a root password. After entering this, the installation should continue from the second disk. On the most recent version of QEMU it had no issues completing. After the installation completes, the system will reboot. To power it on in the future without the CD-ROM, leave off the second drive:
qemu-system-sparc -nic bridge,mac=52:54:00:xx:xx:xx -m 256M -drive file=solaris8.qcow2,if=scsi,bus=0,unit=0,media=disk -nographic
Installing OpenSSH
If you installed Solaris 8 without a GUI, you will need to install OpenSSH in order to install Oracle. If you did install Solaris with a GUI, SSH is still nice to have, for copying files to the machine, etc. As I’ve mentioned in previous posts, Solaris 8 didn’t come with OpenSSH; it must be installed from the OpenCSW repository.
- Download the pkgutil package from OpenCSW. It can be found here.
- You will need to get the pkgutil.pkg file on to your Solaris machine. wget and curl aren’t available on Solaris (you can install them with pkgutil later), so your options are limited. You can set up an FTP server and use the FTP client to get it on the system. Or you can set up an NFS server that allows version 3 and mount it on the Solaris machine. This is what I did. For example, mount 192.168.1.1:/software /mnt.
- cd to /mnt and install the pkgutil package: pkgadd -d pkgutil.pkg
- After the package is installed, edit /etc/opt/csw/pkgutil.conf. Uncomment the “mirror” and change “testing” to “dublin”. This will pull the packages from the Internet. My Solaris 8 machine isn’t configured to connect to the Internet, so I mirrored the packages locally on an Nginx server. In the Nginx document root directory (/usr/share/nginx/html on Debian), I ran sudo mkdir -p opencsw/dublin/sparc/5.8, then sudo rsync -av rsync://mirrors.dotsrc.org/opencsw/dublin/i386/5.8/ opencsw/dublin/sparc/5.8/. The mirror instead was then set to: mirror=http://192.168.1.1/opencsw/dublin.
- Install OpenSSH with /opt/csw/bin/pkgutil -y -i openssh.
If connecting from a recent Linux SSH client, you may need to add the below to your .ssh/config so that you can connect to the Solaris system using deprecated ciphers, etc.:
Host sol8vm
  Ciphers aes128-cbc
  KexAlgorithms diffie-hellman-group1-sha1
  HostKeyAlgorithms +ssh-rsa
You should then be able to connect with ssh root@sol8vm or whatever the host name/IP address is of your VM. If you get this error when opening up a file in vi: I don’t know what kind of terminal you are on – all I have is ‘xterm-256color’, you can SSH in with your TERM variable set to xterm: TERM=xterm ssh root@sol8vm1.
Preparing for installing Oracle 8i
The Oracle 8i installation steps are mostly a clone what I’ve written for Solaris 8 on x86. First, I restarted the machine with the Oracle 8i ISO attached to the virtual CD-ROM drive:
qemu-system-sparc -nic bridge,mac=52:54:00:xx:xx:xx -m 256M -drive file=solaris8_2.qcow2,if=scsi,bus=0,unit=0,media=disk -drive file=Downloads/Oracle8iEE.iso,format=raw,if=scsi,bus=0,unit=1,media=cdrom,readonly=on -nographic
Next, I added the required kernel parameters to the bottom of /etc/system and rebooted the machine.
set shmsys:shminfo_shmmax=4294967295
set shmsys:shminfo_shmmin=1
set shmsys:shminfo_shmmni=100
set shmsys:shminfo_shmseg=10
set semsys:seminfo_semmni=100
set semsys:seminfo_semmsl=100
set semsys:seminfo_semmns=200
set semsys:seminfo_semopm=100
set semsys:seminfo_semvmx=32767
Next, I set up the /u01 mount point. As the auto-layout in the installation allocated more much space for /export/home than I needed, I decided to repurpose this partition for the combined software/data disk (Oracle tells you that these should be separate, but this is just a demo, not a production database).
- Run umount /export/home to unmount the partition.
- Create the directory /u01
- Edit /etc/vfstab and change the mount point /export/home to /u01
- mount /u01 with mount /u01
Create the Oracle user and groups
The Oracle 8i installation guide recommends creating an oracle user account, as well as the groups oinstall and dba. I created these and chown’d /u01 to oracle:oinstall
groupadd oinstall
groupadd dba
useradd -g oinstall -G dba -m -d /export/home/oracle oracle
passwd oracle
chown oracle:oinstall /u01
Per the instructions, I added the below to .profile in the home directory of the oracle user. I also set the LD_LIBRARY_PATH, which isn’t mentioned in the instructions, but can be helpful when compiling stuff.
ORACLE_BASE=/u01/app/oracle
export ORACLE_BASE
ORACLE_HOME=$ORACLE_BASE/product/8.1.5
export ORACLE_HOME
PATH=$PATH:$ORACLE_HOME/bin
export PATH
LD_LIBRARY_PATH=$LD_LIBRARY_PATH:$ORACLE_HOME/lib
export LD_LIBRARY_PATH
Installing Oracle 8i
If the Oracle8i Enterprise Edition is mounted in the machine, you can start the installation. First, open two SSH sessions:
- A session as root, for running certain scripts required by the installer: TERM=xterm ssh root@sol8vm.
- Another session as the oracle user, but with the -X option specified for X11 forwarding: ssh -X oracle@sol8vm.
In the oracle user session, cd to /cdrom/cdrom0 and run ./runInstaller. The Oracle Universal Installer from the late 90s should then pop up on the desktop of your modern computer.
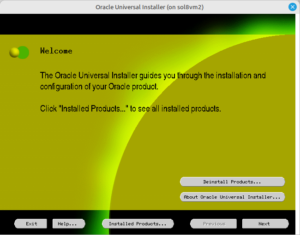
Below lists some the choices I made during the installation:
- For “File Locations”, “Destination”, /u01/app/oracle/product/8.1.5 was already selected, as this was inherited from the ORACLE_HOME variable set in my .profile.
- For UNIX Group Name, I put oinstall. It will then prompt you to run /tmp/OraInstall/orainstRoot.sh in a root terminal. Click Retry when this is done.
- Select Oracle8i Enterprise Edition for the product to install.
- For “Installation Types”, I chose “Typical”.
- For “Database Identification,” choose whatever (mattdb in my case).
- I chose to put the database files in /u01/db.
- Run /u01/app/oracle/product/8.1.5/root.sh when prompted during the database creation.
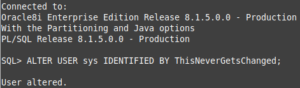
After the installation completes, you should be able to connect to the database with SQLPlus as the sys user: strong>sqlplus sys@your_db. The initial password for the sys account is change_on_install. This can be changed in SQLPlus with ALTER USER sys IDENTIFIED BY yourpassword;.
Configuring Oracle to stop on shutdown and start on boot
Having an init script for Oracle saves you the trouble of having to remember to run the dbstart and dbshut commands whenever you start up or shut down your Solaris system. Chapter 4 of the Oracle 8i Installation Guide provides the steps for creating the init script and making Oracle start/stop automatically.
First, become the root user (su –) and edit the /var/opt/oracle/oratab file. Change the N next to your database entry to a Y:

I created the init script /etc/init.d/dbora as below. In addition to having the script start and stop the database, I also have it start and stop the listener.
#!/bin/sh
# Set ORA_HOME to be equivalent to the ORACLE_HOME
# from which you wish to execute dbstart and
# dbshut
# set ORA_OWNER to the user id of the owner of the
# Oracle database in ORA_HOME
ORA_HOME=/u01/app/oracle/product/8.1.5
ORA_OWNER=oracle

case "$1" in
'start')
# Start the Oracle databases:
# The following command assumes that the oracle login will not prompt the
# user for any values
su - $ORA_OWNER -c "$ORA_HOME/bin/dbstart"
su - $ORA_OWNER -c "$ORA_HOME/bin/lsnrctl start"
;;
'stop')
# Stop the Oracle databases:
# The following command assumes that the oracle login will not prompt the
# user for any values
su - $ORA_OWNER -c "$ORA_HOME/bin/dbshut"
su - $ORA_OWNER -c "$ORA_HOME/bin/lsnrctl stop"
;;
esac
I then made the script executable and linked it to the appropriate run levels:
chmod 744 /etc/init.d/dbora
ln -s /etc/init.d/dbora /etc/rc0.d/K10dbora
ln -s /etc/init.d/dbora /etc/rc2.d/S99dbora
Installing GCC and Make
Solaris 8 did not come with GCC installed. If you have already set up pkgutil, this can be installed with the command /opt/csw/bin/pkgutil -y -i gcc3. In addition to gcc3, I installed GMake and Vim.
/opt/csw/bin/pkgutil -y -i gcc3 gmake vim
I also added /opt/csw/gcc3/bin to the PATH for the oracle user in .profile:
PATH=$PATH:$ORACLE_HOME/bin:/opt/csw/gcc3/bin
Compiling Perl from source
My original goal with this post was to make use of the version of Perl that came with Solaris 8, 5.005_03. However, I ran into a few issues getting the modules I wanted to use compiled, so I ended up compiling a newer version of Perl from source. I decided to compile Perl 5.6, which dates back to 2003, the same year that my release of Solaris 8 is from. To me, this would have been a more realistic experience late 90s/early 2000s experience than installing an updated Perl package from OpenCSW.
I downloaded the tarball of Perl 5.6.2 from CPAN’s site: https://www.cpan.org/src. I then SCP’d it to /tmp on the Solaris machine, extracted it with gunzip -c perl-5.6.2.tar.gz | tar -xf –, and cd’d into /tmp/perl-5.6.2. I also temporarily added the path to GCC and GMake in order to run the build: export PATH=$PATH:/opt/csw/bin:/opt/csw/gcc3/bin. In the directory, I ran the below to build and install Perl to /usr/local/bin/perl:
./Configure -des -Dprefix=/usr/local
gmake
gmake test
gmake install
This will take a while of course. After all, QEMU is trying to emulate a SPARCstation 5 from 1994. Also, some of the tests did fail, but that didn’t matter; everything seemed to work fine after installation.
Compiling and installing Perl modules
For this post, I installed four Perl modules, the links to which can be found below. These are versions that are compatible with Perl 5.6. DBI and DBD::Oracle were built as the oracle user, but the others were built as root.
Template::Toolkit and Config::Tiny were built and installed using the below commands as root. With Template::Toolkit, I entered “n” for all of the optional components, which I did not need.
export PATH=$PATH:/opt/csw/gcc3/bin
gunzip -c Template-Toolkit-2.14.tar.gz | tar -xf -
cd Template-Toolkit-2.14
/usr/local/bin/perl Makefile.PL
gmake
gmake install

gunzip -c Config-Tiny-1.tar.gz | tar -xf -
cd Config-Tiny-1
/usr/local/bin/perl Makefile.PL
gmake
gmake install
Compiling DBI and DBD::Oracle was similarly straightforward, as I didn’t need to override any parameters. I did these both as the oracle user.
export PATH=$PATH:/opt/csw/gcc3/bin
gunzip -c DBI-1.28.tar.gz | tar -xf -
cd DBI-1.28
/usr/local/bin/perl Makefile.PL
gmake
su -u root -c "cd /export/home/oracle/DBI-1.28 && /opt/csw/bin/gmake install"

gunzip -c DBD-Oracle-1.14.tar.gz | tar -xf -
cd DBD-Oracle-1.14
/usr/local/bin/perl Makefile.PL
gmake
su -u root -c "cd /export/home/oracle/DBD-Oracle-1.14 && /opt/csw/bin/gmake install"
Setting up Apache
Similar to my last post, I set up Apache on Solaris by doing the following:
- mv /etc/apache/httpd.conf-example /etc/apache/httpd.conf
- Set the ServerName directive in /etc/apache/httpd.conf to the hostname of my machine.
- Added the below environment variables to /etc/apache/httpd.conf
- Started Apache with: /etc/init.d/apache start
SetEnv LD_LIBRARY_PATH "/u01/app/oracle/product/8.1.5/lib"
SetEnv ORACLE_HOME "/u01/app/oracle/product/8.1.5"
I loaded in the inventory system data from my last post from SQLPlus using the SQL command @./inventory.sql. The SQL file is below.
DROP USER inventory CASCADE;
CREATE USER inventory IDENTIFIED BY "abc1234";
GRANT connect, resource TO inventory;
ALTER USER inventory QUOTA 100M ON users;
CONNECT inventory/abc1234@mattdb;

SET AUTOCOMMIT ON;

CREATE SEQUENCE domains_seq;

CREATE TABLE domains (
    domain_id NUMBER,
    domain_name VARCHAR2(30) NOT NULL,
    create_dt DATE DEFAULT SYSDATE NOT NULL,
    PRIMARY KEY (domain_id),
    UNIQUE (domain_name)
);

CREATE OR REPLACE TRIGGER domains_on_insert
  BEFORE INSERT ON domains
  FOR EACH ROW
BEGIN
  SELECT domains_seq.nextval
  INTO :new.domain_id
  FROM dual;
END;
/

CREATE SEQUENCE locations_seq;

CREATE TABLE locations (
    location_id NUMBER,
    location_name VARCHAR2(50) NOT NULL,
    create_dt DATE DEFAULT SYSDATE NOT NULL,
    PRIMARY KEY (location_id),
    UNIQUE (location_name)
);

CREATE OR REPLACE TRIGGER locations_on_insert
  BEFORE INSERT ON locations
  FOR EACH ROW
BEGIN
  SELECT locations_seq.nextval
  INTO :new.location_id
  FROM dual;
END;
/

CREATE SEQUENCE hw_models_seq;

CREATE TABLE hw_models (
    hw_model_id NUMBER,
    hw_manufacturer VARCHAR2(30) NOT NULL,
    hw_model VARCHAR2(30) NOT NULL,
    create_dt DATE DEFAULT SYSDATE NOT NULL,
    PRIMARY KEY (hw_model_id)
);

CREATE OR REPLACE TRIGGER hw_models_on_insert
  BEFORE INSERT ON hw_models
  FOR EACH ROW
BEGIN
  SELECT hw_models_seq.nextval
  INTO :new.hw_model_id
  FROM dual;
END;
/

CREATE SEQUENCE os_seq;

CREATE TABLE operating_systems (
    os_id NUMBER,
    os_vendor VARCHAR2(30) NOT NULL,
    os_name VARCHAR2(30) NOT NULL,
    os_version VARCHAR2(10) NOT NULL,
    create_dt DATE DEFAULT SYSDATE NOT NULL,
    PRIMARY KEY (os_id)
);

CREATE OR REPLACE TRIGGER os_on_insert
  BEFORE INSERT ON operating_systems
  FOR EACH ROW
BEGIN
  SELECT os_seq.nextval
  INTO :new.os_id
  FROM dual;
END;
/

CREATE SEQUENCE inventory_seq START WITH 200000;

CREATE TABLE inventory (
    inventory_id NUMBER,
    name VARCHAR2(30) NOT NULL,
    serial_num VARCHAR2(30) NOT NULL,
    domain_id NUMBER NOT NULL,
    location_id NUMBER NOT NULL,
    hw_model_id NUMBER NOT NULL,
    os_id NUMBER NOT NULL,
    static_ip VARCHAR2(15),
    create_dt DATE DEFAULT SYSDATE NOT NULL,
    update_dt DATE NULL,
    PRIMARY KEY (inventory_id),
    UNIQUE (name),
    UNIQUE (serial_num),
    FOREIGN KEY (domain_id) REFERENCES domains(domain_id),
    FOREIGN KEY (location_id) REFERENCES locations(location_id),
    FOREIGN KEY (hw_model_id) REFERENCES hw_models(hw_model_id),
    FOREIGN KEY (os_id) REFERENCES operating_systems(os_id)
);

CREATE OR REPLACE TRIGGER inventory_on_insert
  BEFORE INSERT ON inventory
  FOR EACH ROW
BEGIN
  SELECT inventory_seq.nextval
  INTO :new.inventory_id
  FROM dual;
END;
/

INSERT INTO domains (domain_name) VALUES ('dev.example.net');
INSERT INTO domains (domain_name) VALUES ('prod.example.net');
INSERT INTO domains (domain_name) VALUES ('ad.example.net');

INSERT INTO locations (location_name) VALUES ('New York Sales Office');
INSERT INTO locations (location_name) VALUES ('San Francisco Sales Office');
INSERT INTO locations (location_name) VALUES ('Raleigh, NC Office');
INSERT INTO locations (location_name) VALUES ('Atlanta Data Center');
INSERT INTO locations (location_name) VALUES ('Sacramento Data Center');

INSERT INTO hw_models (hw_manufacturer,hw_model) VALUES ('Sun Microsystems','V210');
INSERT INTO hw_models (hw_manufacturer,hw_model) VALUES ('Sun Microsystems','V240');
INSERT INTO hw_models (hw_manufacturer,hw_model) VALUES ('Sun Microsystems','X2100');
INSERT INTO hw_models (hw_manufacturer,hw_model) VALUES ('Sun Microsystems','SunBlade 100');
INSERT INTO hw_models (hw_manufacturer,hw_model) VALUES ('Sun Microsystems','SunBlade 150');
INSERT INTO hw_models (hw_manufacturer,hw_model) VALUES ('Sun Microsystems','Ultra 5');
INSERT INTO hw_models (hw_manufacturer,hw_model) VALUES ('Hewlett-Packard','Proliant DL360 G4');
INSERT INTO hw_models (hw_manufacturer,hw_model) VALUES ('Hewlett-Packard','Proliant DL360 G5');
INSERT INTO hw_models (hw_manufacturer,hw_model) VALUES ('Hewlett-Packard','Proliant DL360 G6');
INSERT INTO hw_models (hw_manufacturer,hw_model) VALUES ('Lenovo','Thinkpad T400');
INSERT INTO hw_models (hw_manufacturer,hw_model) VALUES ('Lenovo','Thinkpad T410');
INSERT INTO hw_models (hw_manufacturer,hw_model) VALUES ('Lenovo','Thinkpad T420');
INSERT INTO hw_models (hw_manufacturer,hw_model) VALUES ('Lenovo','Thinkpad X61');
INSERT INTO hw_models (hw_manufacturer,hw_model) VALUES ('Lenovo','Thinkpad X220');

INSERT INTO operating_systems (os_vendor,os_name,os_version) VALUES ('Sun Microsystems','Solaris','8');
INSERT INTO operating_systems (os_vendor,os_name,os_version) VALUES ('Sun Microsystems','Solaris','9');
INSERT INTO operating_systems (os_vendor,os_name,os_version) VALUES ('Sun Microsystems','Solaris','10');
INSERT INTO operating_systems (os_vendor,os_name,os_version) VALUES ('Red Hat','Red Hat Linux','6.2');
INSERT INTO operating_systems (os_vendor,os_name,os_version) VALUES ('Red Hat','RHEL','4.8');
INSERT INTO operating_systems (os_vendor,os_name,os_version) VALUES ('Red Hat','RHEL','5.4');
INSERT INTO operating_systems (os_vendor,os_name,os_version) VALUES ('Open Source','CentOS','4.8');
INSERT INTO operating_systems (os_vendor,os_name,os_version) VALUES ('Open Source','CentOS','5.6');
INSERT INTO operating_systems (os_vendor,os_name,os_version) VALUES ('Microsoft','Windows Server','2008R2');
INSERT INTO operating_systems (os_vendor,os_name,os_version) VALUES ('Microsoft','Windows','XP');
INSERT INTO operating_systems (os_vendor,os_name,os_version) VALUES ('Sun Microsystems','Solaris','2.6');

INSERT INTO inventory (name,domain_id,location_id,hw_model_id,os_id,static_ip,serial_num) VALUES ('jasmith-x61',3,1,13,10,NULL,'0RQ0VYOPSO');
INSERT INTO inventory (name,domain_id,location_id,hw_model_id,os_id,static_ip,serial_num) VALUES ('ddraper-x220',3,1,14,10,NULL,'UJBOLIP5IC');
INSERT INTO inventory (name,domain_id,location_id,hw_model_id,os_id,static_ip,serial_num) VALUES ('pmueller-sb100',1,3,4,2,'10.2.0.77','YMEVKDCVA2');
INSERT INTO inventory (name,domain_id,location_id,hw_model_id,os_id,static_ip,serial_num) VALUES ('pmueller-t420',3,3,12,10,NULL,'P1P7Z5WZZC');
INSERT INTO inventory (name,domain_id,location_id,hw_model_id,os_id,static_ip,serial_num) VALUES ('sac-prod-web-1',2,5,9,6,'10.0.0.5','KCJQI0GBT4');
INSERT INTO inventory (name,domain_id,location_id,hw_model_id,os_id,static_ip,serial_num) VALUES ('sac-prod-db-1',2,5,9,6,'10.0.0.15','22AZCLKDS9');
INSERT INTO inventory (name,domain_id,location_id,hw_model_id,os_id,static_ip,serial_num) VALUES ('sac-prod-fs-1',2,5,2,3,'10.0.0.22','WH52HKBUJ0');
INSERT INTO inventory (name,domain_id,location_id,hw_model_id,os_id,static_ip,serial_num) VALUES ('atl-dev-web-1',1,4,7,8,'10.10.0.50','SUVJ2H44GY');
INSERT INTO inventory (name,domain_id,location_id,hw_model_id,os_id,static_ip,serial_num) VALUES ('atl-dev-ldap-1',1,4,7,7,'10.10.0.52','02187Z7HTN');
INSERT INTO inventory (name,domain_id,location_id,hw_model_id,os_id,static_ip,serial_num) VALUES ('atl-dev-db-1',1,4,7,8,'10.10.0.54','RDH3MOM9KP');

CREATE TABLE recycling_bin (
    inventory_id NUMBER,
    name VARCHAR2(30) NOT NULL,
    serial_num VARCHAR2(30) NOT NULL,
    domain_id NUMBER NOT NULL,
    location_id NUMBER NOT NULL,
    hw_model_id NUMBER NOT NULL,
    os_id NUMBER NOT NULL,
    static_ip VARCHAR2(15),
    create_dt DATE DEFAULT SYSDATE NOT NULL,
    delete_dt DATE NOT NULL,
    PRIMARY KEY (inventory_id),
    UNIQUE (name),
    UNIQUE (serial_num)
);

CREATE OR REPLACE TRIGGER inventory_on_delete
  BEFORE DELETE ON inventory
  FOR EACH ROW
BEGIN
  INSERT INTO recycling_bin
  (inventory_id,
    name,
    serial_num,
    domain_id,
    location_id,
    hw_model_id,
    os_id,
    static_ip,
    create_dt,
    delete_dt
   )
  values(:old.inventory_id,
            :old.name,
            :old.serial_num,
            :old.domain_id,
            :old.location_id,
            :old.hw_model_id,
            :old.os_id,
            :old.static_ip,
            :old.create_dt,
            SYSDATE);
END;
/

SET AUTOCOMMIT OFF;
After creating the schema, I created a simple CGI script to test out Perl, placing it in /var/apache/cgi-bin and setting the mode to 755:
#!/usr/local/bin/perl -w

use strict;
use DBI;
use CGI;
use POSIX qw(strftime);
use Template;

my $dbh = DBI->connect('dbi:Oracle:mattdb', 'inventory', 'abc1234') || die( $DBI::errstr . "\n" );

my $date = strftime('%B %m, %Y', localtime);
my $cgi = CGI->new;
print $cgi->header('text/html');

my $sql = <<'SQL';
SELECT i.INVENTORY_ID, i.NAME, d.DOMAIN_NAME, l.LOCATION_NAME,
h.HW_MANUFACTURER || ' ' || h.HW_MODEL AS HW_MODEL,
o.OS_VENDOR || ' ' || o.OS_NAME || ' ' || o.OS_VERSION AS OS,
NVL(i.STATIC_IP,'DHCP') AS IP
FROM inventory i, domains d, locations l, hw_models h,
operating_systems o
WHERE i.domain_id = d.domain_id
AND i.location_id = l.location_id
AND i.hw_model_id = h.hw_model_id
AND i.os_id = o.os_id
ORDER BY INVENTORY_ID
SQL

my $sth = $dbh->prepare($sql) || die "Can't prepare statement: $DBI::errstr";
$sth->execute || die "Can't execute statement: $DBI::errstr";
my $rows = $sth->fetchall_hashref('INVENTORY_ID');
$sth->finish();
$dbh->disconnect;

my $tt_vars = {
    date => $date,
    rows => $rows
};
my $tt = Template->new();
$tt->process('inventory_report.tt', $tt_vars) || die $tt->error;
I can confirm that it worked:
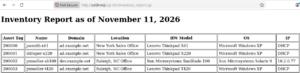
I tested out the other CGI scripts from my last post and they worked as expected after changing the Perl path to /usr/local/bin/perl.
This concludes my post. As always, thanks for reading!