
Introduction
This will be a shorter post and somewhat of an extension of my last post on building a lab environment in Proxmox VE. Here I’ll explore running Proxmox VE inside of KVM virtual machines using nested virtualization, instead of on bare metal systems. This is useful if you want to experiment with Proxmox VE, but don’t have any extra PCs laying around to run it on. The performance is not as good when compared to running it on physical hardware, but at the same time it has the advantage of being to spin a cluster up and down without having to reinstall the OS on an actual computer. In this post, I will spin up the same Terraform lab environment in Proxmox VE, but with nested virtualization instead of running it on physical hardware. A “bonus” section will involve swapping out Bind and isc-dhcp-server for Dnsmasq in the lab environment.
KVM host setup
I won’t go into too much detail on setting up KVM; there are better guides out there on how to do this. You will need a network bridge that can reach out to the Internet. Either the default libvirt network or a bridge interface on the physical computer’s NIC should work. I chose to use the br0 interface tied to the physical interface to enable accessing Proxmox VE from other computers on my network. For Debian 12/13, the below /etc/network/interfaces snippet can be used to set up a network bridge for KVM (install bridge-utils with sudo apt install bridge-utils). You will need to change eno1 to whatever your physical NIC identifier is. After modifying the file, apply the change with sudo systemctl restart networking.
# The primary network interface
allow-hotplug eno1
iface eno1 inet manual

auto br0
iface br0 inet dhcp
  bridge_ports eno1
  bridge_stp off
  bridge_waitport 0
  bridge_fd 0
Or on systems that use Netplan, such as Ubuntu, edit /etc/netplan/50-cloud-init.yaml to something similar to below. Install bridge-utils and then apply with sudo netplan apply.
network:
  version: 2
  ethernets:
    eno1: {}
  bridges:
    br0:
      dhcp4: true
      interfaces: [ eno1 ]
Of course if you’re doing this on a desktop PC or laptop with a GUI, you might use something else to set up networking for KVM, such as NetworkManager.
KVM can be installed manually (sudo apt install ‐‐no‐install‐recommends qemu-kvm libvirt-daemon-system libvirt-daemon virtinst libosinfo-bin libguestfs-tools) or with something like Ansible (code snippet below).
---
- hosts: localhost

  tasks:
  - name: Check if virtualization extensions are enabled
    ansible.builtin.shell: "grep -q -E 'svm|vmx' /proc/cpuinfo"
    register: grep_cpuinfo_result

  - name: Fail if virtualization extensions are disabled
    ansible.builtin.fail:
      msg: 'Virtualization extensions are disabled'
    when: grep_cpuinfo_result.rc > 0

  - name: Install required packages
    ansible.builtin.apt:
      name:
        - libguestfs-tools
        - libosinfo-bin
        - libvirt-daemon
        - libvirt-daemon-system
        - qemu-kvm
        - virtinst
      state: present
      install_recommends: false
VM network setup
The virtual machines inside the Proxmox VE cluster reside on an isolated virtual local area network (VLAN). Access in and out of the environment transits through an HA pair of router VMs that have NICs on the external (my LAN) and lab networks. The lab network can be defined with libvirt by creating an XML file with the network information and importing it with the virsh net-define command. Optionally, you can give the bridge an IP address on the same network, with the “ip” tag; this allows one to access the VMs directly from the host, as opposed to having to “jump” through one of the router VMs. Below is an example libvirt XML file:
<network>
  <name>lab</name>
  <bridge name="virbr20" stp="on" delay="0"/>
  <ip address="192.168.20.5" netmask="255.255.255.0"/>
</network>
Create the above file, then define and enable the network with:
virsh net-define lab.xml
virsh net-start lab
virsh net-autostart lab
Provisioning the Proxmox VMs
You can, of course, download the Proxmox VE ISO and install it with virt-install or virt-manager. I find running through an interactive installation tedious and prefer to automate things as much as possible. Hence, my preferred installation method is to install Debian 13 using an automated preseed file, and then install Proxmox VE on top of that using Ansible.
First, an example Debian preseed file. It is a pretty basic one. Set d-i mirror/http/proxy string to nothing if you don’t use a proxy server for APT (I use apt-cacher-ng to save bandwidth).
d-i debian-installer/locale string en_US
d-i keyboard-configuration/xkb-keymap select us
d-i netcfg/choose_interface select auto
d-i netcfg/disable_autoconfig boolean true
d-i netcfg/get_ipaddress string 192.168.1.71
d-i netcfg/get_netmask string 255.255.255.0
d-i netcfg/get_gateway string 192.168.1.1
d-i netcfg/get_nameservers string 192.168.1.1
d-i netcfg/confirm_static boolean true
d-i netcfg/get_hostname string proxmoxvm1
d-i netcfg/get_domain string ridpath.mbr
d-i netcfg/hostname string proxmoxvm1
d-i netcfg/wireless_wep string
d-i hw-detect/load_firmware boolean false
d-i mirror/country string manual
d-i mirror/http/hostname string http.us.debian.org
d-i mirror/http/directory string /debian
d-i mirror/http/proxy string http://192.168.1.17:3142
d-i passwd/root-login boolean false
d-i passwd/make-user boolean true
d-i passwd/user-fullname string Ansible User
d-i passwd/username string ansible
d-i passwd/user-password-crypted password a-hash-generated-with-mkpasswd
d-i clock-setup/utc boolean true
d-i time/zone string US/Eastern
d-i clock-setup/ntp boolean true
d-i clock-setup/ntp-server string 0.pool.ntp.org
d-i partman-auto/init_automatically_partition select biggest_free
d-i partman-auto/method string regular
d-i partman-lvm/device_remove_lvm boolean true
d-i partman-md/device_remove_md boolean true
d-i partman-lvm/confirm boolean true
d-i partman-lvm/confirm_nooverwrite boolean true
d-i partman-auto/choose_recipe select atomic
d-i partman-partitioning/confirm_write_new_label boolean true
d-i partman/choose_partition select finish
d-i partman/confirm boolean true
d-i partman/confirm_nooverwrite boolean true
d-i partman-md/confirm boolean true
d-i partman-partitioning/confirm_write_new_label boolean true
d-i partman/choose_partition select finish
d-i partman/confirm boolean true
d-i partman/confirm_nooverwrite boolean true
d-i apt-setup/cdrom/set-first boolean false
tasksel tasksel/first multiselect standard, ssh-server
d-i pkgsel/include string sudo qemu-guest-agent
popularity-contest popularity-contest/participate boolean false
d-i grub-installer/only_debian boolean true
d-i grub-installer/with_other_os boolean true
d-i grub-installer/bootdev string default
d-i finish-install/keep-consoles boolean true
d-i finish-install/reboot_in_progress note
You will need to download the Debian 13 network install ISO from here. The installation can be then kicked off with something like below. The RAM, CPUs, etc. options may need to be adjusted for what the physical hardware is capable of.
virt-install -n proxmoxvm1 --memory 16384 --vcpus 4 --disk path=/var/lib/libvirt/proxmoxvm1.qcow2,size=50,format=qcow2 --network bridge=br0 --network bridge=virbr20 --graphics none --console pty,target_type=serial --noautoconsole --os-variant debian13 --initrd-inject proxmoxvm1.cfg --extra-args="auto-install/enable=true netcfg/choose_interface=auto netcfg/disable_autoconfig=true netcfg/get_ipaddress=192.168.1.71 netcfg/get_netmask=255.255.255.0 netcfg/get_gateway=192.168.1.1 netcfg/get_nameservers=192.168.1.1 netcfg/get_hostname=proxmoxvm1 netcfg/get_domain=ridpath.mbr netcfg/hostname=proxmoxvm1 preseed/file=/proxmoxvm1.cfg --- console=ttyS0,115200n8" -l /home/matthew/Downloads/debian-13.3.0-amd64-netinst.iso
A few notes on the above:
- The network interface with internet access should be the first one specified.
- Remove ––noautoconsole to watch the installation.
- ––initrd-inject copies the preseed file directly into the installer’s initrd, eliminating the need to host it on a web server.
- The ––extra-args option is quite long. My experience has been that if the above parameters aren’t specified, the installation will prompt you for them, even though already specified in the preseed file.
- After the installation completes, start the VM with virsh start vm_name.
Automating the VM provisioning with a Bash script
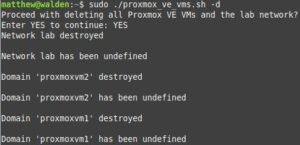
My original goal with this exercise was to automate the creation of these VMs with Terraform; however, the Terraform provider for libvirt does not perform ISO installations. My goal was to be able to spin this environment up when needed, and delete it when I no longer need it. I ended up accomplishing this with a Bash script. When executed without any options, the script, proxmox_ve_vms.sh, will create the lab network and provision the virtual machines. When executed with the –d option, the script will delete the network and the VMs.
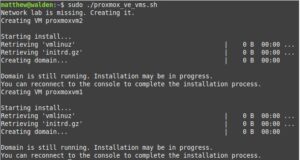
Below is the code snippet of the script. The VM_HOSTS variable is an associative array, allowing multiple hostname=IP pairs. If just building one host, this is could be changed to single variables and the for loop removed.
#!/bin/bash

while getopts ":d" option; do
   case $option in
      d)
         DELETE=1
         ;;
     \?)
         echo "Error: Invalid option"
         exit 1;;
   esac
done

declare -A VM_HOSTS=( [proxmoxvm1]=192.168.1.71 [proxmoxvm2]=192.168.1.72 )
DOMAIN=ridpath.mbr
DNS=192.168.1.1
GW=192.168.1.1
HOST_LAB_IP=192.168.20.5
LAB_NET=lab
LAB_BRIDGE=virbr20
PW_HASH='a-hash-generated-with-mkpasswd'
TIMEZONE='US/Eastern'
APT_PROXY='http://192.168.1.17:3142'
RAM=16384
VCPUS=4
DISK=50
NETINST_ISO='/home/matthew/Downloads/debian-13.3.0-amd64-netinst.iso'

add_net() {
  echo "Network $LAB_NET is missing. Creating it."
  cat > ${LAB_NET}.xml <<DELIM
<network>
  <name>${LAB_NET}</name>
  <bridge name="${LAB_BRIDGE}" stp="on" delay="0"/>
  <ip address='${HOST_LAB_IP}' netmask='255.255.255.0'/>
</network>
DELIM
  virsh net-define ${LAB_NET}.xml > /dev/null
  virsh net-start $LAB_NET > /dev/null
  virsh net-autostart $LAB_NET > /dev/null
}

del_net() {
  virsh net-destroy ${LAB_NET}
  virsh net-undefine ${LAB_NET}
}

add_host() {
  HOST=$1
  IP=$2
  if [[ ! -f "$NETINST_ISO" ]] ; then
    echo "net-install ISO $NETINST_ISO not found!"
    exit 1
  fi

  echo "Creating VM $HOST"

  tpage --define hostname=$HOST --define ip=$IP \
  --define domain=$DOMAIN --define dns=$DNS --define gw=$GW \
  --define pw_hash=$PW_HASH --define timezone=$TIMEZONE \
  --define apt_proxy=$APT_PROXY preseed.cfg.tt > ${HOST}.cfg

  virt-install --name $HOST --memory $RAM --vcpus $VCPUS \
  --disk path=/var/lib/libvirt/${HOST}.qcow2,size=${DISK},format=qcow2 \
  --network bridge=br0 --network bridge=${LAB_BRIDGE} --graphics none \
  --console pty,target_type=serial --noautoconsole \
  --os-variant debian13 --initrd-inject ${HOST}.cfg \
  --location $NETINST_ISO \
  --extra-args="auto-install/enable=true netcfg/choose_interface=auto netcfg/disable_autoconfig=true netcfg/get_ipaddress=${IP} netcfg/get_netmask=255.255.255.0 netcfg/get_gateway=${GW} netcfg/get_nameservers=${DNS} netcfg/get_hostname=${HOST} netcfg/get_domain=${DOMAIN} netcfg/hostname=${HOST} preseed/file=/${HOST}.cfg --- console=ttyS0,115200n8"
  sleep 5
  rm -f ${HOST}.cfg
}

del_host() {
  HOST=$1
  virsh domstate $HOST | grep -q running && virsh destroy $HOST
  virsh undefine $HOST
  rm -f /var/lib/libvirt/images/${HOST}.qcow2
}

if virsh net-info $LAB_NET > /dev/null 2>&1 ; then
  if [[ $DELETE -eq 1 ]] ; then
    echo "Proceed with deleting all Proxmox VE VMs and the $LAB_NET network?"
    read -p "Enter YES to continue: " RESP
    if [[ "$RESP" = 'YES' ]] ; then
      del_net
    else
      exit
    fi
  fi
else
  if [[ $DELETE -ne 1 ]] ; then
    add_net
  fi
fi

for host in "${!VM_HOSTS[@]}" ; do
  if virsh dominfo $host > /dev/null 2>&1 ; then
    if [[ $DELETE -eq 1 ]] ; then
      del_host $host
    else
      read -p "Host $host already exists. Enter YES to delete it: " RESP
      if [[ "$RESP" = 'YES' ]] ; then
        del_host $host
        add_host $host ${VM_HOSTS[$host]}
      fi
    fi
  else
    if [[ $DELETE -ne 1 ]] ; then
      add_host $host ${VM_HOSTS[$host]}
    fi
  fi
done
Because I like Perl, I used the Perl Template Toolkit and the tpage command to generate the preseed files from a template. It can be installed on Debian/Ubuntu with sudo apt install libtemplate-perl. You can use another templating engine, such as the Python Jinja2 engine with the j2cli program (apparently no longer maintained) or Ruby’s ERB engine. Below is the Template Toolkit preseed template I used for this exercise:
d-i debian-installer/locale string en_US
d-i keyboard-configuration/xkb-keymap select us
d-i netcfg/choose_interface select auto
d-i netcfg/disable_autoconfig boolean true
d-i netcfg/get_ipaddress string [% ip %]
d-i netcfg/get_netmask string 255.255.255.0
d-i netcfg/get_gateway string [% gw %]
d-i netcfg/get_nameservers string [% dns %]
d-i netcfg/confirm_static boolean true
d-i netcfg/get_hostname string [% hostname %]
d-i netcfg/get_domain string [% domain %]
d-i netcfg/hostname string [% hostname %]
d-i netcfg/wireless_wep string
d-i hw-detect/load_firmware boolean false
d-i mirror/country string manual
d-i mirror/http/hostname string http.us.debian.org
d-i mirror/http/directory string /debian
d-i mirror/http/proxy string [% apt_proxy %]
d-i passwd/root-login boolean false
d-i passwd/make-user boolean true
d-i passwd/user-fullname string Ansible User
d-i passwd/username string ansible
d-i passwd/user-password-crypted password [% pw_hash %]
d-i clock-setup/utc boolean true
d-i time/zone string [% timezone %]
d-i clock-setup/ntp boolean true
d-i clock-setup/ntp-server string 0.pool.ntp.org
d-i partman-auto/init_automatically_partition select biggest_free
d-i partman-auto/method string regular
d-i partman-lvm/device_remove_lvm boolean true
d-i partman-md/device_remove_md boolean true
d-i partman-lvm/confirm boolean true
d-i partman-lvm/confirm_nooverwrite boolean true
d-i partman-auto/choose_recipe select atomic
d-i partman-partitioning/confirm_write_new_label boolean true
d-i partman/choose_partition select finish
d-i partman/confirm boolean true
d-i partman/confirm_nooverwrite boolean true
d-i partman-md/confirm boolean true
d-i partman-partitioning/confirm_write_new_label boolean true
d-i partman/choose_partition select finish
d-i partman/confirm boolean true
d-i partman/confirm_nooverwrite boolean true
d-i apt-setup/cdrom/set-first boolean false
tasksel tasksel/first multiselect standard, ssh-server
d-i pkgsel/include string sudo qemu-guest-agent
popularity-contest popularity-contest/participate boolean false
d-i grub-installer/only_debian boolean true
d-i grub-installer/with_other_os boolean true
d-i grub-installer/bootdev string default
d-i finish-install/keep-consoles boolean true
d-i finish-install/reboot_in_progress note
Installing and configuring Proxmox VE
This section is really just a clone of previous sections on installing Proxmox VE in Debian 13 using Ansible. I discuss this in more detail in my last post. The below files are what is needed for this. The playbook is then run with something like ansible-playbook -Kkb -D proxmox.yml.
[proxmox]
proxmoxvm[1:2]

[leader]
proxmoxvm1

[followers]
proxmoxvm2
source /etc/network/interfaces.d/*

auto lo
iface lo inet loopback

auto enp1s0
iface enp1s0 inet manual

auto enp2s0
iface enp2s0 inet manual

auto vmbr0
iface vmbr0 inet static
  address {{ ansible_facts['default_ipv4']['address'] }}/{{ ansible_facts['default_ipv4']['prefix'] }}
  gateway {{ ansible_facts['default_ipv4']['gateway'] }}
  bridge-ports enp1s0
  bridge-stp off
  bridge-fd 0

auto vmbr1
iface vmbr1 inet manual
  bridge-ports enp2s0
  bridge-stp off
  bridge-fd 0
---
- hosts: proxmox

  tasks:
  - name: Check if virtualization extensions are enabled
    ansible.builtin.shell: "grep -q -E 'svm|vmx' /proc/cpuinfo"
    register: grep_cpuinfo_result

  - name: Fail if virtualization extensions are disabled
    ansible.builtin.fail:
      msg: 'Virtualization extensions are disabled'
    when: grep_cpuinfo_result.rc > 0

  - name: Set root password
    ansible.builtin.user:
      name: root
      password: 'pw_hash'

  - name: Add Proxmox VE repository key
    ansible.builtin.get_url:
      url: https://enterprise.proxmox.com/debian/proxmox-archive-keyring-trixie.gpg
      dest: /usr/share/keyrings/proxmox-archive-keyring.gpg
      checksum: sha256:136673be77aba35dcce385b28737689ad64fd785a797e57897589aed08db6e45

  - name: Add Proxmox VE repository
    ansible.builtin.deb822_repository:
      name: pve-install-repo
      types: deb
      uris: http://download.proxmox.com/debian/pve
      suites: trixie
      components: pve-no-subscription
      signed_by: /usr/share/keyrings/proxmox-archive-keyring.gpg

  - name: Install Proxmox kernel
    ansible.builtin.apt:
      name: proxmox-default-kernel
      state: present
      update_cache: true

  - name: Reboot system to load Proxmox kernel
    ansible.builtin.reboot:
    when: ansible_facts['kernel'] is not match(".*-pve")

  - name: Re-gather facts
    ansible.builtin.setup:

  - name: Deploy networking configuration
    ansible.builtin.template:
      src: dualnics_interfaces.j2
      dest: /etc/network/interfaces
      backup: true
    notify: Run ifreload

  - name: Remove Debian kernel and os-prober
    ansible.builtin.apt:
      name:
        - linux-image-amd64
        - linux-image-6.12*
        - os-prober
      state: absent
    when: ansible_facts['kernel'] is match(".*-pve")

  - name: Install Proxmox VE packages
    ansible.builtin.apt:
      name:
        - chrony
        - open-iscsi
        - postfix
        - proxmox-ve
      state: present

  - name: Remove pve-enterprise repository
    ansible.builtin.deb822_repository:
      name: pve-enterprise
      state: absent

  - name: Disable the subscription message
    ansible.builtin.replace:
      path: /usr/share/javascript/proxmox-widget-toolkit/proxmoxlib.js
      regexp: 'data\.status\.toLowerCase\(\) !== .active.'
      replace: 'false'
      backup: true
    notify: Restart pveproxy

  handlers:
  - name: Run ifreload
    ansible.builtin.command: /usr/sbin/ifreload -a

  - name: Restart pveproxy
    ansible.builtin.systemd:
      name: pveproxy
      state: restarted
Optionally, a cluster of two or more hosts can be set up with the below playbook, cluster.yml. You will also need an NFS share if VMs or templates will be shared between the hosts.
---
cluster_name: 'labcluster'
nfs_name: 'nfs_shared'
nfs_ip: '192.168.1.25'
nfs_export: '/home/proxmox'
root_password: 'encrypt_me_with_ansible_vault_please'
---
- hosts: proxmox
  gather_facts: false
  tasks:
  - name: Install python3-proxmoxer
    ansible.builtin.apt:
      name: python3-proxmoxer
      state: present

- hosts: leader
  tasks:
  - name: Create a Proxmox VE Cluster
    community.proxmox.proxmox_cluster:
      state: present
      api_host: "{{ ansible_facts['hostname'] }}"
      api_user: root@pam
      api_password: "{{ root_password }}"
      validate_certs: false
      link0: "{{ ansible_facts['default_ipv4']['address'] }}"
      cluster_name: "{{ cluster_name }}"

  - name: Get cluster info
    community.proxmox.proxmox_cluster_join_info:
      api_host: "{{ ansible_facts['hostname'] }}"
      api_user: root@pam
      api_password: "{{ root_password | default(omit) }}"
      api_token_id: "{{ token_id | default(omit) }}"
      api_token_secret: "{{ token_secret | default(omit) }}"
    register: proxmox_cluster_join

  - name: Set cluster info fact
    ansible.builtin.set_fact:
      proxmox_cluster_fp: "{{ proxmox_cluster_join['cluster_join']['nodelist'][0]['pve_fp'] }}"
      cluster_nodes: "{{ proxmox_cluster_join['cluster_join']['nodelist'] | map(attribute='name') }}"

  - name: Mount NFS Storage
    ansible.builtin.command: "/usr/sbin/pvesm add nfs {{ nfs_name }} --server {{ nfs_ip }} --export {{ nfs_export }} --content \"images,rootdir,vztmpl,iso\""
    when: "ansible_mounts | selectattr('mount', 'equalto', '/mnt/pve/' ~  nfs_name) | list | length == 0"

- hosts: followers
  tasks:
  - name: Join host to cluster
    community.proxmox.proxmox_cluster:
      state: present
      api_host: "{{ ansible_facts['hostname'] }}"
      api_user: root@pam
      api_password: "{{ root_password }}"
      validate_certs: false
      fingerprint: "{{ hostvars[groups['leader'][0]]['proxmox_cluster_fp'] }}"
      master_ip: "{{ hostvars[groups['leader'][0]]['ansible_facts']['default_ipv4']['address'] }}"
      cluster_name: "{{ cluster_name }}"
    when: ansible_facts['hostname'] not in hostvars[groups['leader'][0]]['cluster_nodes']
Replacing Bind and isc-dhcp-server with Dnsmasq in my lab environment
In my last post I utilized Bind and isc-dhcp-server to provide DNS and DHCP services in my lab environment. I’ve decided to swap out both for Dnsmasq, which provides a single solution for both DHCP and DNS. My only consideration is that I only want DHCP to run on router1 in the environment, as it doesn’t need to have high availability and would require syncing the leases file between the two hosts. As was the case with Bind, I’ve used a Terraform template to generate a Dnsmasq hosts file, which contains the hosts in the environment and their corresponding IP addresses for DNS lookups.
I only made two modifications to the Terraform part of the project: main.tf was modified and a new template 02-hosts.conf.tftpl was created. In main.tf I only changed the zone_file resource to hosts_file, and pointed it at the Dnsmasq template.
provider "proxmox" {
  pm_api_url = "https://${var.proxmox_host}:8006/api2/json"
  pm_tls_insecure = true
}

resource "local_file" "ansible_inventory" {
  filename = "${path.module}/inventory"
  content  = templatefile("${path.module}/inventory.tftpl", {
      merged_vms = local.merged_vms,
      galera_vms = var.galera_vms,
      router_vms = var.router_vms,
      lb_vms     = var.lb_vms,
      www_vms    = var.www_vms
  })
  file_permission = 0640
}

resource "local_file" "hosts_file" {
  filename = "${path.module}/02-hosts.conf"
  content  = templatefile("${path.module}/02-hosts.conf.tftpl", {
      all_vms = local.all_vms,
      domain  = var.domain,
      int_gw  = var.int_gw
  })
  file_permission = 0640
}

resource "proxmox_vm_qemu" "router_vms" {
  for_each    = var.router_vms
  name        = each.key
  target_node = each.value.vmhost
  clone       = var.vm_template
  full_clone  = false
  memory      = 2048
  scsihw      = "virtio-scsi-pci"
  boot        = "order=scsi0"
  agent       = 1
  # cloud-init settings
  ciuser       = "ansible"
  sshkeys      = var.ssh_key
  ipconfig0    = "ip=${each.value.ext_ip}/24,gw=${var.ext_gw}"
  ipconfig1    = "ip=${each.value.ip}/24"
  nameserver   = "127.0.0.1"
  searchdomain = var.domain

  cpu {
    cores = 2
  }

  network {
    id     = 0
    bridge = "vmbr0"
    model  = "virtio"
  }

  network {
    id     = 1
    bridge = "vmbr1"
    model  = "virtio"
  }

  serial {
    id = 0
  }

  vga {
    type = "serial0"
  }

  disk {
    slot    = "ide0"
    type    = "cloudinit"
    storage = "local"
  }

  disk {
    type    = "disk"
    slot    = "scsi0"
    size    = "20G"
    storage = "local"
    format  = "qcow2"
  }

  startup_shutdown {
    order            = -1
    shutdown_timeout = -1
    startup_delay    = -1
  }
}

resource "proxmox_vm_qemu" "galera_vms" {
  for_each    = var.galera_vms
  name        = each.key
  target_node = each.value.vmhost
  clone       = var.vm_template
  full_clone  = false
  memory      = 8192
  scsihw      = "virtio-scsi-pci"
  boot        = "order=scsi0"
  agent       = 1
  # cloud-init settings
  ciuser       = "ansible"
  sshkeys      = var.ssh_key
  ipconfig0    = "ip=${each.value.ip}/24,gw=${var.int_gw}"
  nameserver   = join(" ", var.nameservers)
  searchdomain = var.domain

  cpu {
    cores = 2
  }

  network {
    id     = 0
    bridge = "vmbr1"
    model  = "virtio"
  }

  serial {
    id = 0
  }

  vga {
    type = "serial0"
  }

  disk {
    slot    = "ide0"
    type    = "cloudinit"
    storage = "local"
  }

  disk {
    type    = "disk"
    slot    = "scsi0"
    size    = "${each.value.os_disk}G"
    storage = "local"
    format  = "qcow2"
  }

  disk {
    type    = "disk"
    slot    = "scsi1"
    size    = "${each.value.data_disk}G"
    storage = "local"
    format  = "qcow2"
  }

  startup_shutdown {
    order            = -1
    shutdown_timeout = -1
    startup_delay    = -1
  }
}

resource "proxmox_vm_qemu" "merged_vms" {
  for_each    = local.merged_vms
  name        = each.key
  target_node = each.value.vmhost
  clone       = var.vm_template
  full_clone  = false
  memory      = each.value.ram
  scsihw      = "virtio-scsi-pci"
  boot        = "order=scsi0"
  agent       = 1
  # cloud-init settings
  ciuser       = "ansible"
  sshkeys      = var.ssh_key
  ipconfig0    = "ip=${each.value.ip}/24,gw=${var.int_gw}"
  nameserver   = var.int_gw
  searchdomain = var.domain


  cpu {
    cores = each.value.cpu
  }

  network {
    id     = 0
    bridge = "vmbr1"
    model  = "virtio"
  }

  serial {
    id = 0
  }

  vga {
    type = "serial0"
  }

  disk {
    slot    = "ide0"
    type    = "cloudinit"
    storage = "local"
  }

  disk {
    type    = "disk"
    slot    = "scsi0"
    size    = "${each.value.disk}G"
    storage = "local"
    format  = "qcow2"
  }

  startup_shutdown {
    order            = -1
    shutdown_timeout = -1
    startup_delay    = -1
  }
}
address=/router.${domain}/${int_gw}
%{ for key, params in all_vms ~}
address=/${key}.${domain}/${params.ip}
%{ endfor ~}
As with Bind and isc-dhcp-server, I created an Ansible role for Dnsmasq. The directory structure is below:
├── dnsmasq
│   ├── handlers
│   │   └── main.yml
│   ├── tasks
│   │   └── main.yml
│   └── templates
│       └── 01-lab.conf.j2
The tasks in main.yml deploy the 02-hosts.conf file generated by Terraform, as well as an 01-lab.conf file generated from an Ansible template. The DHCP configuration is only applied to router1. As with Bind, it was necessary to disable the Systemd stub resolver, which conflicts with Dnsmasq, as it also listens on port 53. Below are the code snippets:
---
ansible_ssh_common_args: ''
dns_forwarders:
  - '192.168.87.1'
domain: 'ridpath.lab'
keepalived_interface: 'eth1'
nft_lan_dev: 'eth0'
nft_lab_dev: 'eth1'
subnet: '192.168.20'
virtual_router_id: 1
vip_addresses:
  - '192.168.20.1'
vrrp_instance: 'ROUTER'
---
- name: Install dnsmasq
  ansible.builtin.apt:
    name: dnsmasq
    state: present

- name: Set /etc/dnsmasq.conf to include .conf files in /etc/dnsmasq.d
  ansible.builtin.lineinfile:
    path: /etc/dnsmasq.conf
    regexp: '^(#)?conf-dir=/etc/dnsmasq.d/,\*.conf'
    line: 'conf-dir=/etc/dnsmasq.d/,*.conf'
  notify: Restart dnsmasq

- name: Deploy /etc/dnsmasq.d/01-lab.conf
  ansible.builtin.template:
    src: 01-lab.conf.j2
    dest: /etc/dnsmasq.d/01-lab.conf
  notify: Restart dnsmasq

- name: Deploy /etc/dnsmasq.d/02-hosts.conf
  ansible.builtin.copy:
    src: 02-hosts.conf
    dest: /etc/dnsmasq.d/02-hosts.conf
  notify: Restart dnsmasq

- name: Populate service facts
  ansible.builtin.service_facts:

- name: Disable DNSStubListener if systemd-resolved is enabled
  when: ansible_facts['services']['systemd-resolved.service']['status'] | default('not-found') != 'not-found'
  block:
    - name: Create /etc/systemd/resolved.conf.d
      ansible.builtin.file:
        path: /etc/systemd/resolved.conf.d
        state: directory

    - name: Create /etc/systemd/resolved.conf.d/nodnsstub.conf
      ansible.builtin.copy:
        dest: /etc/systemd/resolved.conf.d/nodnsstub.conf
        content: "[Resolve]\nDNSStubListener=no\n"
      notify: Restart systemd-resolved

- name: Enable and start dnsmasq service
  ansible.builtin.systemd:
    name: dnsmasq
    state: started
    enabled: true
  ignore_errors: true
---
- name: Restart systemd-resolved
  ansible.builtin.systemd:
    name: systemd-resolved
    state: restarted

- name: Restart dnsmasq
  ansible.builtin.systemd:
    name: dnsmasq
    state: restarted
The Dnsmasq role is included in the playbook routers.yml and is applied to both router servers:
---
- hosts: routers
  roles:
    - base
    - nftables
    - keepalived
    - dnsmasq
    - ssh_proxy_host
Conclusion
This was a boring post, but I wanted to put it out there anyway. Perhaps it might be of use to somehow who wants to learn about Proxmox, but doesn’t want to dedicate a system to running it. As always, thanks for reading!