
In light of a few issues I’ve discovered with this post, I wouldn’t suggest that you use it as a guide. However, I’m leaving it up anyway, in case it is of use to someone. Instead, I recommend running pre-built cloud images from the OS vendor. I also recommend running using KVM for Enterprise Linux instead of Xen.
In my last post on Xen, I discussed using pre-built cloud images from Debian and AlmaLinux to create Xen virtual machines. These are convenient to use, but might not be ideal for certain use cases. For example, you might want certain packages to be included or excluded from your image, minimizing or even eliminating the role of cloud-init. Or for security reasons, you might not want to run an image from the internet on your local network. In this post, I will discuss how I built Xen images for AlmaLinux and Debian.
Setting up a build host
The steps for setting up a build host are similar to what I used in my post on Xen and Debian. The Xen build host in this case was running Debian 12 (Bookworm). The below Ansible playbook can be used for configuring the build server, except for the network bridge. Unlike the example in the last post, it does not include dnsmasq or any Perl modules:
---
- hosts: all
  vars:
    xen_mem: 1024

  tasks:
  - name: Add the OS repo if needed
    ansible.builtin.lineinfile:
      path: /etc/apt/sources.list
      regexp: 'contrib main non-free-firmware'
      line: "deb http://deb.debian.org/debian {{ ansible_facts['distribution_release'] }} contrib main non-free-firmware"

  - name: Install required packages
    ansible.builtin.apt:
      name:
        - bridge-utils
        - nginx
        - qemu-utils
        - xen-hypervisor
        - xen-hypervisor-common
        - xen-utils
      state: present
      update_cache: true
      install_recommends: false

  - name: Set RAM for Xen Dom0
    ansible.builtin.lineinfile:
      path: /etc/default/grub.d/xen.cfg
      regexp: '^(#)?GRUB_CMDLINE_XEN_DEFAULT'
      line: "GRUB_CMDLINE_XEN_DEFAULT=\"dom0_mem={{ xen_mem }}M,max:{{ xen_mem }}M loglvl=all guest_loglvl=all\""
    notify: Run update-grub

  - name: Create /srv/xen
    ansible.builtin.file:
      path: /srv/xen
      state: directory

  handlers:
  - name: Run update-grub
    ansible.builtin.command: /usr/sbin/update-grub
A simple network bridge can be created by editing /etc/network/interfaces and changing it to something like below:
# The primary network interface
allow-hotplug eno1
iface eno1 inet manual

auto br0
iface br0 inet static
  address 192.168.2.44/24
  gateway 192.168.2.1
  bridge_ports eno1
  bridge_stp off
  bridge_waitport 0
  bridge_fd 0
Set inet to dhcp instead of static and omit the address and gateway lines if you would prefer to use DHCP instead. After making these changes, restart the networking service with sudo systemctl restart networking.
Download the kernel and ramdisk files
The kernel and ramdisk files are used for booting the initial kernel for installing the OS. Once the OS has been written to the disk, the Xen instance configuration file can be modified to boot from the installed kernel.
- For AlmaLinux, the files initrd.img and vmlinuz can be found here for version 9. I saved these to /srv/xen/alma/9. They can also be found on the ISO in images/pxeboot, as will be the case for Rocky Linux, Oracle Linux, etc.
- For Debian, the files initrd.gz and vmlinuz can be found here for version 13/trixie or on the ISO in install.amd/xen. I copied these to /srv/xen/debian/13.
Creating kickstart and preseed files
You can, of course, create OS images using the manual installation process—this is a perfectly acceptable method. I personally prefer to automate things, so that I’m not performing the same tedious tasks over and over again. In order to automate building either Debian or Enterprise Linux (Rocky/Alma/RedHat/etc.) images, you will need to create a preseed or a kickstart file, respectively. You will also need a web server to host these files during the build process; either Nginx or Apache will work.
First, the Debian preseed file. I will be honest: I dislike the preseed file syntax and prefer EL kickstart files, which give one greater control over the configuration of the system. One thing I dislike is how preseed forces you to download all packages from the internet, even if you try to tell it to use the CD-ROM (I’ve tried every single combination of cryptic options and none worked). I ended up setting up apt-cacher-ng on the build host as a proxy server to save on bandwidth while I worked on refining the preseed file (this is specified with: d-i mirror/http/proxy string http://proxy_ip:3142). Below is the preseed file I created for Debian 12 and 13:
d-i debian-installer/locale string en_US
d-i keyboard-configuration/xkb-keymap select us
d-i netcfg/choose_interface select auto
d-i netcfg/get_hostname string debian
d-i netcfg/get_domain string localdomain
d-i netcfg/hostname string debian
d-i netcfg/wireless_wep string
d-i mirror/country string manual
d-i mirror/http/hostname string http.us.debian.org
d-i mirror/http/directory string /debian
d-i mirror/http/proxy string
d-i passwd/root-login boolean true
d-i passwd/make-user boolean false
d-i passwd/root-password password changeme
d-i passwd/root-password-again password changeme
d-i clock-setup/utc boolean true
d-i time/zone string US/Eastern
d-i clock-setup/ntp boolean true
d-i clock-setup/ntp-server string 0.pool.ntp.org
d-i partman-auto/init_automatically_partition select biggest_free
d-i partman-auto/method string regular
d-i partman-lvm/device_remove_lvm boolean true
d-i partman-md/device_remove_md boolean true
d-i partman-lvm/confirm boolean true
d-i partman-lvm/confirm_nooverwrite boolean true
d-i partman-auto/choose_recipe select atomic
d-i partman-partitioning/confirm_write_new_label boolean true
d-i partman/choose_partition select finish
d-i partman/confirm boolean true
d-i partman/confirm_nooverwrite boolean true
d-i partman-md/confirm boolean true
d-i partman-partitioning/confirm_write_new_label boolean true
d-i partman/choose_partition select finish
d-i partman/confirm boolean true
d-i partman/confirm_nooverwrite boolean true
d-i apt-setup/cdrom/set-first boolean false
tasksel tasksel/first multiselect standard, ssh-server
d-i pkgsel/include string sudo cloud-init
popularity-contest popularity-contest/participate boolean false
d-i grub-installer/only_debian boolean true
d-i grub-installer/with_other_os boolean true
d-i grub-installer/bootdev string default
d-i finish-install/keep-consoles boolean true
d-i finish-install/reboot_in_progress note
d-i debian-installer/exit/halt boolean true
d-i debian-installer/exit/poweroff boolean true
You may want to read through the example preseed file on the Debian site to learn about the options and trial/error them for yourself. I placed this particular file in the top-level directory of my web server, /var/www/html in my case.
Next, the kickstart files. I split these into ks_el8.cfg and ks_el9.cfg, for versions 8 and 9. The only difference between these is that EL8 uses the ‐‐ntpservers after the timezone command to specify NTP servers, while EL9 uses the separate timesource ‐‐ntp-server command (the deprecated method supposedly works in EL9). These files are similar to the ones created for the last post, except that they use the device identifier instead of the MAC address for ‐‐device in the network command.
url --url http://192.168.2.75/el/8/
lang en_US
keyboard --vckeymap=us
network --bootproto=dhcp --device=enX0 --hostname=alma8
rootpw changeme
firewall --enabled --ssh
selinux --disabled
timezone US/Eastern --ntpservers=0.pool.ntp.org
bootloader --location=mbr
text
skipx
poweroff

# Partitioning
zerombr
clearpart --all --initlabel
autopart --noboot --nohome --nolvm --fstype=xfs

%packages
-cockpit
cloud-init
%end
url --url http://192.168.2.75/el/9/
lang en_US
keyboard --vckeymap=us
network --bootproto=dhcp --device=enX0 --hostname=alma9
rootpw changeme
firewall --enabled --ssh
selinux --disabled
timezone US/Eastern
timesource --ntp-server 0.pool.ntp.org
bootloader --location=mbr
text
skipx
poweroff

# Partitioning
zerombr
clearpart --all --initlabel
autopart --noboot --nohome --nolvm --fstype=xfs

%packages
-cockpit
cloud-init
%end
Writing scripts to build images
If you know how to write shell scripts, then it isn’t hard to write a script that builds Debian or Enterprise Linux images. To start off, I wrote a pair of very basic ones for each OS type. The scripts place the Xen configuration file inside a heredoc. This is probably sufficient for most use cases:
#!/bin/bash

if [[ -z "$1" ]] ; then
    echo 'You must specify an OS version to build!'
    exit 1
fi

BRIDGE='br0'
DISK_SIZE=5
IMG_PATH='/srv/xen'
PRESEED_SERVER=$(hostname -i)
OS_VER=$1
OS_VERS=(12 13)
if ! [[ $(echo ${OS_VERS[@]} | grep -w $OS_VER) ]] ; then
    echo 'OS version invalid!'
    exit 1
fi

IMAGE="${IMG_PATH}/debian${OS_VER}.img"
XEN_CFG="/etc/xen/debian${OS_VER}.cfg"

if ! [[ -x '/usr/bin/qemu-img' ]] ; then
    echo 'qemu-utils are missing!'
    exit 1
fi

/usr/bin/qemu-img create -f raw ${IMAGE} ${DISK_SIZE}G

cat > $XEN_CFG <<DELIM
name = 'debian${OS_VER}'
type = 'pv'
memory = '2048'
vcpus = 1
disk = [ '${IMAGE},,xvda,w' ]
vif = [ 'bridge=${BRIDGE}' ]
kernel = '${IMG_PATH}/debian/${OS_VER}/vmlinuz'
ramdisk = '${IMG_PATH}/debian/${OS_VER}/initrd.gz'
extra = 'auto-install/enable=true netcfg/get_hostname=debian${OS_VER} netcfg/get_domain=localdomain preseed/url=http://${PRESEED_SERVER}/preseed.cfg'
on_reboot = 'destroy'
on_crash = 'destroy'
DELIM

/usr/sbin/xl create -c $XEN_CFG
rm -f $XEN_CFG
Simply kick the script off with: sudo ./build_deb_xen_img.sh 13 (or 12). It will run the installation and the place the image in /srv/xen/debianver.img (or wherever you choose).
The script for Enterprise Linux is similar, except that it uses the full virtualization VM type (hvm) and the more compact QCOW2 image type:
#!/bin/bash

if [[ -z "$1" ]] ; then
    echo 'You must specify an OS version to build!'
    exit 1
fi

BRIDGE='br0'
DISK_SIZE=20
IMG_PATH='/srv/xen'
KS_SERVER=$(hostname -i)
OS_VER=$1
OS_VERS=(8 9)
if ! [[ $(echo ${OS_VERS[@]} | grep -w $OS_VER) ]] ; then
    echo 'OS version invalid!'
    exit 1
fi

IMAGE="${IMG_PATH}/alma${OS_VER}.qcow2"
XEN_CFG="/etc/xen/alma${OS_VER}.cfg"

if ! [[ -x '/usr/bin/qemu-img' ]] ; then
    echo 'qemu-utils are missing!'
    exit 1
fi

/usr/bin/qemu-img create -f qcow2 $IMAGE ${DISK_SIZE}G

cat > $XEN_CFG <<DELIM
name = 'alma${OS_VER}'
type = 'hvm'
memory = '4096'
vcpus = 1
disk = [ '${IMAGE},qcow2,xvda,w' ]
vif = [ 'bridge=${BRIDGE}' ]
kernel = '${IMG_PATH}/alma/${OS_VER}/vmlinuz'
ramdisk = '${IMG_PATH}/alma/${OS_VER}/initrd.img'
extra = 'ip=dhcp inst.ks=http://${KS_SERVER}/ks_el${OS_VER}.cfg inst.text console=hvc0'
on_reboot = 'destroy'
on_crash = 'destroy'
DELIM

/usr/sbin/xl create -c $XEN_CFG
rm -f $XEN_CFG
This script can be kicked off with: sudo ./build_el_xen_img.sh 9 (or 8). After building AlmaLinux 9 and Debian 13 images, I tested them using the prov_xen_cloud.pl script I wrote in the previous post. The only thing that was changed was the os_hash variable, with the image keys being updated to point to the created image files:
my %os_hash = (
    'alma9' => {
        'family' => 'el',
        'image'  => 'alma9.qcow2',
        'type'   => 'hvm'
    },
    'debian12' => {
        'family' => 'deb',
        'image'  => 'debian13.img',
        'type'   => 'pv'
    },
    'debian13' => {
        'family' => 'deb',
        'image'  => 'debian13.img',
        'type'   => 'pv'
    }
);
I also removed the disable SELinux task from user-data file for EL, as it is no longer needed. The commands sudo ./prov_xen_cloud.pl -o debian13 -d 10 -r 2048 -f debweb01 and sudo ./prov_xen_cloud.pl -o alma9 -d 20 -r 2048 -f almaweb01 then ran successfully, bringing up an instance of each type.
Getting slightly more sophisticated with Jinja2 templates
In my blog I like to write about new tools or modules I have discovered. One tool I recently discovered was j2cli, which allows the creation of Jinja2 templates on the command line or in Bash scripts. I have familiarity with Jinja2 templates from using Ansible, so this was a welcome discovery. Transforming the kickstart, preseed, and Xen configuration files into templates will allow them to be more modular. To install j2cli on Debian, just run: sudo apt install j2cli.
First, the preseed file. I only pass one variable to this, PROXY_HOST. To test it out, create the file preseed.cfg.j2 and run the command: export PROXY_HOST=’http://192.168.2.15:3142′ ; j2 preseed.cfg.j2. It should output a preseed file with the proxy server host defined.
d-i debian-installer/locale string en_US
d-i keyboard-configuration/xkb-keymap select us
d-i netcfg/choose_interface select auto
d-i netcfg/get_hostname string debian
d-i netcfg/get_domain string localdomain
d-i netcfg/hostname string debian
d-i netcfg/wireless_wep string
d-i mirror/country string manual
d-i mirror/http/hostname string http.us.debian.org
d-i mirror/http/directory string /debian
d-i mirror/http/proxy string {{ PROXY_HOST }}
d-i passwd/root-login boolean true
d-i passwd/make-user boolean false
d-i passwd/root-password password changeme
d-i passwd/root-password-again password changeme
d-i clock-setup/utc boolean true
d-i time/zone string US/Eastern
d-i clock-setup/ntp boolean true
d-i clock-setup/ntp-server string 0.pool.ntp.org
d-i partman-auto/init_automatically_partition select biggest_free
d-i partman-auto/method string regular
d-i partman-lvm/device_remove_lvm boolean true
d-i partman-md/device_remove_md boolean true
d-i partman-lvm/confirm boolean true
d-i partman-lvm/confirm_nooverwrite boolean true
d-i partman-auto/choose_recipe select atomic
d-i partman-partitioning/confirm_write_new_label boolean true
d-i partman/choose_partition select finish
d-i partman/confirm boolean true
d-i partman/confirm_nooverwrite boolean true
d-i partman-md/confirm boolean true
d-i partman-partitioning/confirm_write_new_label boolean true
d-i partman/choose_partition select finish
d-i partman/confirm boolean true
d-i partman/confirm_nooverwrite boolean true
d-i apt-setup/cdrom/set-first boolean false
tasksel tasksel/first multiselect standard, ssh-server
d-i pkgsel/include string sudo cloud-init
popularity-contest popularity-contest/participate boolean false
d-i grub-installer/only_debian boolean true
d-i grub-installer/with_other_os boolean true
d-i grub-installer/bootdev string default
d-i finish-install/keep-consoles boolean true
d-i finish-install/reboot_in_progress note
d-i debian-installer/exit/halt boolean true
d-i debian-installer/exit/poweroff boolean true
The template for kickstart files is simple also. Only the OS version and URL variables are passed it. This allows a single template for EL 8 and 9. It can be tested with: export OS_VER=9 ; export OS_URL=’http://192.168.2.75/alma’ ; j2 ks.cfg.j2
url --url {{ OS_URL }}/{{ OS_VER }}
lang en_US
keyboard --vckeymap=us
network --bootproto=dhcp --device=enX0 --hostname=alma{{ OS_VER }}
rootpw changeme
firewall --enabled --ssh
selinux --disabled
{% if OS_VER | int == 8 -%}
timezone US/Eastern --ntpservers=0.pool.ntp.org
{% else -%}
timezone US/Eastern
timesource --ntp-server 0.pool.ntp.org
{% endif -%}
bootloader --location=mbr
text
skipx
poweroff

# Partitioning
zerombr
clearpart --all --initlabel
autopart --noboot --nohome --nolvm --fstype=xfs

%packages
-cockpit
cloud-init
%end
I split the Debian and Enterprise Linux Xen configuration files into separate templates. The code snippets are below:
name = '{{ OS }}'
type = 'pv'
memory = '2048'
vcpus = 1
disk = [ '{{ IMAGE }},,xvda,w' ]
vif = [ 'bridge={{ BRIDGE }}' ]
kernel = '{{ IMG_PATH }}/debian/{{ OS_VER }}/vmlinuz'
ramdisk = '{{ IMG_PATH }}/debian/{{ OS_VER }}/initrd.gz'
extra = 'auto-install/enable=true netcfg/get_hostname=debian{{ OS_VER }} netcfg/get_domain=localdomain preseed/url=http://{{ HTTP_SERVER }}/{{ OS }}.cfg'
on_reboot = 'destroy'
on_crash = 'destroy'
name = '{{ OS }}'
type = 'hvm'
memory = '4096'
vcpus = 1
disk = [ '{{ IMAGE }},qcow2,xvda,w' ]
vif = [ 'bridge={{ BRIDGE }}' ]
kernel = '{{ IMG_PATH }}/{{ OS_NAME }}/{{ OS_VER }}/vmlinuz'
ramdisk = '{{ IMG_PATH }}/{{ OS_NAME }}/{{ OS_VER }}/initrd.img'
extra = 'ip=dhcp inst.ks=http://{{ HTTP_SERVER }}/{{ OS }}.cfg inst.text console=hvc0'
on_reboot = 'destroy'
on_crash = 'destroy'
Finally, the script itself. It can be executed with something like: sudo ./build_xen_img.sh debian13 or sudo ./build_xen_img.sh alma9.
#!/bin/bash

if [[ -z "$1" ]] ; then
    echo 'You must specify an OS version to build!'
    exit 1
fi

export BRIDGE='br0'
export IMG_PATH='/srv/xen'
export HTTP_SERVER=$(hostname -i)
export OS=$1
OS_LIST=(alma{8..9} rocky{8..9} debian{12..13})

if ! [[ $(echo ${OS_LIST[@]} | grep -w $OS) ]] ; then
    echo "OS version invalid! It must be: ${OS_LIST[@]}."
    exit 1
fi

export OS_NAME=$(echo -n $OS | grep -oP '^[a-z]+')
if [[ "$OS_NAME" = 'debian' ]] ; then
    ANSWER_TEMPLATE='preseed.cfg.j2'
    DISK_SIZE=5
    IMG_FMT='raw'
    export IMAGE="${IMG_PATH}/${OS}.img"
    export PROXY_HOST="http://$(hostname -i):3142"
    XEN_TEMPLATE='debian_xen.cfg.j2'
else
    ANSWER_TEMPLATE='ks.cfg.j2'
    DISK_SIZE=20
    IMG_FMT='qcow2'
    export IMAGE="${IMG_PATH}/${OS}.qcow2"
    export OS_URL="http://192.168.87.75/${OS_NAME}"
    XEN_TEMPLATE='el_xen.cfg.j2'
fi

export OS_VER=$(echo -n $OS | grep -oP '\d{1,2}$')
XEN_CFG="/etc/xen/${OS}.cfg"

if ! [[ -x '/usr/bin/qemu-img' ]] ; then
    echo 'qemu-utils are missing!'
    exit 1
fi

/usr/bin/qemu-img create -f $IMG_FMT $IMAGE ${DISK_SIZE}G
/usr/bin/j2 $ANSWER_TEMPLATE > /var/www/html/${OS}.cfg
/usr/bin/j2 $XEN_TEMPLATE > $XEN_CFG
/usr/sbin/xl create -c $XEN_CFG
rm -f $XEN_CFG /var/www/html/${OS}.cfg
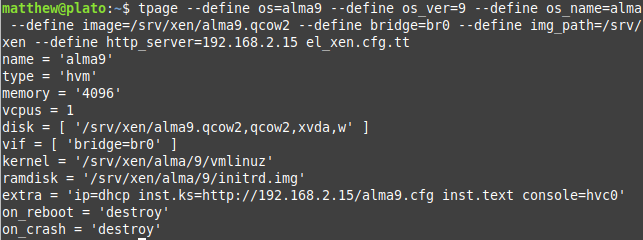
If you prefer to use Perl-related things, you can also use the venerable Template-Toolkit module and the tpage command. With the Template-Toolkit approach, you would create your template like the example below and then pass each variable to tpage with ‐‐ var=value. This approach is cumbersome if you have a lot of variables, whereas j2cli allows the usage of environment variables, which is much cleaner in my opinion. If you want to use Template-Toolkit templates instead of Jinja2 ones, you might be better off writing the entire script in Perl.
name = '[% os %]'
type = 'hvm'
memory = '4096'
vcpus = 1
disk = [ '[% image %],qcow2,xvda,w' ]
vif = [ 'bridge=[% bridge %]' ]
kernel = '[% img_path %]/[% os_name %]/[% os_ver %]/vmlinuz'
ramdisk = '[% img_path %]/[% os_name %]/[% os_ver %]/initrd.img'
extra = 'ip=dhcp inst.ks=http://[% http_server %]/[% os %].cfg inst.text console=hvc0'
on_reboot = 'destroy'
on_crash = 'destroy'
Turning image creation into a Jenkins job
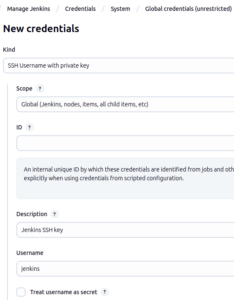
I thought it might be interesting to turn the above into a Jenkins job. Full disclosure: I am not a Jenkins expert. I know how to install it and create simple jobs, but there is a high chance that whatever I am doing is wrong. One thing this post will not dive into is installing the Jenkins controller. My controller is running in Docker with the jenkins:lts-jdk17 image, which will be end of life this year, but is still being updated as of this writing. Back in 2021, I wrote a post on setting up a Jenkins build node using Ansible. The post is somewhat dated at this point (it references CentOS 8 for example), but the steps will be similar to what I did here. First, I generated an SSH key with a passphrase: ssh-keygen -t ed25519 -C Jenkins -f jenkins. I then added that key as a global credential in Jenkins under Manage Jenkins > Credentials > System > Global credentials:
I also created an identical credential for Git, the only difference being that the username was set to git instead of jenkins.
Next up, I created an Ansible playbook that installs the JRE on the build node and sets up the jenkins user. As a good practice, I limited accesss via SSH to the controller and allowed only /usr/sbin/xl and /usr/bin/qemu-img in the sudoers file for the jenkins user:
---
- hosts: all
  gather_facts: false
  vars:
    jenkins_controller_ip: '192.168.87.25'

  tasks:
  - name: Install required packages
    ansible.builtin.apt:
      name:
        - git
        - openjdk-17-jre
      state: present
      install_recommends: false

  - name: Create jenkins user
    ansible.builtin.user:
      name: jenkins
      state: present
      shell: /bin/bash

  - name: Create SSH authorized key
    ansible.posix.authorized_key:
      user: jenkins
      key: "{{ lookup('file', 'jenkins.pub') }}"
      key_options: "from=\"{{ jenkins_controller_ip }}\""

  - name: Create sudoers entry
    ansible.builtin.copy:
      content: "jenkins ALL=(ALL) NOPASSWD: /usr/sbin/xl, /usr/bin/qemu-img\n"
      dest: /etc/sudoers.d/10_jenkins
      mode: 0440
      owner: root
      group: root
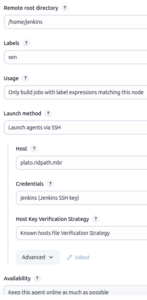
To launch a node, go to Manage Jenkins > Nodes > New Node. Enter a name for your node, select Permanent Agent, and click the Create button. On the next screen, fill out the required options. Below is what I entered. Note: if you select “Known hosts file Verification Strategy” for “Host Key Verification Strategy,” you will have to do the following if your Jenkins controller is running under Docker:
- Enter a Bash session inside the container with: sudo docker exec -it jenkins bash.
- SSH to the node, using the same hostname or IP specified under Host. You don’t have to log in, but ensure that the entry gets saved to the known_hosts file.
- Continue with adding the node
You also don’t have to specify labels and usage. This was a personal preference.
Finally, it’s time to create the project. I created separate projects for AlmaLinux and Debian, but they are similar. They both use the same Jinja2 templates from above, placed in a Git repository. Below lists some of the options I selected for this project:
- “Discard old builds” was checked, with the maximum number of old builds to retain set to 2.
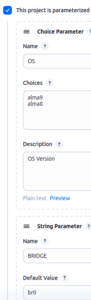
- I checked “This project is parameterized.” I created a choice parameter, OS, with the options of alma9 and alma8. I also created a string parameter, BRIDGE, with the default value of br0.
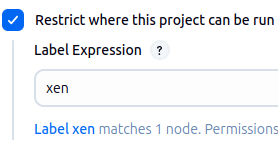
- I checked “Restrict where this project can be run”, with the label set to “xen”.
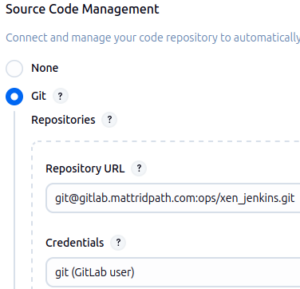
- “Source Code Management” was set to Git. Your settings may look different.
Finally, the Build step itself. Click Add build step > Execute shell. The script I created for AlmaLinux is below, similar to my earlier bash script:
export OS
export BRIDGE
export IMG_PATH='/srv/xen'
export HTTP_SERVER="$(hostname -i):8000"
export OS_NAME=$(echo -n $OS | grep -oP '^[a-z]+')
export OS_VER=$(echo -n $OS | grep -oP '\d{1,2}$')
export IMAGE="${IMG_PATH}/${OS}.qcow2"
export OS_URL="http://192.168.87.75/${OS_NAME}"

if ! /usr/bin/test -d "${WORKSPACE}/web" ; then
    mkdir ${WORKSPACE}/web
fi
/usr/bin/j2 ks.cfg.j2 > ${WORKSPACE}/web/${OS}.cfg
python3 -m http.server --directory ${WORKSPACE}/web 8000 > /dev/null 2>&1 &
HTTP_PID=$!
sudo /usr/bin/qemu-img create -f qcow2 $IMAGE 20G
/usr/bin/j2 el_xen.cfg.j2 > ${OS}.cfg

sudo /usr/sbin/xl create -c ${WORKSPACE}/${OS}.cfg
kill $HTTP_PID
One main difference with the Jenkins script is that it uses the Python web server instead of Nginx, as this can run under the Jenkins user and serve a directory inside the Jenkins workspace. If you plan on running this at the same time as the Debian job, you may want to configure the Python web server to listen on a different port in one of the jobs. Of course you don’t have to do it this way; I am merely showing how I did it. I have also thought about setting up an NFS share to copy the image to as a post-build step, so that it is available for other Xen hosts.
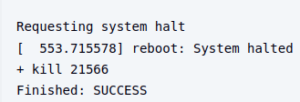
After saving the job configuration, click Build with Parameters to kick off a build. If the OS installation is successful, it should reflect in the status of the Jenkins job.
The below code snippet contains the script I used for the Debian job:
export OS
export BRIDGE
export IMG_PATH='/srv/xen'
export HTTP_SERVER="$(hostname -i):8001"
export OS_NAME=$(echo -n $OS | grep -oP '^[a-z]+')
export OS_VER=$(echo -n $OS | grep -oP '\d{1,2}$')
export IMAGE="${IMG_PATH}/${OS}.img"
export PROXY_HOST="http://$(hostname -i):3142"

if ! /usr/bin/test -d "${WORKSPACE}/web" ; then
    mkdir ${WORKSPACE}/web
fi
/usr/bin/j2 preseed.cfg.j2 > ${WORKSPACE}/web/${OS}.cfg
python3 -m http.server --directory ${WORKSPACE}/web 8001 > /dev/null 2>&1 &
HTTP_PID=$!
sudo /usr/bin/qemu-img create -f raw $IMAGE 5G
/usr/bin/j2 debian_xen.cfg.j2 > ${OS}.cfg

sudo /usr/sbin/xl create -c ${WORKSPACE}/${OS}.cfg
kill $HTTP_PID
Conclusion
Like most of my blog posts, this was a meandering narrative of my experimentation with different tools: Xen, Ansible, Bash, Jinja2, and finally Jenkins. In the real world, people probably use tools like Packer to do this sort of thing; however, I’m not aware of a Packer builder for standalone Xen (i.e. not XCP-NG/XenServer). Also, sometimes it’s more straightforward to write a simple Bash script to do the job, as opposed to struggling to make a tool such as Packer work. For me, this provided an opportunity to exercise my scripting skills, while learning about simple and useful tools such as j2cli. I plan on continuing to write more about Xen. If you’re interested in that sort of thing (unlikely), then stay tuned. As always, thanks for reading!