
Introduction
In a previous post, I discussed my experiences with installing a recent version of Enterprise Linux, AlmaLinux 9, on an e-waste HP ProLiant DL360 G7. I also discussed updating the firmware for the Integrated Lights-Out (iLO) remote management tool and the HP Smart Array controller, and installing the OS over the network from the iLO console. In this post I will perform some of these tasks, but for Debian instead. I will also incorporate some knowledge from my previous posts on virtualization, networking, and Ansible.
These exercises were performed on a ProLiant DL360 G7, but it’s likely that they will work on other Proliant servers.

The particular server I used in this exercise has two CPUs, 72GB, and four enterprise SAS drives in a RAID 1+0 array. The iLO has the Advanced License installed; none of the remote console stuff will work without it, unfortunately.
Configuring the iLO
G
Before using the iLO for this post, I did the following (actually I did all of it for the AlmaLinux post):
- To SSH into an iLO 3 from a modern Linux system (assuming you’ve set an IP and username/password to it), use the options: ssh -o KexAlgorithms=diffie-hellman-group1-sha1 -o HostKeyAlgorithms=ssh-dss username@host.
- I choose to upgrade the iLO firmware. This will probably break web access, which is pretty useless nowadays anyway. This link for the firmware still works as of this writing. I put the ilo3_194.bin file out on a web server and installed it from the iLO CLI with: cd /map1/firmware1, then load -source http://your_ip/ilo3_194.bin.
- I blocked access to the web GUI with: set /map1/config1 oemhp_sslport=0.
- I disabled CLI timeouts with: set /map1/config1 oemhp_timeout=0.
- I set the serial connection speed to 115200 with: set /map1/config1 oemhp_serialclispeed=115200.
- After making these changes, I cd’d to /map1 and executed reset to reboot the iLO.
Fixing Debian 12/13 not booting
When I initially installed Debian on the G7 from USB, I ran into an issue in which the system would boot once after installation, but any subsequent boots would hang. I’m still not sure why it is doing this, but my hunch is that Debian has dropped support in the kernel for the onboard graphics card. What ended up resolving the issue was adding the option nomodeset to the Grub kernel parameters, which disables initialization of the graphics card. This can be done during installation by selecting non-graphical installation, hitting the TAB key, adding nomodeset to the end of the line (after the dashes), and hitting enter to start the installation. Anything added after the three dashes will be retained after installation.
Installing Debian over the network
One of the awesome features of the HP iLO is the ability to access the system console over a virtual serial port (the Dell iDRAC does this as well). This allows an administrator to install an OS on a server without needing to be physically present at a monitor and keyboard, or even need a web browser—everything can be done in an SSH session, as long as the server is properly cabled. In my last post on this server, I described installing Enterprise Linux over the network; here I will do the same for Debian. As the DL360 G7 is an older BIOS (non-UEFI) machine, it will need to use PXEBoot and TFTP for starting the installation.
First, you will need to tell your DHCP server which TFTP server should be used. For the isc-dhcp-server used in Debian and Ubuntu, this is defined in the next-server parameter within a subnet definition. For dedicated routers, this option may or may not be available, depending on the model. Then, to set up the TFTP server on Debian or Ubuntu:
- Install the packages: sudo apt install pxelinux syslinux tftpd-hpa
- Copy the following files to /srv/tftp: sudo cp /usr/lib/syslinux/modules/bios/{chain.c32,ldlinux.c32,libutil.c32,mboot.c32,menu.c32} /usr/lib/syslinux/memdisk /usr/lib/PXELINUX/pxelinux.0 /srv/tftp
- Create the directories for the boot files and install files. In my case, I put the Debian install files in /srv/tftp/debian12 (or debian13): sudo mkdir /srv/tftp/debian12 /srv/tftp/pxelinux.cfg
- Create the file /srv/tftp/pxelinux.cfg/default similar to the code snippet below. This is the file that tells the system to boot off the hard disk if accidentally network-booted.
Or use the below Ansible playbook for doing all of the above, except creating the OS install directory:
default menu.c32
prompt 0
ALLOWOPTIONS 0
NOESCAPE 1

timeout 0
ONTIMEOUT local

MENU TITLE BIOS PXE Menu

LABEL local
        MENU LABEL Boot local hard drive
        LOCALBOOT 0
---
- hosts: tftp
  tasks:
  - name: Install packages
    ansible.builtin.apt:
      name:
        - pxelinux
        - syslinux
        - tftpd-hpa
      state: present

  - name: Copy syslinux BIOS files
    ansible.builtin.copy:
      src: "/usr/lib/syslinux/modules/bios/{{ item }}"
      dest: "/srv/tftp/{{ item }}"
      remote_src: true
    loop:
      - chain.c32
      - ldlinux.c32
      - libutil.c32
      - mboot.c32
      - menu.c32

  - name: Copy memdisk
    ansible.builtin.copy:
      src: /usr/lib/syslinux/memdisk
      dest: /srv/tftp/memdisk
      remote_src: true

  - name: Copy pxelinux.0
    ansible.builtin.copy:
      src: /usr/lib/PXELINUX/pxelinux.0
      dest: /srv/tftp/pxelinux.0
      remote_src: true

  - name: Create /srv/tftp/pxelinux.cfg
    ansible.builtin.file:
      path: /srv/tftp/pxelinux.cfg
      state: directory
      mode: 0755

  - name: Copy /srv/tftp/pxelinux.cfg/default
    ansible.builtin.copy:
      src: pxelinux.cfg_default
      dest: /srv/tftp/pxelinux.cfg/default
      mode: 0644
For Debian, you will need to download the netboot files initrd.gz and linux, which for 12/Bookworm can be found here (for 13/Trixie, replace bookworm with trixie). These will be placed in /srv/tftp/os_directory, such as debian12. In addition to these, as the DL360 G7 has a Broadcom NIC, you will need to download the non-free firmware image and append it to the initrd using the below steps from this guide. Without this firmware, the Debian installer will fail:
cd /srv/tftp/debian12
wget https://cdimage.debian.org/cdimage/firmware/bookworm/current/firmware.cpio.gz
mv initrd.gz initrd.gz.orig
cat initrd.gz.orig firmware.cpio.gz > initrd.gz
Next, I created the preseed and PXEBoot files. The preseed file is Debian’s automated installation answer file and is documented here. It needs to be hosted on a web server. Below is a code snippet of one I created. In my environment I use the apt-cacher-ng proxy to cache the deb files to save bandwidth, but this isn’t necessary and the mirror/http/proxy line can be set to blank. The password hash was generated with mkpasswd -m sha-512.
d-i debian-installer/locale string en_US
d-i keyboard-configuration/xkb-keymap select us
d-i netcfg/choose_interface select auto
d-i netcfg/disable_autoconfig boolean true
d-i netcfg/get_ipaddress string 192.168.1.7
d-i netcfg/get_netmask string 255.255.255.0
d-i netcfg/get_gateway string 192.168.1.1
d-i netcfg/get_nameservers string 192.168.1.1
d-i netcfg/confirm_static boolean true
d-i netcfg/get_hostname string dl360g7
d-i netcfg/get_domain string ridpath.mbr
d-i netcfg/hostname string dl360g7
d-i netcfg/wireless_wep string
d-i hw-detect/load_firmware boolean false
d-i mirror/country string manual
d-i mirror/http/hostname string http.us.debian.org
d-i mirror/http/directory string /debian
d-i mirror/http/proxy string http://192.168.1.44:3142
d-i passwd/root-login boolean false
d-i passwd/make-user boolean true
d-i passwd/user-fullname string Ansible User
d-i passwd/username string ansible_user
d-i passwd/user-password-crypted password $6$I3dgqn7f/Z4AVWW0$Reo5CS3VjE493pDfbIryGUf/mo9PoNOU9t.mAkQUtyQz3MYaE5B9uv2gz6cNTC31n5pCuCyfNQBXJteeRbA6N.
d-i clock-setup/utc boolean true
d-i time/zone string US/Eastern
d-i clock-setup/ntp boolean true
d-i clock-setup/ntp-server string 0.pool.ntp.org
d-i partman-auto/init_automatically_partition select biggest_free
d-i partman-auto/method string regular
d-i partman-lvm/device_remove_lvm boolean true
d-i partman-md/device_remove_md boolean true
d-i partman-lvm/confirm boolean true
d-i partman-lvm/confirm_nooverwrite boolean true
d-i partman-auto/choose_recipe select atomic
d-i partman-partitioning/confirm_write_new_label boolean true
d-i partman/choose_partition select finish
d-i partman/confirm boolean true
d-i partman/confirm_nooverwrite boolean true
d-i partman-md/confirm boolean true
d-i partman-partitioning/confirm_write_new_label boolean true
d-i partman/choose_partition select finish
d-i partman/confirm boolean true
d-i partman/confirm_nooverwrite boolean true
d-i apt-setup/cdrom/set-first boolean false
tasksel tasksel/first multiselect standard, ssh-server
d-i pkgsel/include string sudo
popularity-contest popularity-contest/participate boolean false
d-i grub-installer/only_debian boolean true
d-i grub-installer/with_other_os boolean true
d-i grub-installer/bootdev string default
d-i finish-install/keep-consoles boolean true
d-i finish-install/reboot_in_progress note
The PXEBoot file will reside in /srv/tftp/pxelinux.cfg and will follow the format of 01-mac-address (so if your MAC address is 88:99:AA:BB:CC:DD, you would name this file: 01-88-99-aa-bb-cc-dd). If you don’t know the MAC address of your ProLiant, one trick you can use is to type the following command into the iLO CLI: show /system1/network1/Integrated_NICs. Below is the /srv/tftp/pxelinux.cfg/01-mac-address file I created for my system:
default menu.c32
prompt 0
ALLOWOPTIONS 0
NOESCAPE 1

timeout 150
ONTIMEOUT debian12

MENU TITLE BIOS PXE Menu

LABEL debian12
         MENU LABEL Debian 12 Installer
         KERNEL debian12/linux
         APPEND initrd=debian12/initrd.gz auto-install/enable=true netcfg/choose_interface=auto netcfg/disable_autoconfig=true netcfg/get_ipaddress=192.168.1.7 netcfg/get_netmask=255.255.255.0 netcfg/get_gateway=192.168.1.1 netcfg/get_nameservers=192.168.1.1 netcfg/get_hostname=dl360g7 netcfg/get_domain=ridpath.mbr netcfg/hostname=dl360g7 preseed/url=http://192.168.1.75/preseed/dl360g7.cfg --- nomodeset console=tty0 console=ttyS1,115200n8

LABEL local
        MENU LABEL Boot local hard drive
        LOCALBOOT 0
The netcfg options had to be specified because otherwise I would get prompted for these during the installation. The goal of this exercise was to make the installation completely non-interactive. The options after the ‐‐‐ are meant to persist after installation. console=tty0 is the console output on to the monitor, while console=ttyS1,115200n8 is the output on to the iLO virtual serial port. Of course if you’re going to be doing this on a lot of systems, you should create a script that writes the preseed and PXEBoot files, or use a provisioning application such as Foreman.
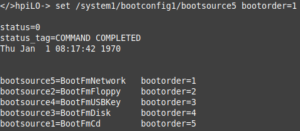
To boot from the network, you have a few options: hit F12 when prompted (easier done with a keyboard and monitor, versus through the laggy virtual serial console) or set the network as the first item on the boot order. To set the boot order in the iLO CLI, use this command: set /system1/bootconfig1/bootsource5 bootorder=1. Changing this will persist across subsequent reboots and if you don’t either set it back to bootsource3 (the hard disk) or rename/delete the /srv/tftp/pxelinux.cfg/01-mac-address file, the installation will run over and over again.
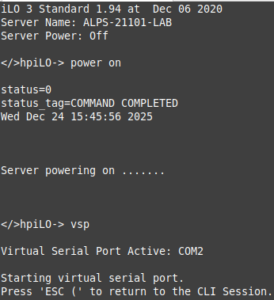
After this is done, power on the server by typing power on at the iLO CLI prompt or of course press the power button. Issue vsp to enter the serial console. Hit ESC, then Shift+9 to exit the virtual serial console.
If everything was set correctly in the preseed and PXELinux boot files, then the installation should complete successfully. There are, of course, a lot of things that can go wrong here and it took a lot of trial and error to get this installation to be non-interactive.
Upgrading the RAID controller firmware and installing ssacli
In my previous post on this system, I upgraded the firmware on the RAID controller to the latest that is available from HP. The link for downloading this is still valid as of this writing. This package is only distributed in an RPM for Linux and not a .deb, but it can be extracted used rpm2cpio and run.
- Install rpm2cpio with sudo apt install rpm2cpio.
- Download the firmware RPM from the link here.
- SCP the RPM to the DL360 G7 being upgraded and extract it with: rpm2cpio hp-firmware-smartarray-14ef73e580-6.64-2.x86_64.rpm | cpio -idmv
- cd to ./usr/lib/x86_64-linux-gnu/hp-firmware-smartarray-14ef73e580-6.64-2 and run sudo ./ccissflash. In my case, nothing was updated because the RAID controller already has the latest firmware
Installing the Smart Storage Administrator CLI, ssacli, is useful for managing the RAID array. It can be used to query the status of drives, the cache battery, add/remove drives, etc. HPE publishes an APT repository for Debian 12/bookworm, but not for 13/trixie as of this writing. The Debian repository can be found here, while the actual .deb files can be found here. For Debian 12, I was able to use the below Ansible playbook to install the HPE APT repository and install ssacli. Note, I created the hpePublicKey.gpg on the Ansible host with the following commands:
curl https://downloads.linux.hpe.com/SDR/hpePublicKey2048_key1.pub | gpg --dearmor > hpePublicKey.gpg
curl https://downloads.linux.hpe.com/SDR/hpePublicKey2048_key2.pub | gpg --dearmor >> hpePublicKey.gpg
---
- hosts: proliant
  tasks:
  - name: add HP gpg key
    ansible.builtin.copy:
      src: hpePublicKey.gpg
      dest: /etc/apt/keyrings/hpe.gpg

  - name: add HPE deb repository
    ansible.builtin.deb822_repository:
      name: hpe_mcp
      types: deb
      uris: https://downloads.linux.hpe.com/SDR/repo/mcp
      suites: "{{ ansible_facts['distribution_release'] }}/current"
      components: non-free
      architectures: amd64
      signed_by: /etc/apt/keyrings/hpe.gpg

  - name: Install HPE packages
    ansible.builtin.apt:
      name: ssacli
      state: present
      update_cache: true
On Debian 13, you can download the latest ssacli .deb file from this page and install it on the host with sudo apt install ./ssacli-6.45-8.0_amd64.deb. I would guess that in the future HPE will publish an APT repository for Debian 13.
Querying system sensor information with ipmitool
In my previous post on this model of server, I explored using the hp-health package to query sensor information from the system, such as the status of power supplies and fans. However, it appears that HPE has deprecated this package, as the last one was published in 2019. Fortunately, you can use the open source ipmitool to gather the same information. This information can then be used for Nagios plugins, etc.
- Install the required packages with: sudo apt install ipmitool.
- Query the sensor list with sudo ipmitool sensor. Add the ‐c option to have the results outputted in CSV.
There are a number of Nagios plugins out there that work with ipmitool or you can create your own. Below is a modified version of one I originally created for hp-health:
#!/usr/bin/perl -w

# This plugin uses the ipmitool command to check the status of an HP ProLiant server's fans.
# It requires the ipmitool package to be installed.

use strict;

my $state = 0;
my $exit_msg = '';

sub nagios_exit_state {
  (my $state, my $exit_msg) = @_;
  # Exit State
  # 0 = no alarm
  # 1 = warning
  # 2 = critical
  # 3 = unknown (including application errors)

  print "$exit_msg\n";
  exit $state;
}

unless (-x '/usr/bin/ipmitool') {
  &nagios_exit_state(3, '/usr/bin/ipmitool not found! You may need to install the ipmitool package');
}

open(IPMI, '/usr/bin/ipmitool -c sensor |') || die 'ERROR: unable to get ipmitool output';
while (my $line = <IPMI>) {
  if ($line =~ /^Fan Block/) {
    my @output = split(/,/, $line);
    my $fan_block = $output[0];
    my $status = $output[3];

    unless ($status eq 'ok') {
      $state = 2;
      $exit_msg .= "$fan_block status = ${status}. ";
    }
  }
}
close(IPMI);

if ($state == 2) {
  $exit_msg = 'CRITICAL: ' . $exit_msg;
} else {
  $exit_msg = 'All fans are healthy';
}

&nagios_exit_state($state, $exit_msg);
Setting up the NICs for virtualization
Since the DL360 G7 I used for this post has a four-port NIC, I thought it would be interesting to utilize each port, while expanding on some of the networking concepts I have discussed in other posts. I decided to create two sets of NIC teams; these are pairs of NICs running in active-passive mode, so if one loses connectivity, traffic will fail over to the other. One pair will be on my home network and will provide internet access, while the other will be an isolated lab VLAN for the virtual machines to run on. A firewall will be configured on the host to forward traffic from the lab VLAN to the home network LAN. The ports on the lab NIC team will be on separate VLAN on a managed switch (a separate physical “dumb” switch could be used for this also).
First, the network configuration; in Debian this is configured in /etc/network/interfaces. The below steps should probably done from either the virtual serial port or on the physical console (monitor/keyboard), as network connectivity will be interrupted:
- Install the ifenslave and bridge-utils packages: sudo apt install ifenslave bridge-utils.
- Enable the bonding module as root: modprobe bonding && echo bonding > /etc/modules-load.d/bonding.conf.
- Make a backup of /etc/network/interfaces.
- Modify the /etc/network/interfaces file similar to the below code snippet. Your physical interface names may be different.
- Restart the networking service with sudo systemctl restart networking.
auto enp3s0f0
iface enp3s0f0 inet manual

auto enp3s0f1
iface enp3s0f1 inet manual

auto enp4s0f0
iface enp4s0f0 inet manual

auto enp4s0f1
iface enp4s0f1 inet manual

auto bond0
iface bond0 inet static
  address 192.168.1.7/24
  gateway 192.168.1.1
  bond-mode active-backup
  bond-primary enp3s0f0
  bond-slaves enp3s0f0 enp3s0f1
  bond-miimon 1000
  dns-nameservers 192.168.1.1
  dns-search ridpath.mbr

auto bond1
iface bond1 inet manual
  bond-mode active-backup
  bond-primary enp4s0f0
  bond-slaves enp4s0f0 enp4s0f1
  bond-miimon 1000

auto br0
iface br0 inet static
  address 192.168.20.1/24
  bridge_ports bond1
  bridge_stp off
  bridge_waitport 0
  bridge_fd 0
For the firewall I used nftables, in a similar configuration to my post on setting up a Linux router. I used Ansible to deploy the /etc/nftables.conf file and enable IP forwarding. Note: this is not a configuration for a router that is internet-facing, as inbound SSH is allowed.
---
- hosts: dl360g7
  vars:
    nft_lan_dev: 'bond0'
    nft_lab_dev: 'br0'
    nft_lab_net: '192.168.20.0/24'

  tasks:
  - name: install nftables
    ansible.builtin.apt:
      name: nftables
      state: present

  - name: Create /etc/nftables.conf
    ansible.builtin.template:
      src: nftables.conf.j2
      dest: /etc/nftables.conf
      mode: 0700
    notify: restart nftables

  - name: enable and start nftables
    ansible.builtin.systemd:
      name: nftables
      state: started
      enabled: true

  - name: enable ip_forward
    ansible.posix.sysctl:
      name: net.ipv4.ip_forward
      value: '1'

  handlers:
  - name: restart nftables
    ansible.builtin.systemd:
      name: nftables
      state: restarted
#!/usr/sbin/nft -f

flush ruleset

define DEV_LAN = {{ nft_lan_dev }}
define DEV_LAB = {{ nft_lab_dev }}
define NET_LAB = {{ nft_lab_net }}

table ip global {
    chain inbound_lan {
        icmp type echo-request limit rate 5/second accept

        # allow SSH
        ip protocol . th dport vmap { tcp . 22 : accept }
    }

    chain inbound_lab {
        # accepting ping (icmp-echo-request) for diagnostic purposes.
        icmp type echo-request limit rate 5/second accept

        # allow SSH, DHCP, and DNS
        ip protocol . th dport vmap { tcp . 22 : accept, udp . 53 : accept, tcp . 53 : accept, udp . 67 : accept }
    }

    chain inbound {
        type filter hook input priority 0; policy drop;

        # Allow traffic from established and related packets, drop invalid
        ct state vmap { established : accept, related : accept, invalid : drop }

        # allow loopback traffic, anything else jump to chain for further evaluation
        iifname vmap { lo : accept, $DEV_LAN : jump inbound_lan, $DEV_LAB : jump inbound_lab }

        # the rest is dropped by the above policy
    }

    chain forward {
        type filter hook forward priority 0; policy drop;

        # Allow traffic from established and related packets, drop invalid
        ct state vmap { established : accept, related : accept, invalid : drop }

        # Forward traffic from the lab network to the LAN
        meta iifname . meta oifname { $DEV_LAB . $DEV_LAN } accept

        # the rest is dropped by the above policy
    }

    chain postrouting {
        type nat hook postrouting priority 100; policy accept;

        # masquerade private IP addresses
        ip saddr $NET_LAB meta oifname $DEV_LAN counter masquerade
    }
}
To provide DNS and DHCP services for the lab network, I set up dnsmasq, similar to what I did in my previous post on writing a Perl YAML provisioner for Xen. However, this time I used Ansible to create the base configuration for the lab subnet.
---
- hosts: dl360g7
  vars:
    subnet: '192.168.20'
    dns_forwarders:
      - '192.168.1.1'
    dhcp_domain: 'ridpath.lab'

  tasks:
  - name: Install dnsmasq
    ansible.builtin.apt:
      name: dnsmasq
      state: present

  - name: Set /etc/dnsmasq.conf to include .conf files in /etc/dnsmasq.d
    ansible.builtin.lineinfile:
      path: /etc/dnsmasq.conf
      regexp: '^(#)?conf-dir=/etc/dnsmasq.d/,\*.conf'
      line: 'conf-dir=/etc/dnsmasq.d/,*.conf'
    notify: Restart dnsmasq

  - name: Deploy /etc/dnsmasq.d/01-lab.conf
    ansible.builtin.template:
      src: 01-lab.conf.j2
      dest: /etc/dnsmasq.d/01-lab.conf
    notify: Restart dnsmasq

  - name: Populate service facts
    ansible.builtin.service_facts:

  - name: Disable DNSStubListener if systemd-resolved is enabled
    when: ansible_facts['services']['systemd-resolved.service']['status'] | default('not-found') != 'not-found'
    block:
      - name: Create /etc/systemd/resolved.conf.d
        ansible.builtin.file:
          path: /etc/systemd/resolved.conf.d
          state: directory

      - name: Create /etc/systemd/resolved.conf.d/nodnsstub.conf
        ansible.builtin.copy:
          dest: /etc/systemd/resolved.conf.d/nodnsstub.conf
          content: "[Resolve]\nDNSStubListener=no\n"
        notify: Restart systemd-resolved

  - name: Enable and start dnsmasq service
    ansible.builtin.systemd:
      name: dnsmasq
      state: started
      enabled: true
    ignore_errors: true

  handlers:
  - name: Restart systemd-resolved
    ansible.builtin.systemd:
      name: systemd-resolved
      state: restarted

  - name: Restart dnsmasq
    ansible.builtin.systemd:
      name: dnsmasq
      state: restarted
listen-address=::1,127.0.0.1,{{ subnet }}.1
no-resolv
no-hosts
{% for forwarder in dns_forwarders %}
server={{ forwarder }}
{% endfor %}
domain={{ dhcp_domain }}
dhcp-range={{ subnet }}.100,{{ subnet }}.200,12h
dhcp-option=3,{{ subnet }}.1
dhcp-option=6,{{ subnet }}.1
{% if dns_records is defined %}
{% for rec, ip in dns_records.items() %}
address=/{{ rec }}.{{ dhcp_domain }}/{{ ip }}
{% endfor %}
{% endif %}
Setting up Xen and KVM
For Xen and KVM, I created Ansible playbooks to install and configure each, as well as including the packages needed to run my YAML provisioning scripts. Below is the Xen playbook:
---
- hosts: dl360g7
  vars:
    xen_mem: 1024

  tasks:
  - name: Install required packages
    ansible.builtin.apt:
      name:
        - genisoimage
        - libtemplate-perl
        - libyaml-libyaml-perl
        - qemu-system-xen
        - qemu-utils
        - xen-hypervisor
        - xen-hypervisor-common
        - xen-utils
      state: present
      install_recommends: false

  - name: Set RAM for Xen Dom0
    ansible.builtin.lineinfile:
      path: /etc/default/grub.d/xen.cfg
      regexp: '^(#)?GRUB_CMDLINE_XEN_DEFAULT'
      line: "GRUB_CMDLINE_XEN_DEFAULT=\"dom0_mem={{ xen_mem }}M,max:{{ xen_mem }}M loglvl=all guest_loglvl=all\""
    notify:
      - Run update-grub
      - Reboot system

  - name: Create /srv/xen
    ansible.builtin.file:
      path: /srv/xen
      state: directory

  handlers:
  - name: Run update-grub
    ansible.builtin.command: /usr/sbin/update-grub

  - name: Reboot system
    ansible.builtin.reboot:
The playbook for KVM is simpler, as it only has to install some packages. It also checks if the virtualization extensions are enabled on the system and fails the playbook if they are missing.
---
- hosts: dl360g7

  tasks:
  - name: Check if virtualization extensions are enabled
    ansible.builtin.shell: "grep -q -E 'svm|vmx' /proc/cpuinfo"
    register: grep_cpuinfo_result

  - name: Fail if virtualization extensions are disabled
    ansible.builtin.fail:
      msg: 'Virtualization extensions are disabled'
    when: grep_cpuinfo_result.rc > 0

  - name: Install required packages
    ansible.builtin.apt:
      name:
        - libguestfs-tools
        - libosinfo-bin
        - libtemplate-perl
        - libvirt-daemon
        - libvirt-daemon-system
        - libyaml-libyaml-perl
        - qemu-kvm
        - virtinst
      state: present
      install_recommends: false
I tested both the Xen and KVM versions of my YAML provisioning script on this server and both performed well. The Debian 13 virtual machines loaded quickly and seemed to be responsive. This server could function quite well as a virtualization host, as long as power consumption isn’t a concern.
Installing Proxmox Virtual Environment
Proxmox Virtualization Environment is a well-known open source virtualization platform that gets a lot of attention these days as a replacement for VMWare ESXi (due to the Broadcom acquistion) and for home lab use. It is built on top of Debian (13 as of this writing) and KVM, but it uses its own commands and hardly resembles KVM when you dive into it. For this post, I decided to install Proxmox VE on the DL360 G7, to learn more about it.
Normally, one would install Proxmox VE from the provided ISO on a USB stick; this is how I’ve always done it on the desktop computers I own. However, a colleague of mine recently suggested the idea of installing Debian first, and then installing Proxmox VE on top of that. He also wrote an Ansible playbook to perform the Proxmox VE installation and configuration, which I borrowed. The manual steps for doing this are documented here in the Proxmox Wiki. The main advantage of using this approach is that the base OS can be installed automatically using a preseed file over the network, versus having to mount an ISO or USB stick and install the system interactively—tedious if you’re building out a bunch of systems remotely in data center. Installing Debian first over the network will allow one to set the parameters for a serial console, negating any need to use a web browser for remote installation. Another advantage is that the base system can have any hardening standards or authentication configuration (such as LDAP or AD) applied prior to installing Proxmox VE (I suppose that these could be applied to a system that was installed from the ISO as well).
I installed Debian 13 on the server using the same preseed file and PXEBoot configuration that I used for KVM and Xen. After this, I installed Proxmox VE using the below Ansible playbook. If I were to do this in a production environment, I would split the various tasks out into roles, but for this post I chose to do a simpler monolithic playbook. It performs the following tasks:
- Checks if virtualizations extensions are enabled.
- Sets the root password. My preseed file configures a normal user, but Proxmox VE requires logging as the root user. The password hash was created with mkpasswd ‐‐method=sha-512. I strongly recommend encrypting any password hashes with Ansible Vault.
- Configure the network interfaces. All variables for this are stored in host_vars/host.
- Install the Proxmox repository using the ansible.builtin.deb822_repository module.
- Install the Proxmox kernel and reboot the system into the new kernel.
- Remove the Debian kernel and os-prober packages.
- Remove the pve-enterprise repository and disable the missing subscription notification.
First, the inventory and host_vars/dl360g7 files: the inventory file contains only my host, dl360g7, in the group proxmox. The host_vars/dl360g7 file contains the variables specific to that host. If you had a bunch of G7s that used those same parameters, you could create a group_vars file and create a group that includes all of the G7s.
[proxmox]
dl360g7
---
network_template: g7_network_interfaces.j2
bond0_nics:
  - enp3s0f0
  - enp3s0f1
bond1_nics:
  - enp4s0f0
  - enp4s0f1
The g7_network_interfaces.j2 template creates two network bonds: one for VM management traffic, NFS, and internet access, and the other for traffic between VMs on VLAN 20. A more sophisticated example would involve multiple VLANs on vmbr1, but I chose to do just one VLAN initially.
# This file describes the network interfaces available on your system
# and how to activate them. For more information, see interfaces(5).

source /etc/network/interfaces.d/*

# The loopback network interface
auto lo
iface lo inet loopback

{% for nic in bond0_nics %}
auto {{ nic }}
iface {{ nic }} inet manual

{% endfor %}
{% for nic in bond1_nics %}
auto {{ nic }}
iface {{ nic }} inet manual

{% endfor %}
auto bond0
iface bond0 inet manual
  bond-mode active-backup
  bond-primary {{ bond0_nics[0] }}
  bond-slaves {{ bond0_nics | join(' ') }}
  bond-miimon 1000

auto bond1
iface bond1 inet manual
  bond-mode active-backup
  bond-primary {{ bond1_nics[0] }}
  bond-slaves {{ bond1_nics | join(' ') }}
  bond-miimon 1000

auto vmbr0
iface vmbr0 inet static
  address {{ ansible_facts['default_ipv4']['address'] }}/{{ ansible_facts['default_ipv4']['prefix'] }}
  gateway {{ ansible_facts['default_ipv4']['gateway'] }}
  bridge-ports bond0
  bridge-stp off
  bridge-fd 0

auto vmbr1
iface vmbr1 inet manual
  bridge-ports bond1
  bridge-stp off
  bridge-fd 0
Finally, the playbook itself:
---
- hosts: proxmox

  tasks:
  - name: Check if virtualization extensions are enabled
    ansible.builtin.shell: "grep -q -E 'svm|vmx' /proc/cpuinfo"
    register: grep_cpuinfo_result

  - name: Fail if virtualization extensions are disabled
    ansible.builtin.fail:
      msg: 'Virtualization extensions are disabled'
    when: grep_cpuinfo_result.rc > 0

  - name: Set root password
    ansible.builtin.user:
      name: root
      password: '$6$WURnD5v2tOP7DCFA$OMTFPoI5jiyGS.Y8JvuWS7mo2HOZ0XKrIsMHRoJpkRoRpU0L3duylSotOebfLgVeVVE8du5AjJTtv...aAVyu1'

  - name: Add Proxmox VE repository key
    ansible.builtin.get_url:
      url: https://enterprise.proxmox.com/debian/proxmox-archive-keyring-trixie.gpg
      dest: /usr/share/keyrings/proxmox-archive-keyring.gpg
      checksum: sha256:136673be77aba35dcce385b28737689ad64fd785a797e57897589aed08db6e45

  - name: Add Proxmox VE repository
    ansible.builtin.deb822_repository:
      name: pve-install-repo
      types: deb
      uris: http://download.proxmox.com/debian/pve
      suites: trixie
      components: pve-no-subscription
      signed_by: /usr/share/keyrings/proxmox-archive-keyring.gpg

  - name: Install Proxmox kernel
    ansible.builtin.apt:
      name: proxmox-default-kernel
      state: present
      update_cache: true

  - name: Reboot system to load Proxmox kernel
    ansible.builtin.reboot:
    when: ansible_facts['kernel'] is not match(".*-pve")

  - name: Re-gather facts
    ansible.builtin.setup:

  - name: Deploy networking configuration
    ansible.builtin.template:
      src: "{{ network_template }}"
      dest: /etc/network/interfaces
      backup: true
    notify: Run ifreload

  - name: Remove Debian kernel and os-prober
    ansible.builtin.apt:
      name:
        - linux-image-amd64
        - linux-image-6.12*
        - os-prober
      state: absent
    when: ansible_facts['kernel'] is match(".*-pve")

  - name: Install Proxmox VE packages
    ansible.builtin.apt:
      name:
        - chrony
        - open-iscsi
        - postfix
        - proxmox-ve
      state: present

  - name: Remove pve-enterprise repository
    ansible.builtin.deb822_repository:
      name: pve-enterprise
      state: absent

  - name: Disable the subscription message
    ansible.builtin.replace:
      path: /usr/share/javascript/proxmox-widget-toolkit/proxmoxlib.js
      regexp: 'data\.status\.toLowerCase\(\) !== .active.'
      replace: 'false'
      backup: true
    notify: Restart pveproxy

  handlers:
  - name: Run ifreload
    ansible.builtin.command: /usr/sbin/ifreload -a

  - name: Restart pveproxy
    ansible.builtin.systemd:
      name: pveproxy
      state: restarted
After the playbook runs, you should be able to log into Proxmox VE at https://ip_address:8006 using the root username and password. Note: sometimes the subscription “nag” will still appear despite following the directions that disable it. Usually I’ve had to restart my browser a few times to get it to go away.
Deploying a simple cloud image in Proxmox VE
I decided to deploy a virtual machine in Proxmox VE that would function as router, DNS, and DHCP server for the lab network. First, I downloaded the Debian 13 pre-built cloud image from here (debian-13-generic-amd64.qcow2) and saved it to the home directory on the Proxmox server. I then ran the below commands as root on the server, following the steps in the cloud-init support guide in the Proxmox wiki:
# Create the VM
qm create 9000 --memory 2048 --net0 virtio,bridge=vmbr0 --scsihw virtio-scsi-pci
# Import the image
qm set 9000 --scsi0 local:0,import-from=/home/ansible_user/debian-13-generic-amd64.qcow2,format=qcow2
# Add the cloud-init drive
qm set 9000 --ide2 local:cloudinit
# Set boot order
qm set 9000 --boot order=scsi0
# Enable serial console
qm set 9000 --serial0 socket --vga serial0
# Create template
qm template 9000
qm set 9000 --name "debian13-template"
For the router VM, I cloned the above image, added the second NIC, set the IP addresses for both interfaces, and set the VM to use a custom user-data file. The user-data file was placed in /var/lib/vz/snippets.
qm clone 9000 100 --name router
qm set 100 --net0 virtio,bridge=vmbr0
qm set 100 --net1 virtio,bridge=vmbr1
qm set 100 --ipconfig0 ip=192.168.1.79/24,gw=192.168.1.1 --ipconfig1 ip=192.168.20.1/24
qm set 100 --cicustom "user=local:snippets/router_user-data"
qm start 100
#cloud-config

hostname: router
manage_etc_hosts: true
fqdn: router.ridpath.mbr
users:
  - name: ansible_user
    passwd: $6$rounds=500000$YPNQ0e2UQ.KlxE1s$fdRbE.JYYcKxwMvopuaYTw/HYerzjxtfeap4nVYmYUuNCBp1x1pLMSZBulwqkKlrewzLdMRFg6Sjb8CTe4G8M/
    ssh_authorized_keys:
      - ssh-ed25519 pubkey1 matt@example.com
      - ssh-ed25519 pubkey2 matthew@laptop
    sudo: ALL=(ALL) ALL
    shell: /bin/bash
    lock_passwd: false

ssh_pwauth: true
ssh_deletekeys: true

chpasswd:
  expire: false
  users:
    - name: root
      password: $6$rounds=500000$YPNQ0e2UQ.KlxE1s$fdRbE.JYYcKxwMvopuaYTw/HYerzjxtfeap4nVYmYUuNCBp1x1pLMSZBulwqkKlrewzLdMRFg6Sjb8CTe4G8M/
Once the VM came up, I used the same Ansible playbooks and templates from earlier in this post to configure nftables and dnsmasq, changing only the “hosts” line and the interface names.
---
- hosts: router
  vars:
    subnet: '192.168.20'
    dns_forwarders:
      - '192.168.1.1'
    dhcp_domain: 'ridpath.lab'
    dns_records:
      'router': '192.168.20.1'

  tasks:
  - name: Install dnsmasq
    ansible.builtin.apt:
      name: dnsmasq
      state: present

  - name: Set /etc/dnsmasq.conf to include .conf files in /etc/dnsmasq.d
    ansible.builtin.lineinfile:
      path: /etc/dnsmasq.conf
      regexp: '^(#)?conf-dir=/etc/dnsmasq.d/,\*.conf'
      line: 'conf-dir=/etc/dnsmasq.d/,*.conf'
    notify: Restart dnsmasq

  - name: Deploy /etc/dnsmasq.d/01-lab.conf
    ansible.builtin.template:
      src: 01-lab.conf.j2
      dest: /etc/dnsmasq.d/01-lab.conf
    notify: Restart dnsmasq

  - name: Populate service facts
    ansible.builtin.service_facts:

  - name: Disable DNSStubListener if systemd-resolved is enabled
    when: ansible_facts['services']['systemd-resolved.service']['status'] | default('not-found') != 'not-found'
    block:
      - name: Create /etc/systemd/resolved.conf.d
        ansible.builtin.file:
          path: /etc/systemd/resolved.conf.d
          state: directory

      - name: Create /etc/systemd/resolved.conf.d/nodnsstub.conf
        ansible.builtin.copy:
          dest: /etc/systemd/resolved.conf.d/nodnsstub.conf
          content: "[Resolve]\nDNSStubListener=no\n"
        notify: Restart systemd-resolved

  - name: Enable and start dnsmasq service
    ansible.builtin.systemd:
      name: dnsmasq
      state: started
      enabled: true
    ignore_errors: true

  handlers:
  - name: Restart systemd-resolved
    ansible.builtin.systemd:
      name: systemd-resolved
      state: restarted

  - name: Restart dnsmasq
    ansible.builtin.systemd:
      name: dnsmasq
      state: restarted
---
- hosts: router
  vars:
    nft_lan_dev: 'eth0'
    nft_lab_dev: 'eth1'
    nft_lab_net: '192.168.20.0/24'

  tasks:
  - name: install nftables
    ansible.builtin.apt:
      name: nftables
      state: present

  - name: Create /etc/nftables.conf
    ansible.builtin.template:
      src: nftables.conf.j2
      dest: /etc/nftables.conf
      mode: 0700
    notify: restart nftables

  - name: enable and start nftables
    ansible.builtin.systemd:
      name: nftables
      state: started
      enabled: true

  - name: enable ip_forward
    ansible.posix.sysctl:
      name: net.ipv4.ip_forward
      value: '1'

  handlers:
  - name: restart nftables
    ansible.builtin.systemd:
      name: nftables
      state: restarted
Once nftables and dnsmasq are set up on the router, other VMs on the same 192.168.20.0/24 subnet should have internet access, etc. I confirmed this by creating another VM from the Proxmox VE GUI on vmbr1 with an IP of 192.168.20.21.
Conclusion
I hope that this post was of use to someone. I learned quite a bit about Proxmox VE while writing it, while demonstrating that there could be a use for a decommissioned/e-waste server that has long been left behind Microsoft, VMWare, and soon, RedHat. One of the reasons I love Linux (and BSD, when I use it) is that I can do something with equipment that would otherwise be scrapped. In the future, I want to understand how to use Packer and Terraform with Proxmox VE, and hopefully write about it. As always, thanks for reading!